
How to Add Reviews to Shopify in 8 Steps (2026)
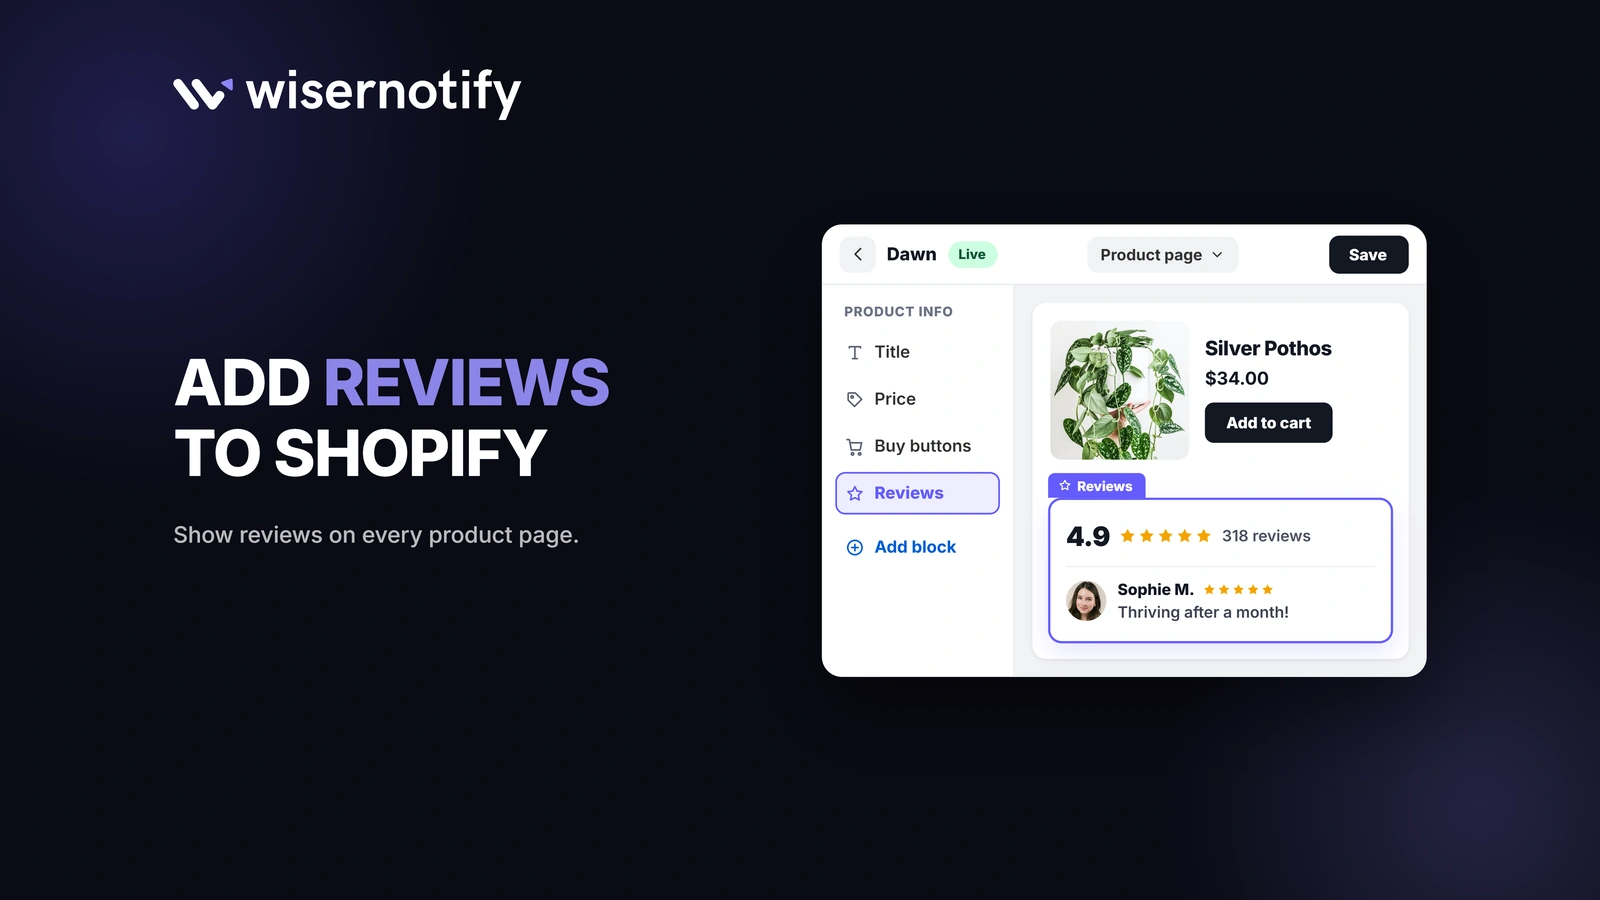
Shoppers look for reviews before they buy, and a product page without any leaves them guessing. On Shopify, adding reviews takes a review app, since Shopify retired its own Product Reviews app in 2024.
The setup itself is short. You install a review app, let it ask your customers for reviews after they order, and add a review section to your product page in the theme editor.
This guide walks through each step with screenshots, then covers older themes, imports, other pages, and what to check when reviews don’t show up.
Does Shopify Have Built-In Product Reviews?
No. Shopify removed its free Product Reviews app on May 6, 2024, so every Shopify store now needs a third-party review app to collect and display product reviews.
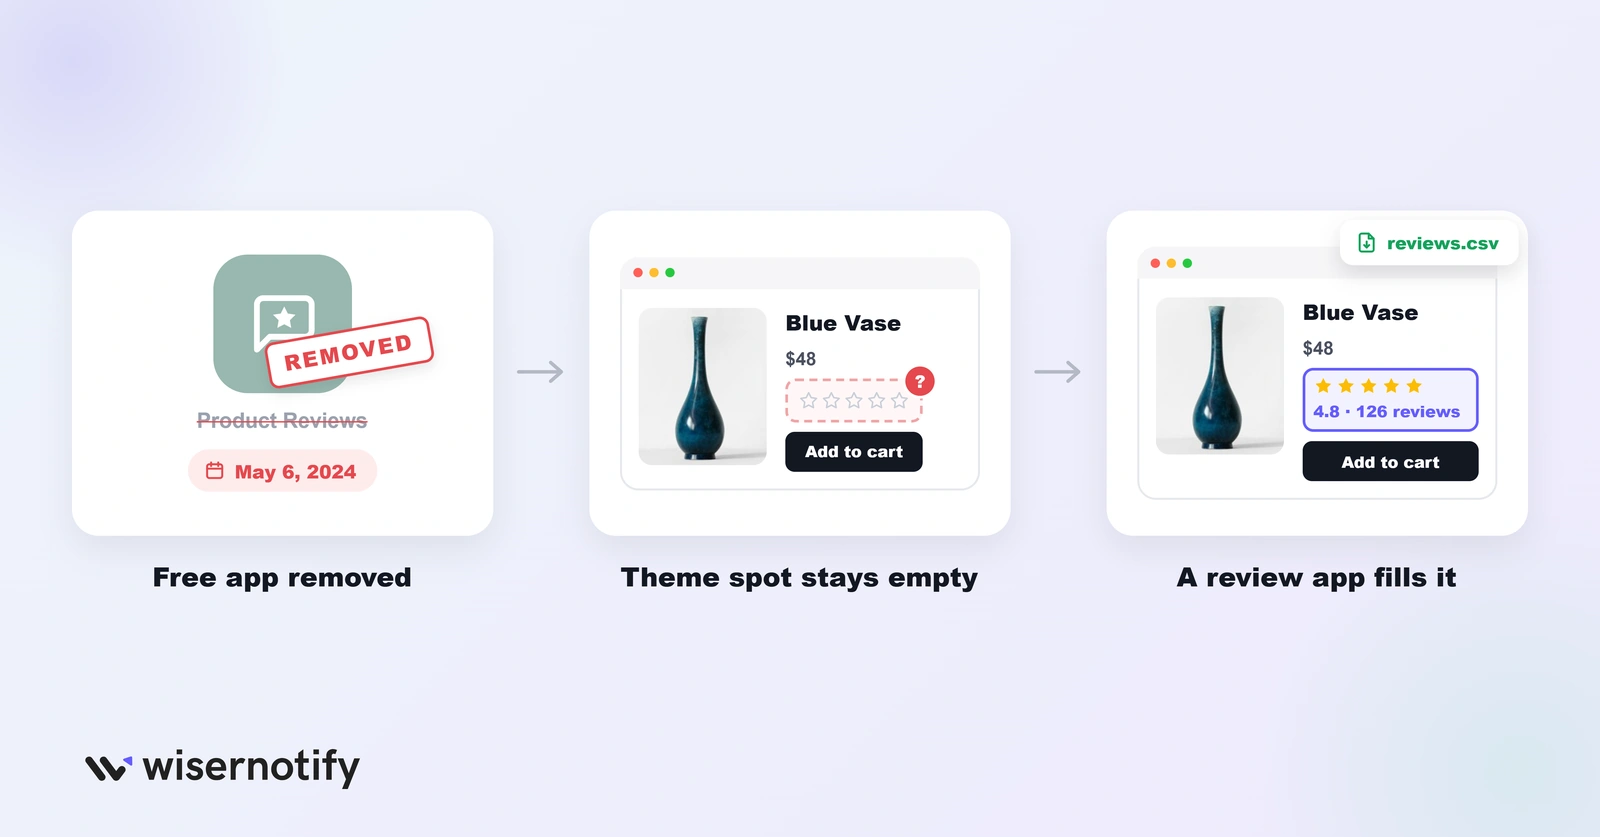
Some themes still show a “product rating” spot or reviews placeholder. That spot stays empty until a review app fills it.
If you used the old app and kept a CSV export of your reviews, don’t throw it away. You can bring those reviews back with the import steps below.
How to Add Reviews to Shopify
These eight steps follow WiserReview‘s own Shopify setup, from installing the app to live reviews on your product page. On an Online Store 2.0 theme, none of them needs code.
Step 1: Install the WiserReview App
- Log in to your Shopify admin.
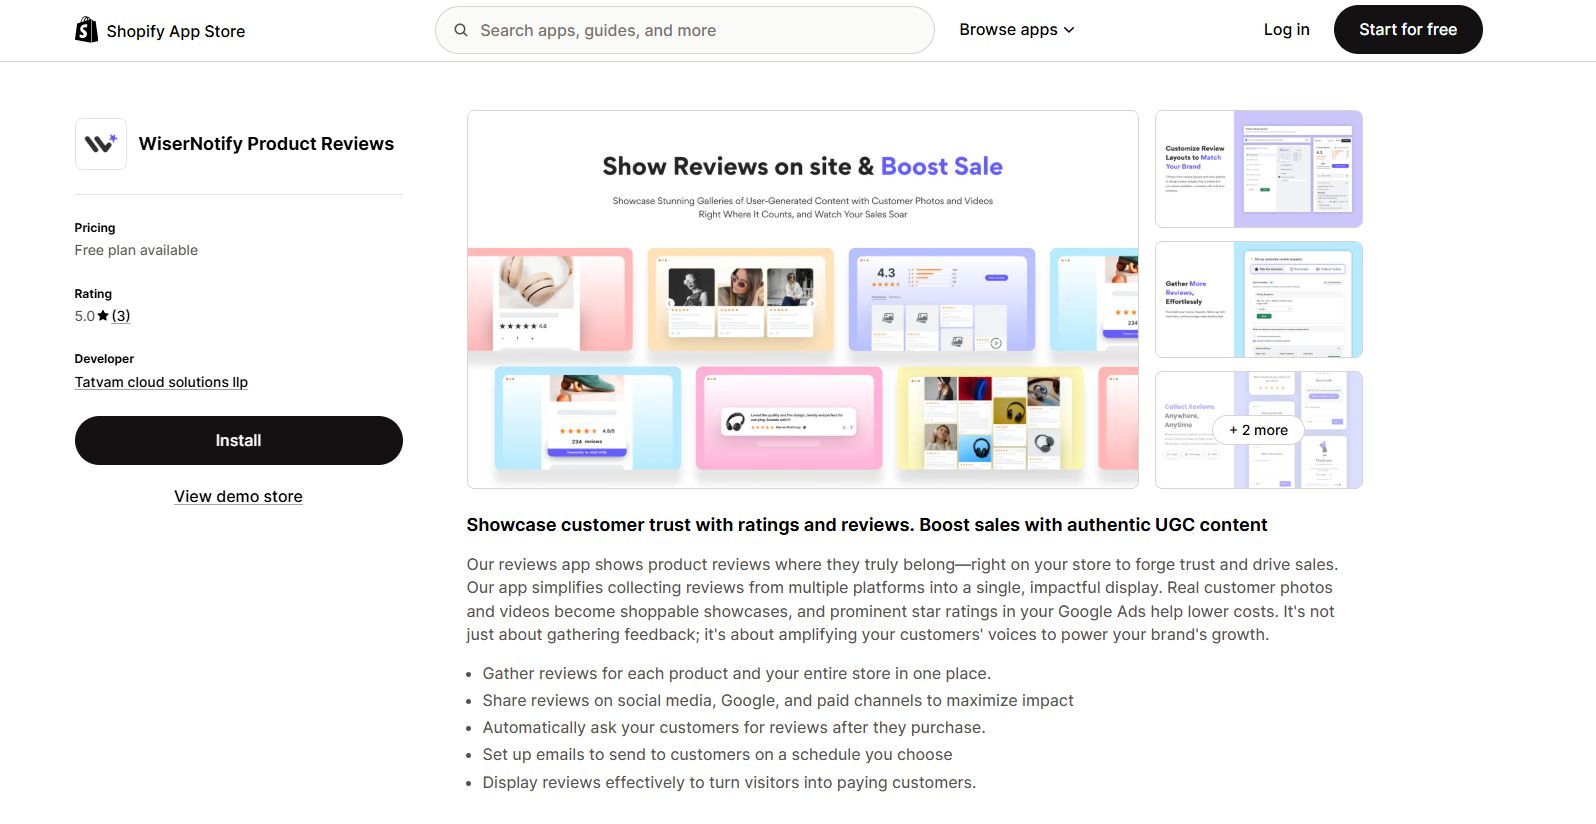
- Open the WiserReview listing on the Shopify App Store.
- Click Install.
- Approve the permissions Shopify asks for.
Step 2: Open the Widget Dashboard
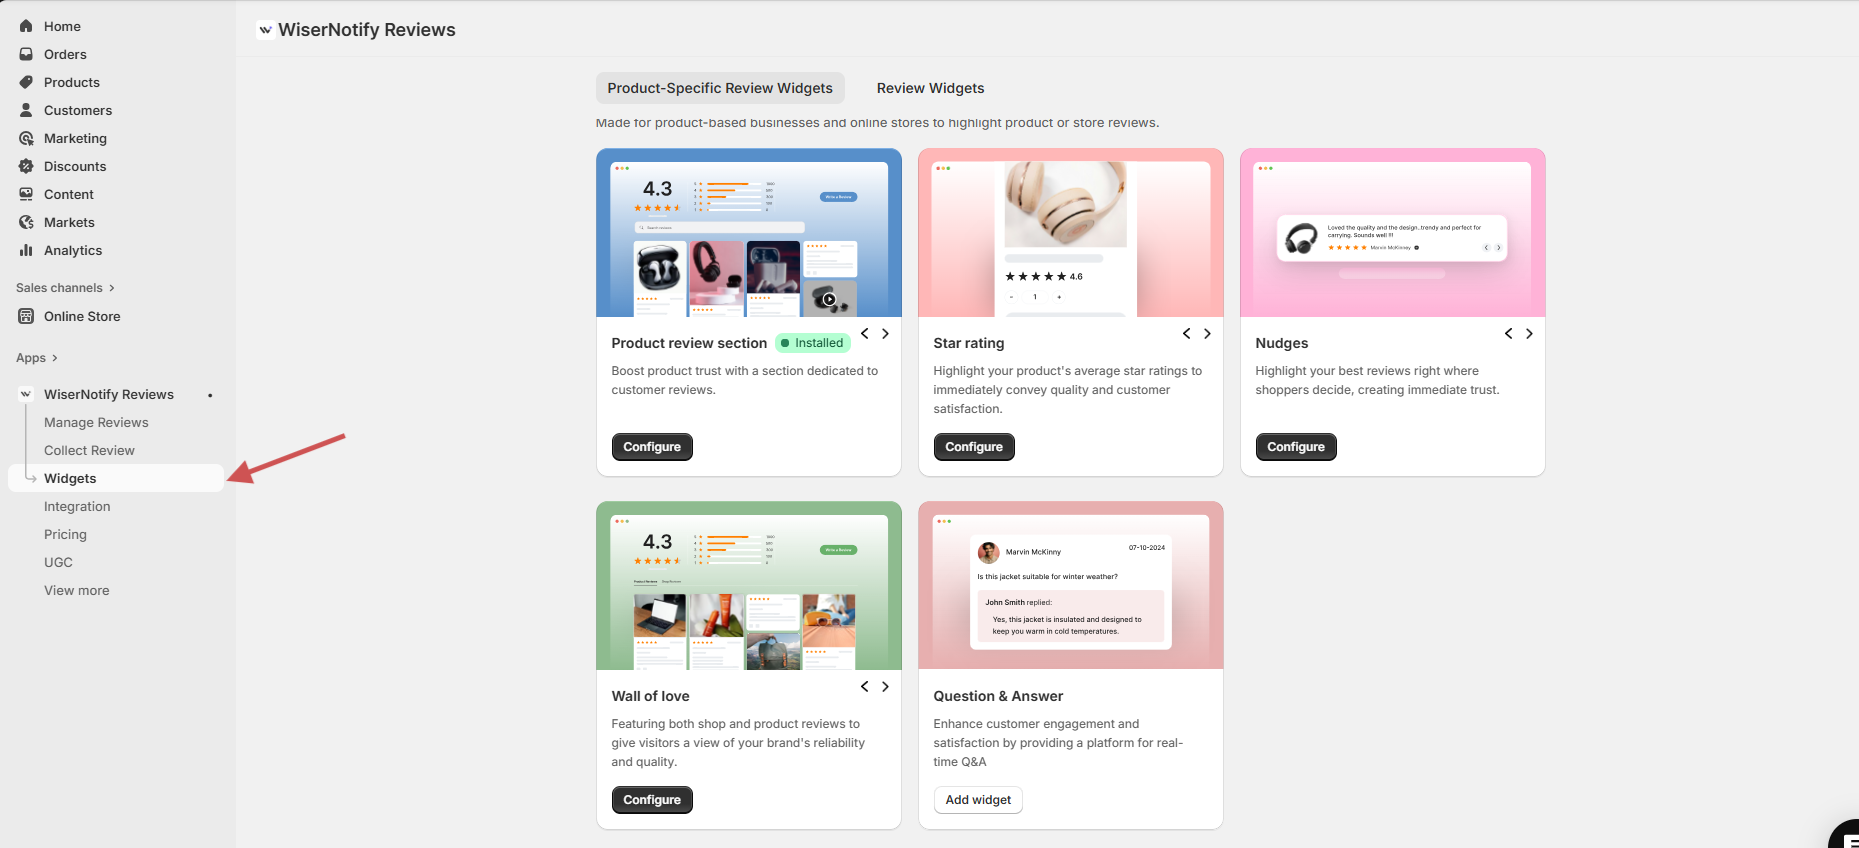
- In your Shopify admin, go to Apps in the left sidebar.
- Click WiserReview.
- Click Widgets.
Step 3: Choose a Review Widget
- Stay on the Product-Specific Review Widgets tab.
- Find Product review section.
- Click Configure.
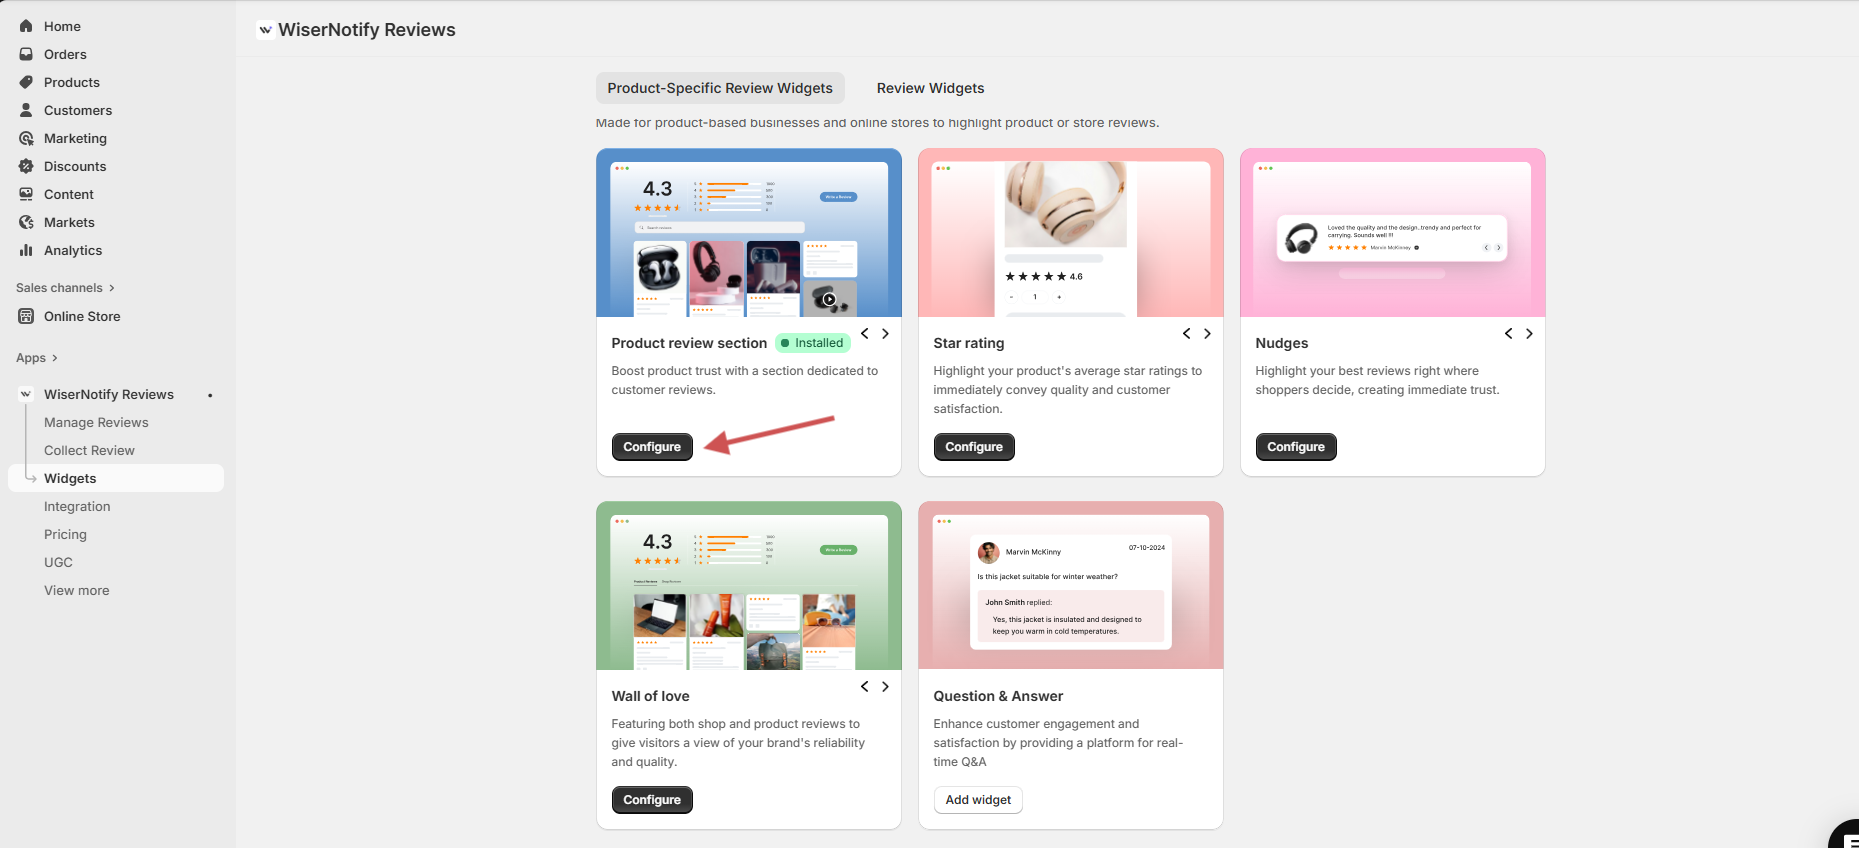
Start with the Product review section. It’s the full block of ratings, photos, and written reviews shoppers expect under a product. Star rating, Nudges, Wall of love, and Question & Answer sit on the same tab for later.
Step 4: Customize the Widget Design
- Set the colors by hand, or let the AI option pick them.
- Change the fonts, buttons, and card layout.
- Open Schema & SEO and keep it on.
- Set the widget language.
- Preview the widget on desktop and mobile.
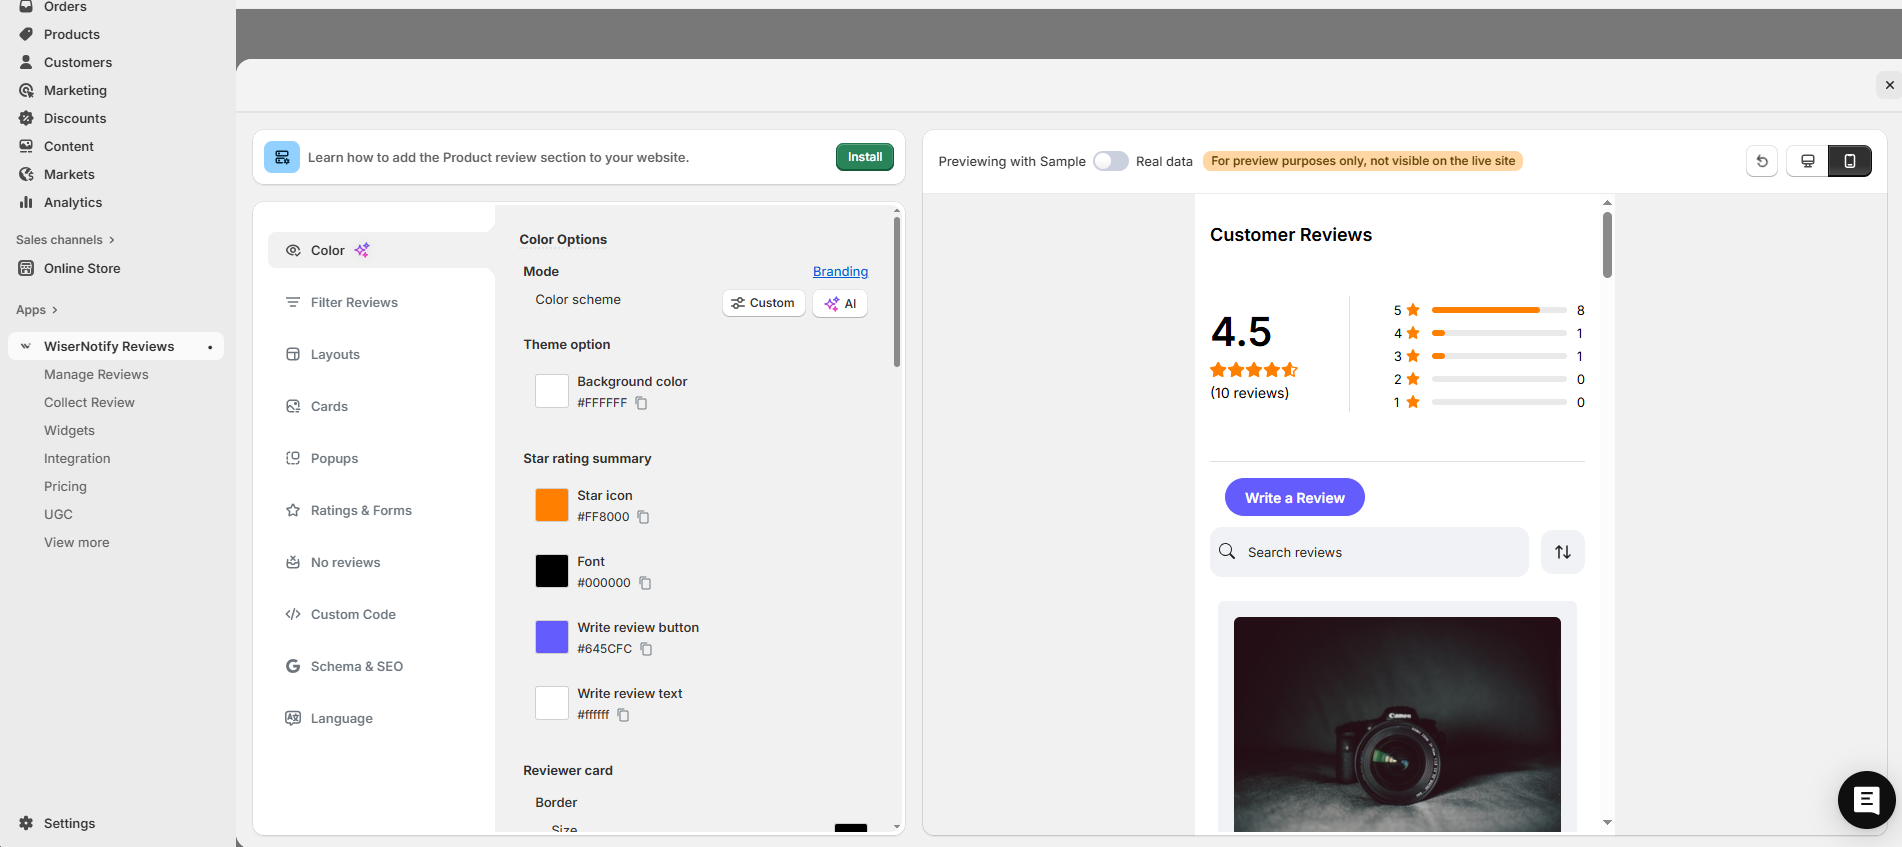
The schema setting lets Google read your ratings, which is what can put stars next to your products in search. Our guide to star ratings in Google search results explains when Google shows them.
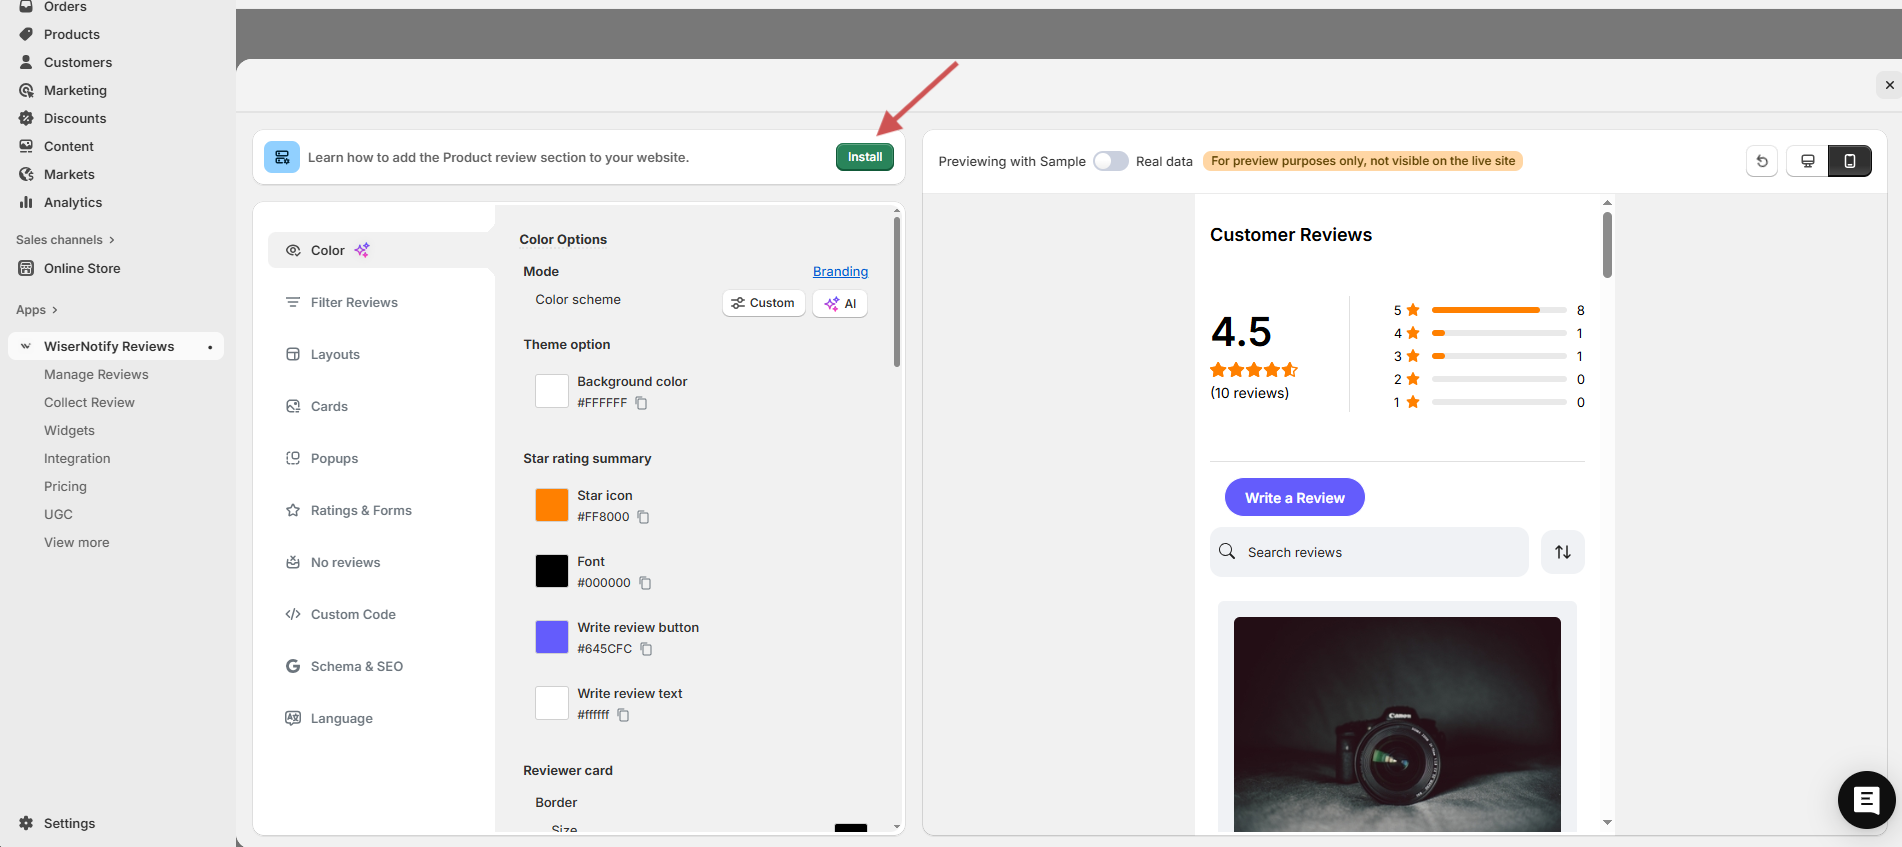
Step 5: Click Install
- Stay in the widget editor.
- Click the green Install button at the top left.
Step 6: Open the Theme Editor
- In the pop-up, open Embed app via drag & Drop.
- Check that it shows Enabled.
- Click Customize Settings.
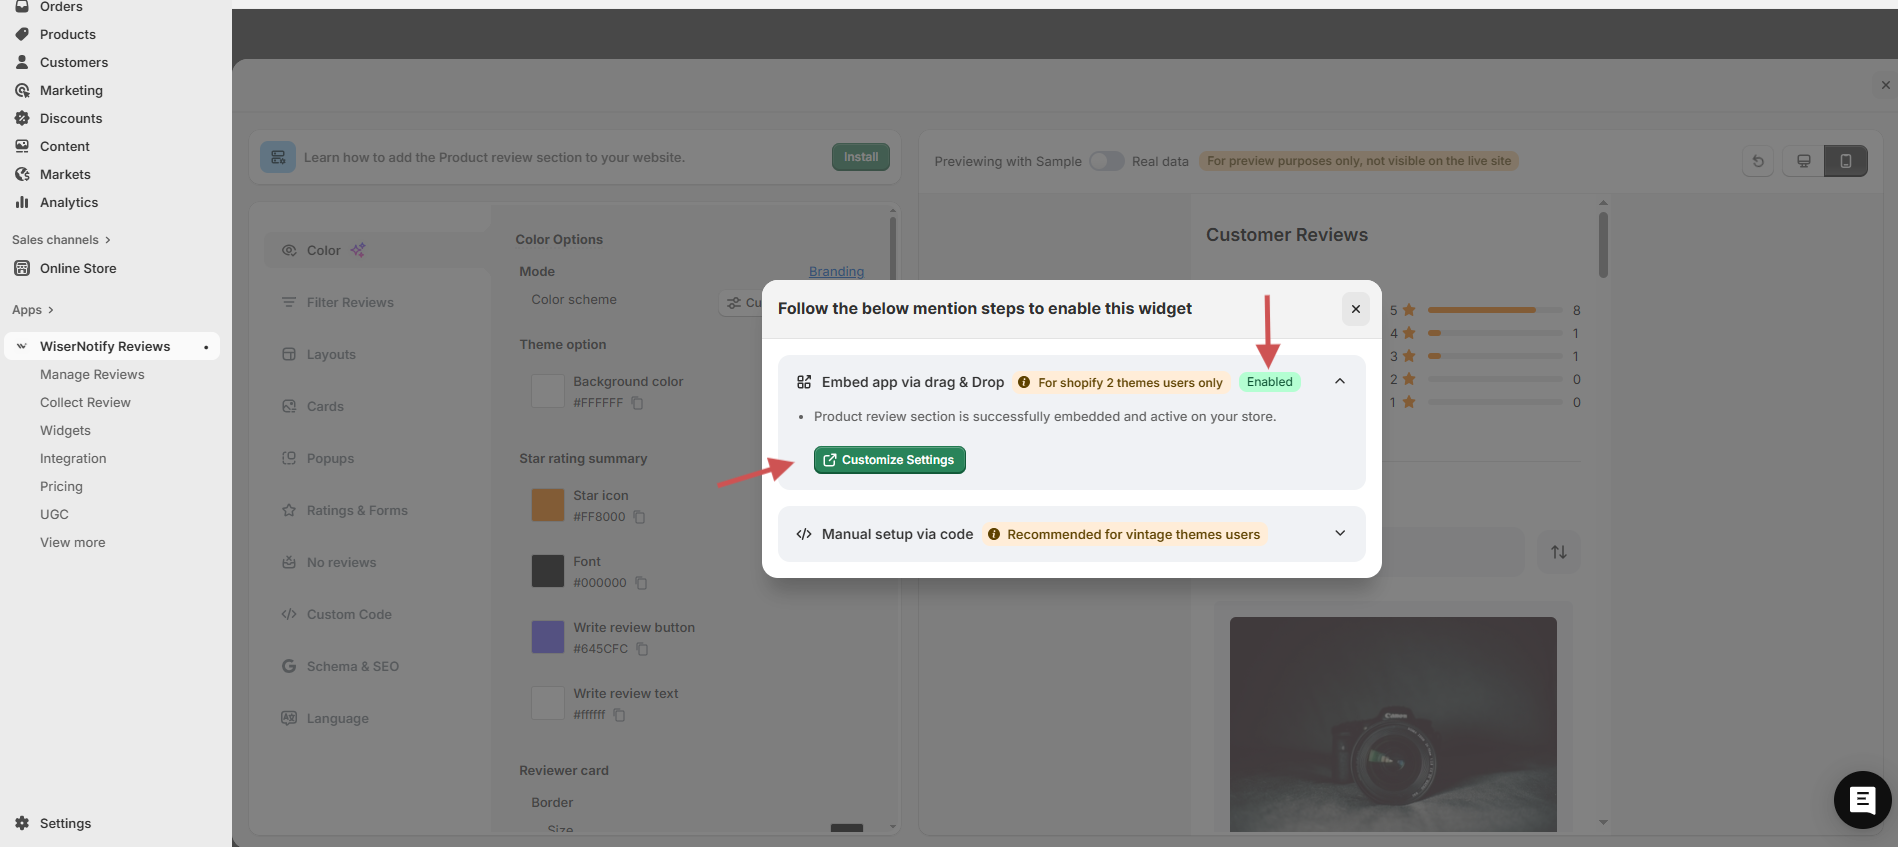
Customize Settings opens the Shopify theme editor. You can also get there from your admin through Online Store, then Themes, then Customize.
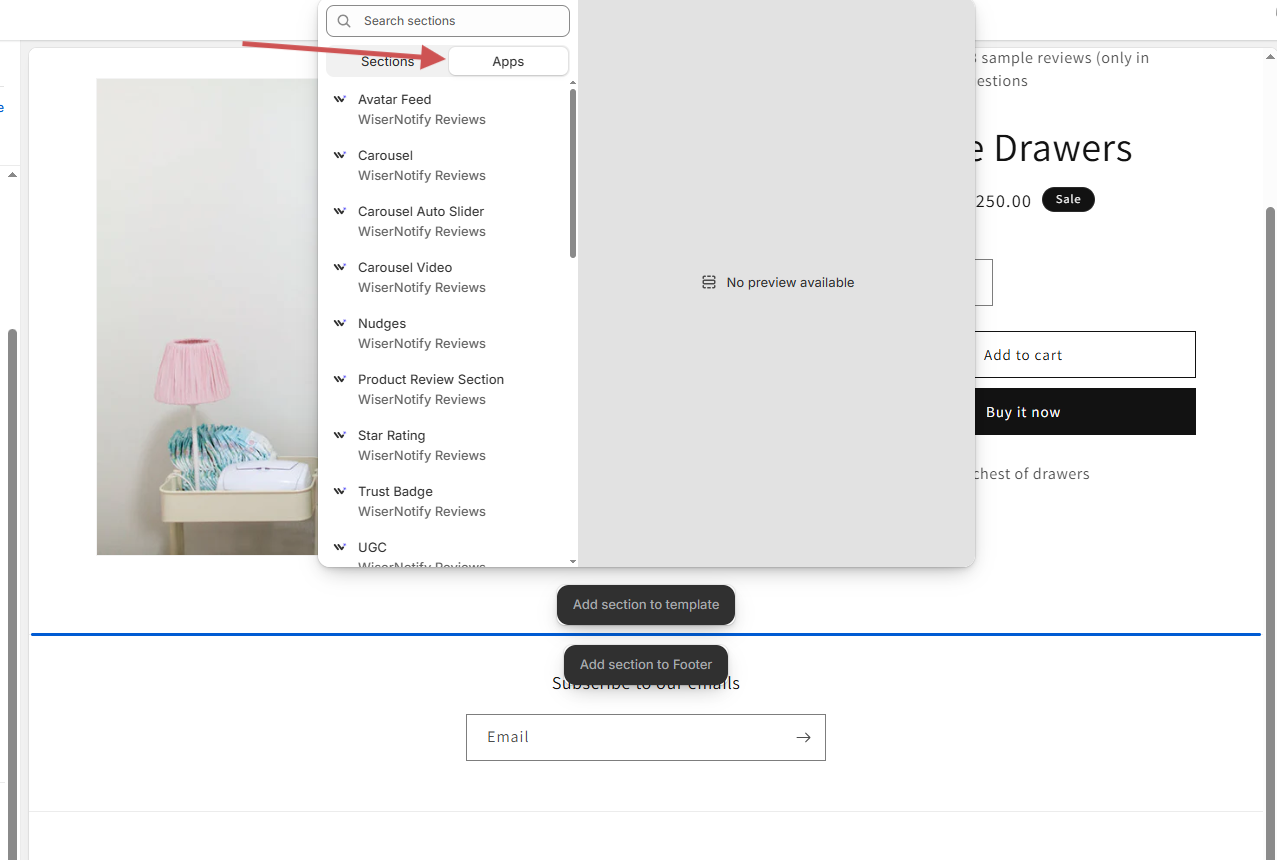
Step 7: Add It to Your Product Page
- Pick your product template from the page menu at the top.
- Click Add section.
- Open the Apps tab.
- Choose Product Review Section.
- Drag it below the product description.
- Click Save.
Step 8: Turn On the App Embed
- In the theme editor, click the App embeds icon in the left bar.
- Turn on Core Snippet.
- Turn on Floating Badge, Floating Popup, or Sidebar Snippet if you want them too.
- Click Save.
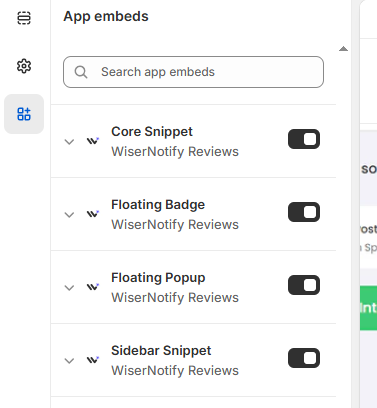
Don’t skip this one. If the core snippet is off, Shopify warns that app embeds are missing from the live theme, and the review section can load blank.

All your reviews in one place
Collect reviews, manage every response, and display them where they matter most.
Using an Older Shopify Theme?
Vintage themes, the ones built before Online Store 2.0, don’t support app sections. On those, you paste one line of code into the product template instead.
Copy the Widget Code
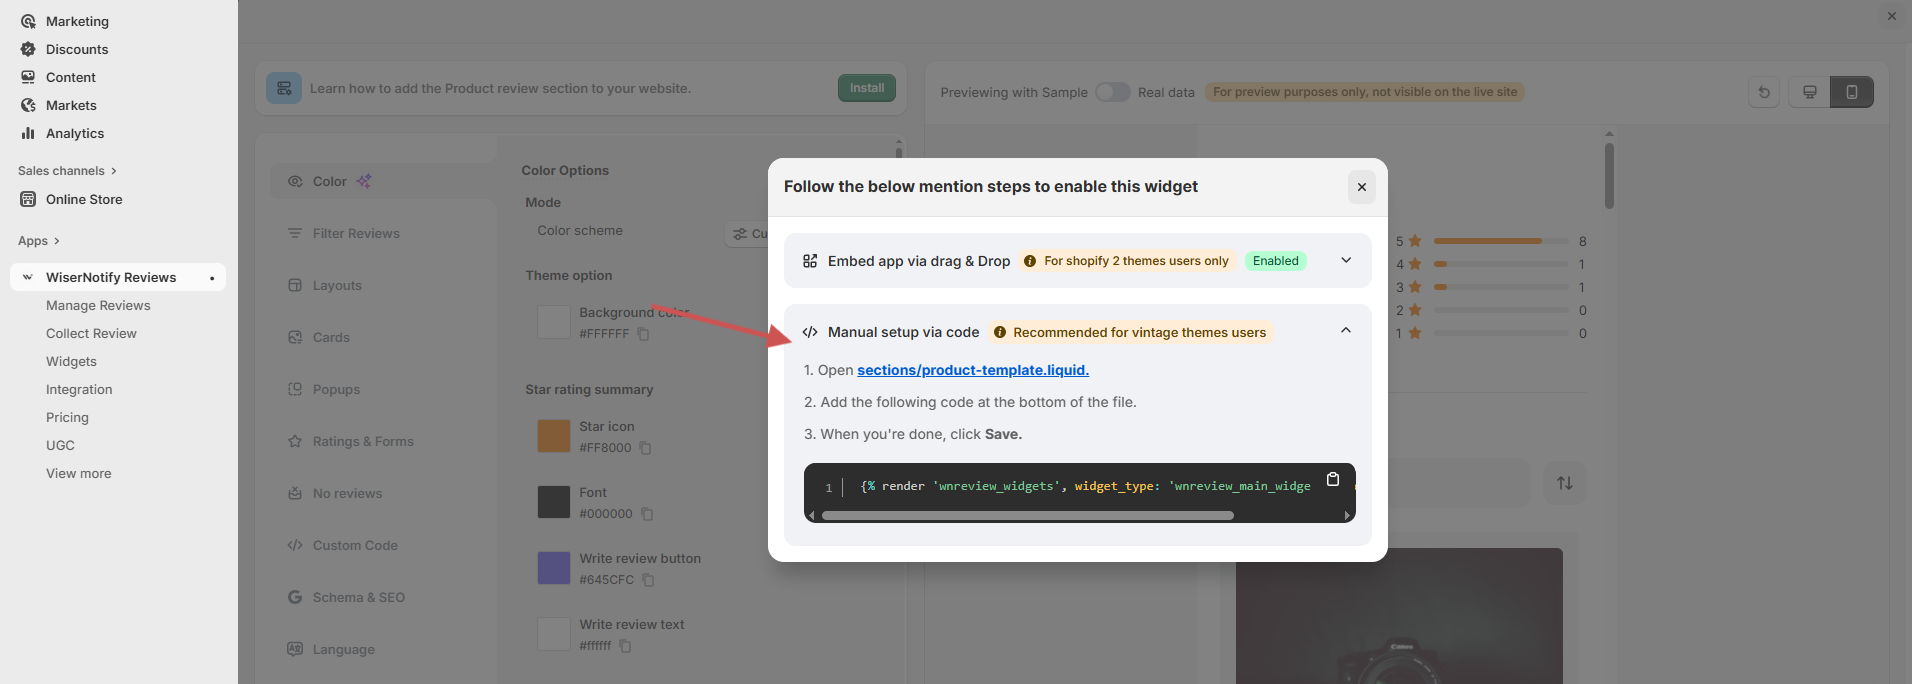
- Click Install in the widget editor, as in Step 5.
- In the pop-up, open Manual setup via code.
- Copy the line of code shown.
Paste It Into Your Theme
- In Shopify, go to Online Store, then Themes, then Edit code.
- Open sections/product-template.liquid, or sections/main-product.liquid on Dawn.
- Paste the code at the very bottom of the file.
- Click Save.
- Turn on the app embed as in Step 8.
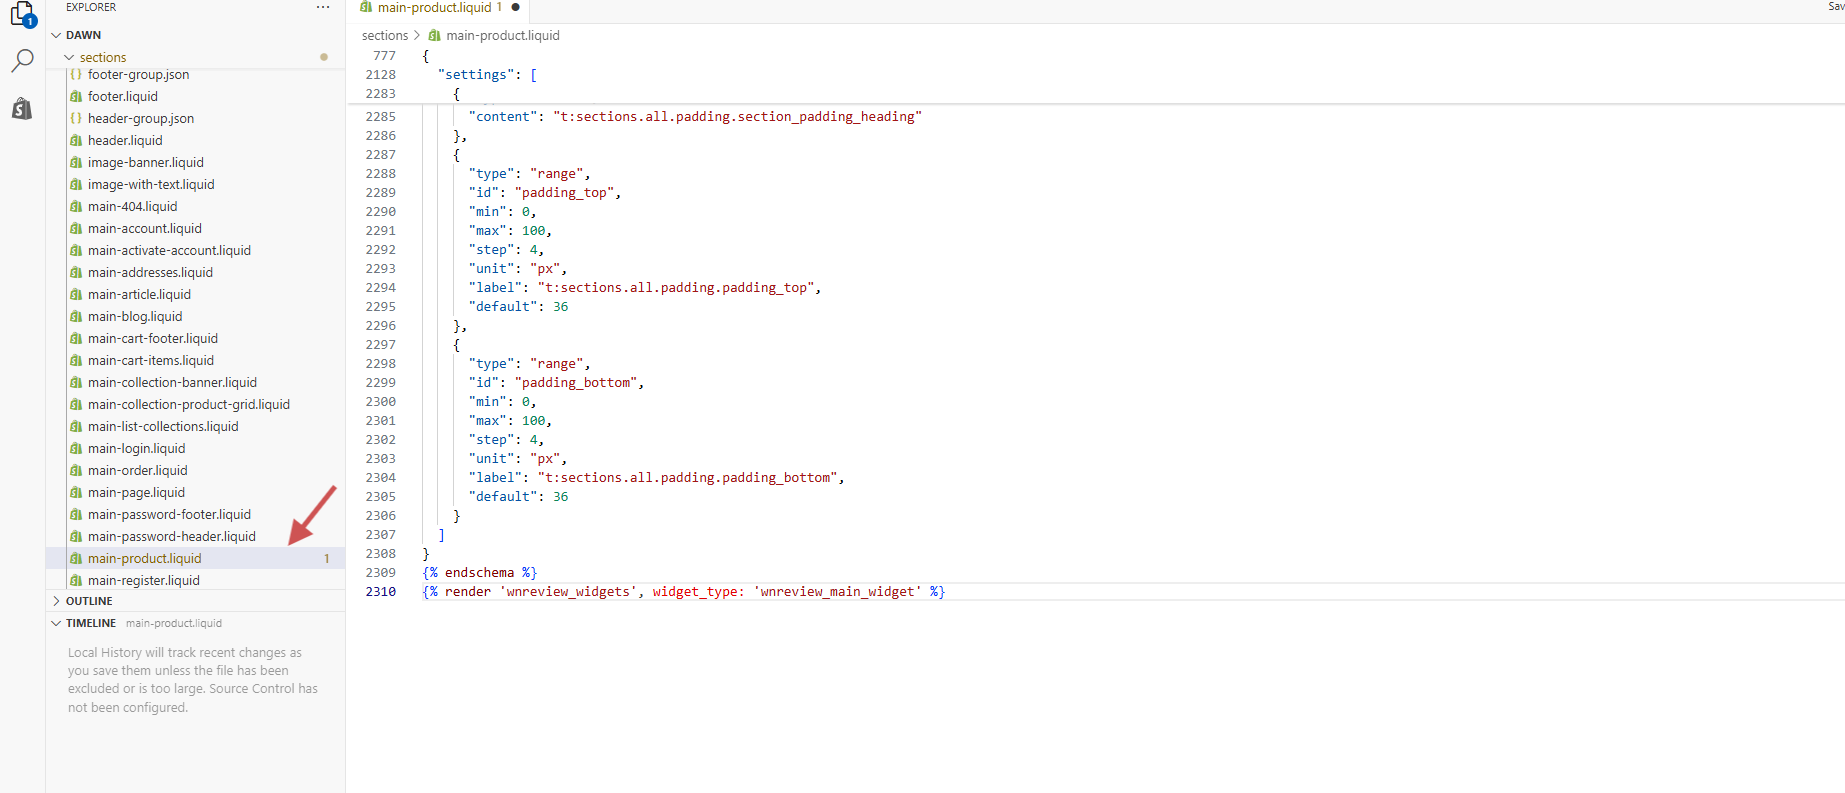
The code changes with the widget type, so copy it fresh from WiserReview for each widget you add.
Turn On Automatic Review Requests
Installing the app connects your store and creates a review request automation for you. These settings decide who gets asked, when, and how often.
Open Your Automation
- In WiserReview, open the Automate tab.
- Find the Shopify automation the app already created.
- Click Configure.

Choose Who Gets Asked
- Pick all customers and products, or certain customers and products.
- For certain ones, select a type, such as Product name.
- Choose a condition, such as Does not contain.
- Enter the value, such as addon, and click Add.
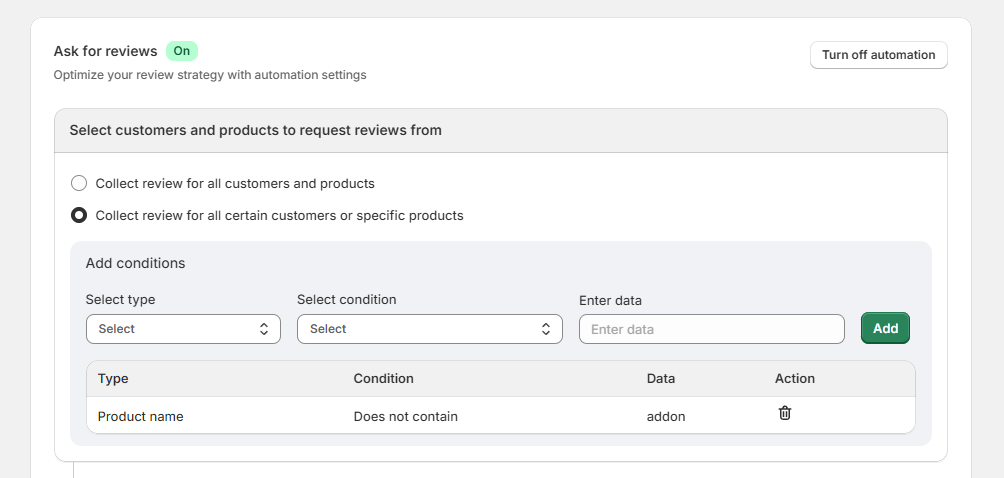
Conditions keep requests away from gifts, free samples, and add-ons nobody wants to review.
Set the Timing and Template
- Find Send the review request after.
- Set the days to match your delivery time.
- Tick the single-product or multi-product email template.
- Click Edit to add your branding and wording.
- Send yourself a test email.
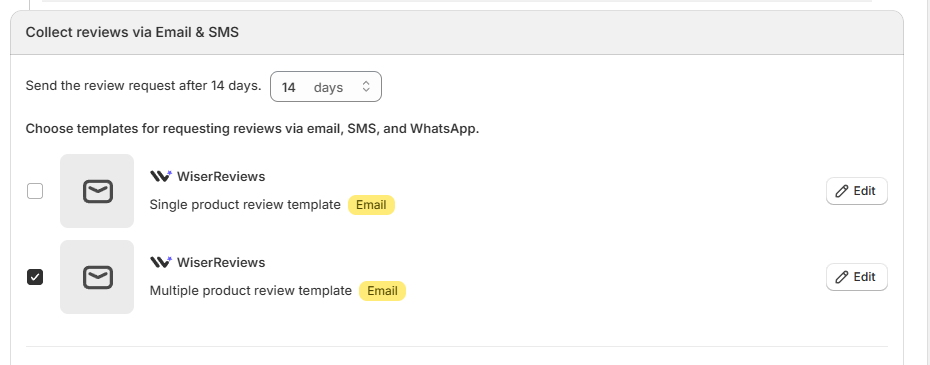
Need wording ideas? These review collection email templates are ready to adapt.
Add a Reminder
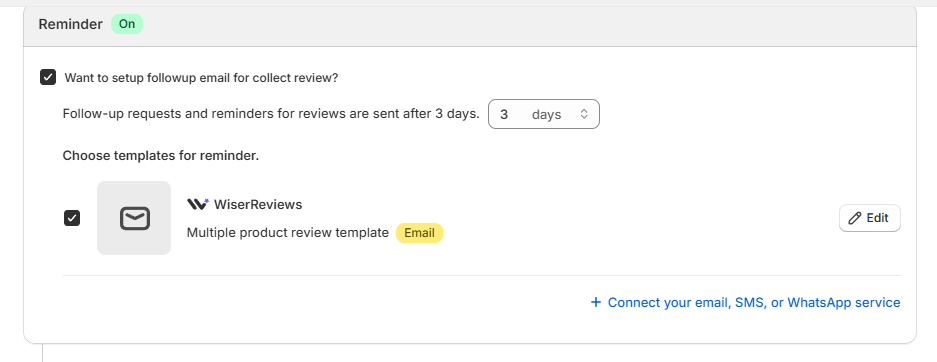
- Tick the follow-up email option.
- Set how many days after the first email it goes out.
- Choose the reminder template.
Ask for Photos and Videos
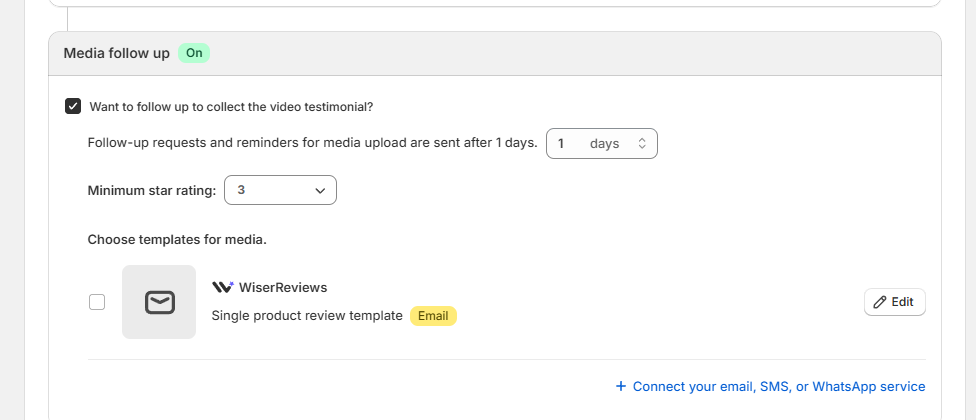
- Tick the media follow-up option.
- Set the delay after a review comes in.
- Choose a minimum star rating, such as 3.
- Pick the media request template.
Test and Switch It On
- Send a test of each email you turned on.
- Click Save.
- Check that Ask for reviews shows On.
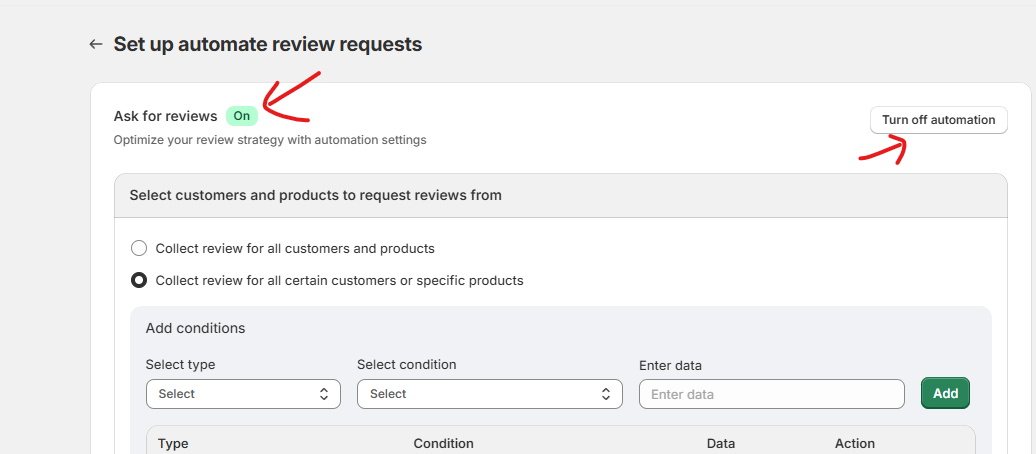
Automation only covers orders placed after you switch it on. For earlier orders, go to Automate, then Manual, pick a date range, keep Exclude already reviewed items on, and click Launch campaign. One-time campaigns need a paid plan.
Already Have a WiserReview Account?
If you signed up at wiserreview.com first, connect your store from the WiserReview dashboard instead of starting in Shopify.
- In your WiserReview dashboard, go to Automate.
- Click Add automation.
- Find Shopify and click Install now.
- Log in with your Shopify account and approve the connection.
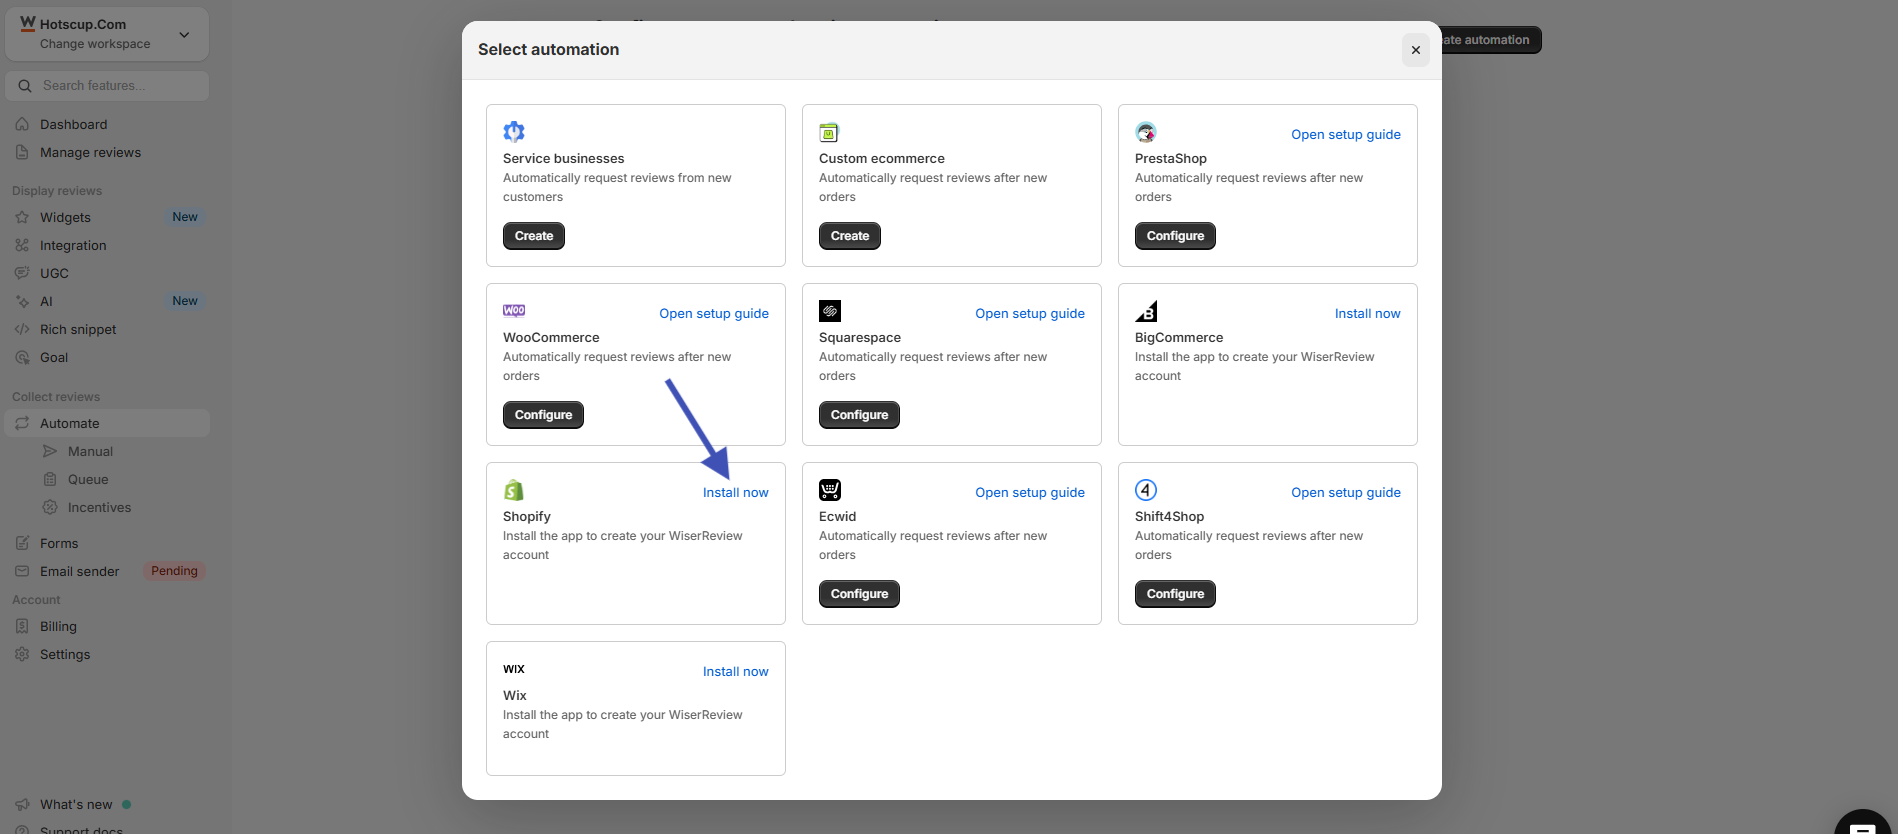
Once connected, WiserReview starts collecting reviews from your store orders, and the widget steps above work the same way.
Add Reviews to Other Shopify Pages
The product page matters most, but shoppers also look for reviews in other spots. Every one of these uses the same Add section, then Apps path from Step 7.
- Star ratings under the title: on your product template, add the Star Rating section and drag it just under the product title.
- Homepage: open the Home page template and add Carousel or Carousel Auto Slider near your best sellers.
- A reviews page: add a page called Reviews under Online Store, then Pages, give it its own page template, and add a review section to that template.
- Collection grids: stars under product titles in grid views depend on your theme, so add them there only if your theme supports it.
How to Import Reviews You Already Have
Moving from another review app, or selling on a marketplace too? Import your existing reviews so your product pages don’t start at zero.
- Export your old reviews as a CSV file from the previous app.
- In WiserReview, open Manage Reviews.
- Click Import.
- Choose the source platform, such as Judge.me, or the CSV option.
- Upload the file.
- Match each column to the right field and confirm.
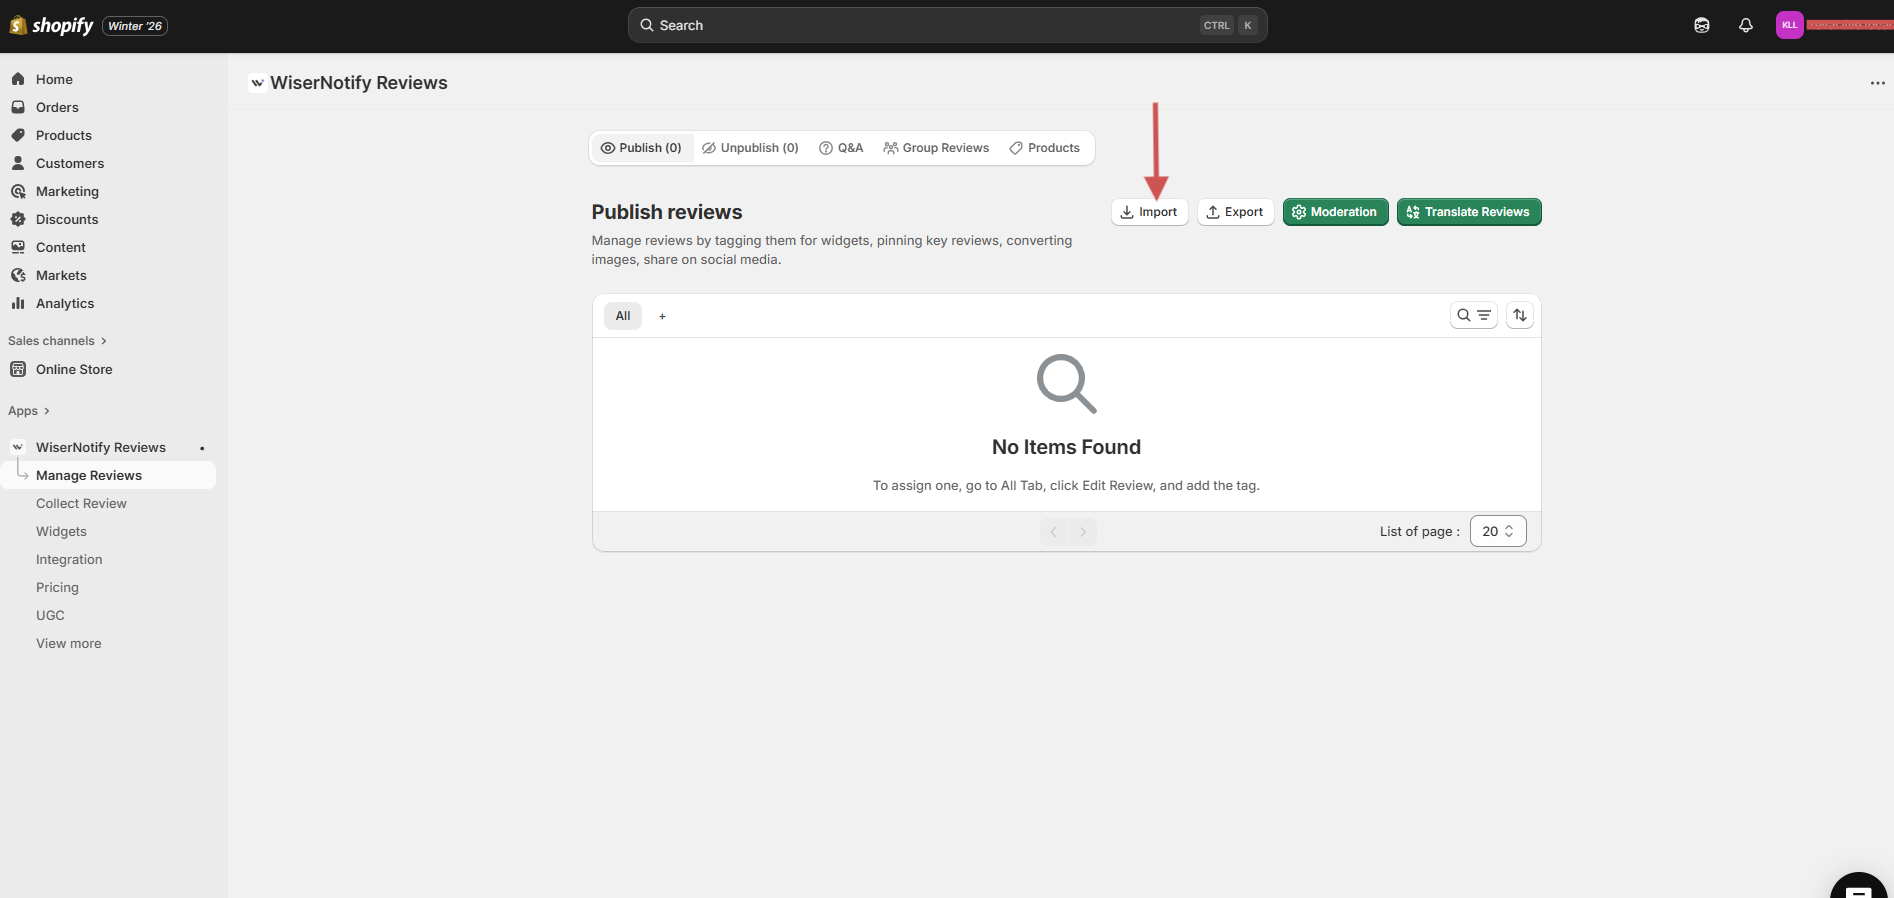
Reviews from Etsy, Amazon, or AliExpress go in the same way once they’re in a CSV file. Only import reviews you have the right to reuse, and keep the original dates so shoppers see an honest timeline.
Share Reviews Across Product Variants
If you sell the same item in several colors or sizes as separate products, group them so each one shows the full set of reviews.
- In WiserReview, open Manage Reviews.
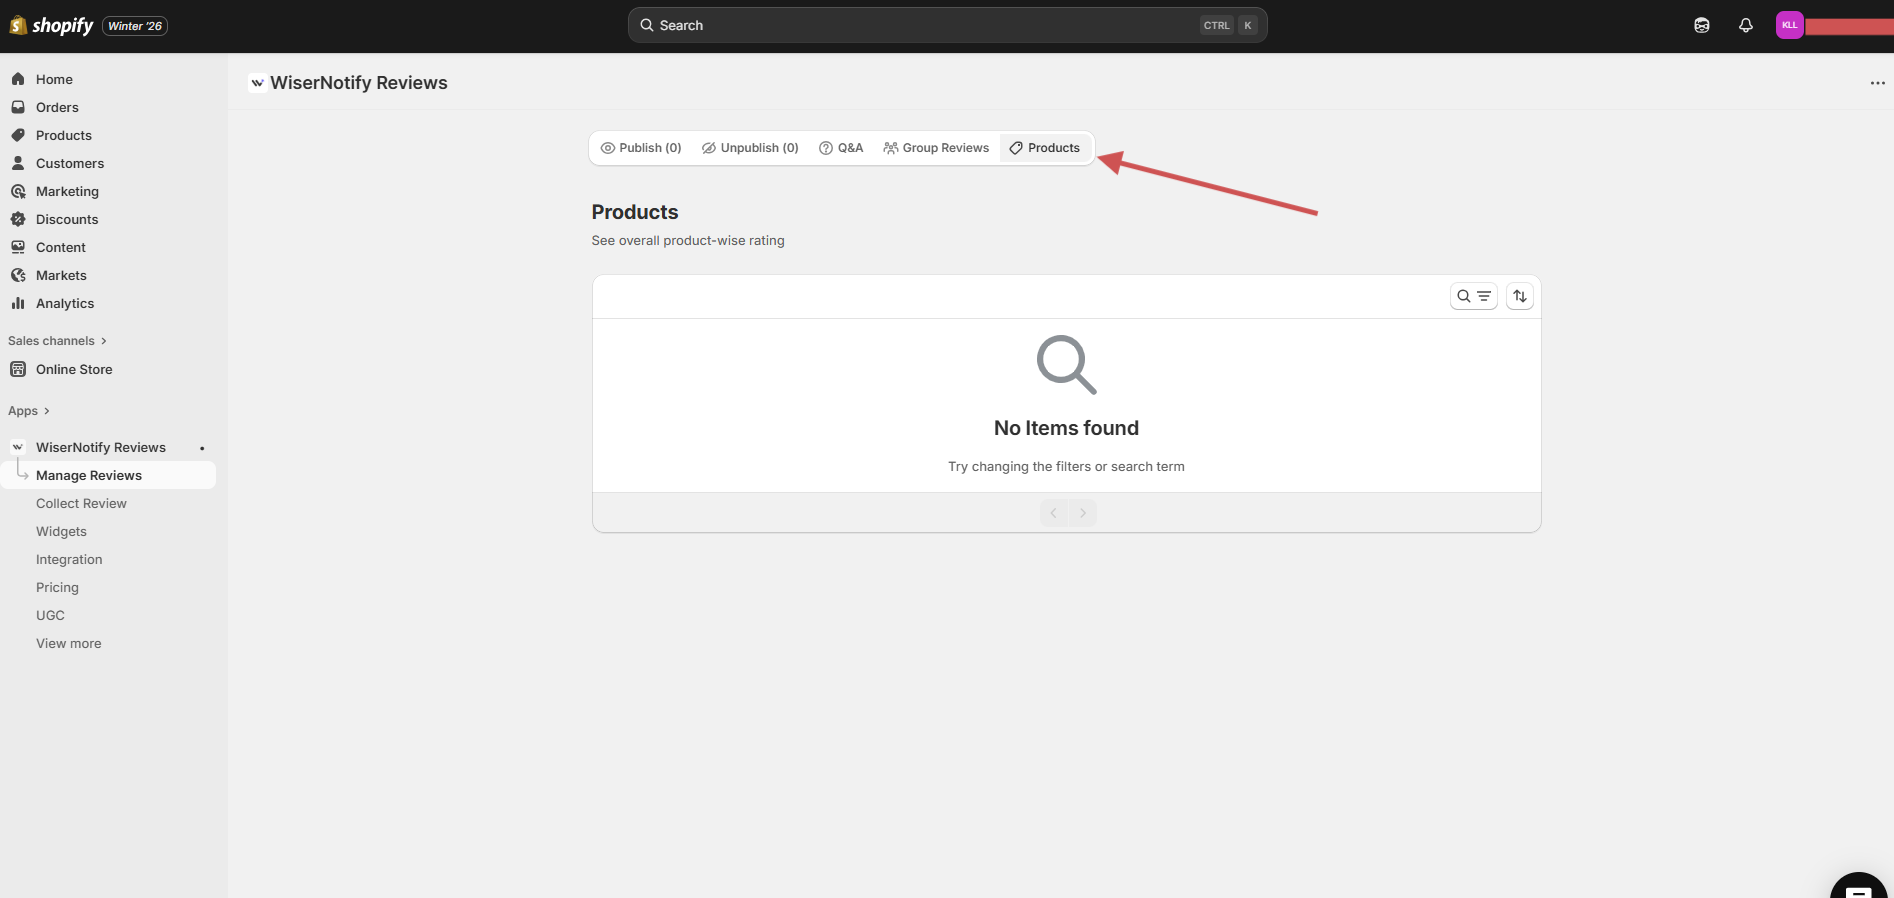
- Open the Group Reviews tab.
- Click Create Group.
- Select the related products.
- Click Save.
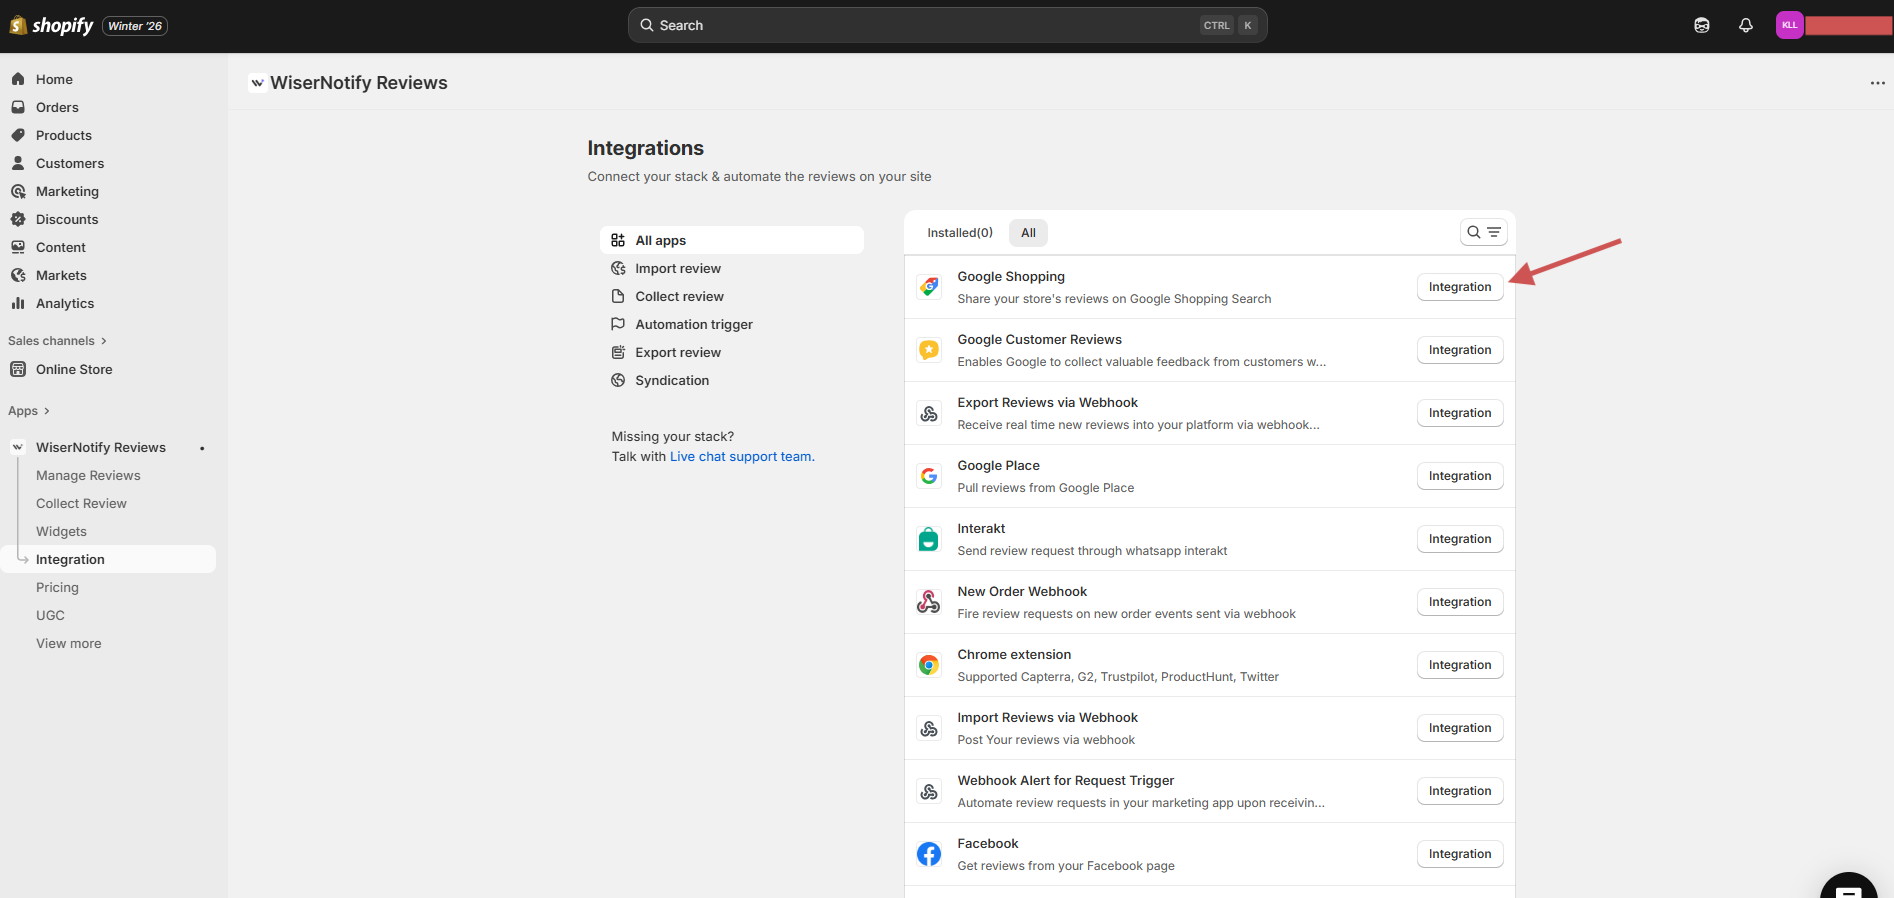
Show Your Ratings in Google Shopping
WiserReview can send your product reviews to Google Merchant Center as a review feed, so your ratings can appear on your Google Shopping listings.
- In WiserReview, open Integrations.
- Find Google Shopping and click Integration.
- Generate the review feed XML.
- Copy the feed URL.
- Add the feed URL in your Google Merchant Center account.
Running More Than One Shopify Store?
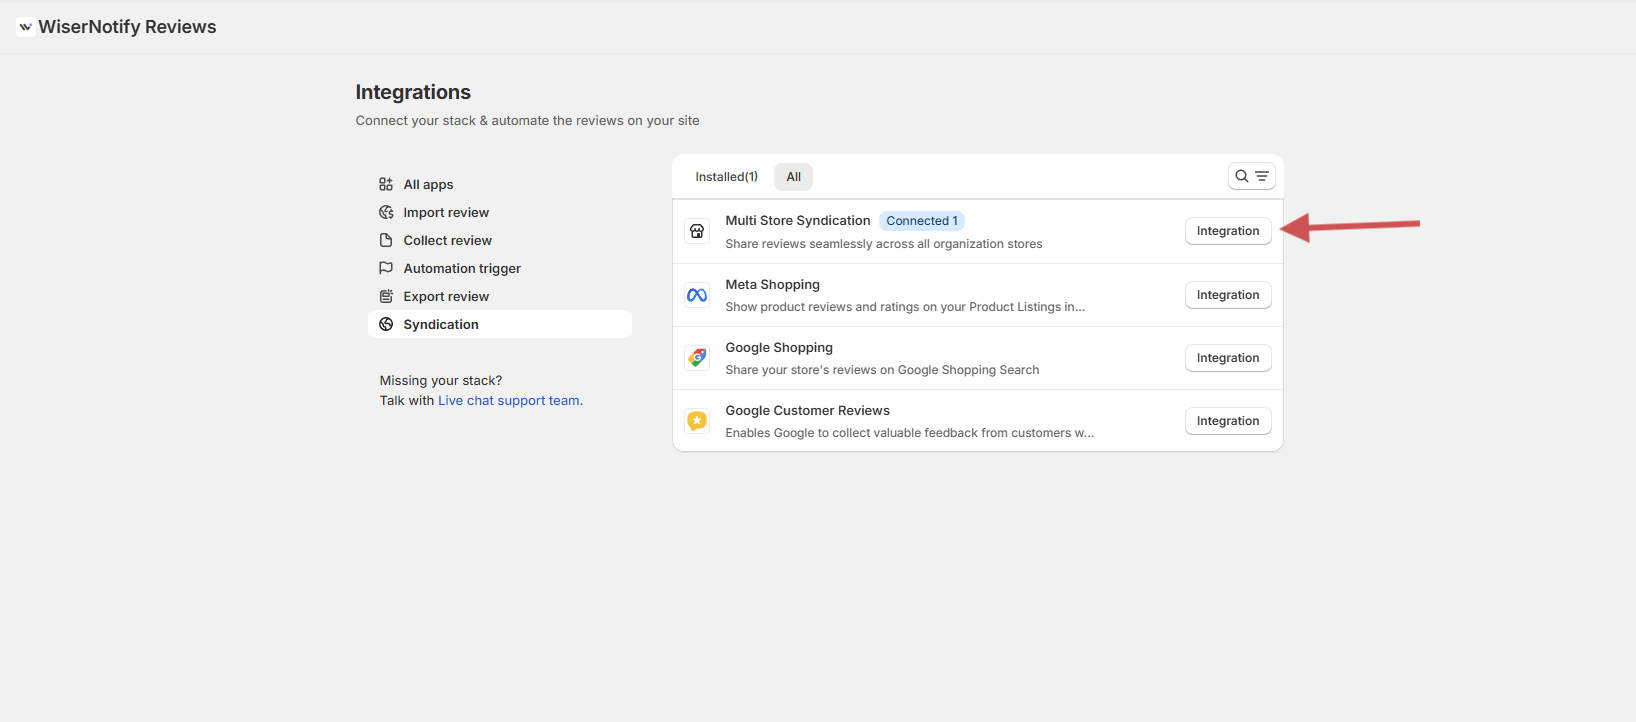
Stores that sell the same products under different domains can share one pool of reviews instead of collecting them twice.
- In WiserReview, open Integrations.
- Click Syndication.
- Open Multi Store Syndication and click Integration.
- Connect your other stores.
- Check that the SKUs match, then turn the sync on.
Which WiserReview Widget Should You Use?
Each Shopify page has a different job, so the right widget changes with the page. Use this as a starting map.
| Shopify page | Widget to add | Why it works there |
|---|---|---|
| Product page, below the description | Product Review Section | Full ratings, photos, and text right where shoppers decide |
| Product page, under the title | Star Rating | Shows the average score before anyone scrolls |
| Near Add to cart | Nudges | One short review at the moment of doubt |
| Homepage | Carousel | Several reviews in little space |
| Every page | Floating Badge (app embed) | Keeps your star rating in view while people browse |
The same widgets also live in your WiserReview dashboard, where you manage them for every store you connect.

All your reviews in one place
Collect reviews, manage every response, and display them where they matter most.
Best Practices for Shopify Reviews
Getting reviews on the page is step one. These habits decide whether shoppers trust them.
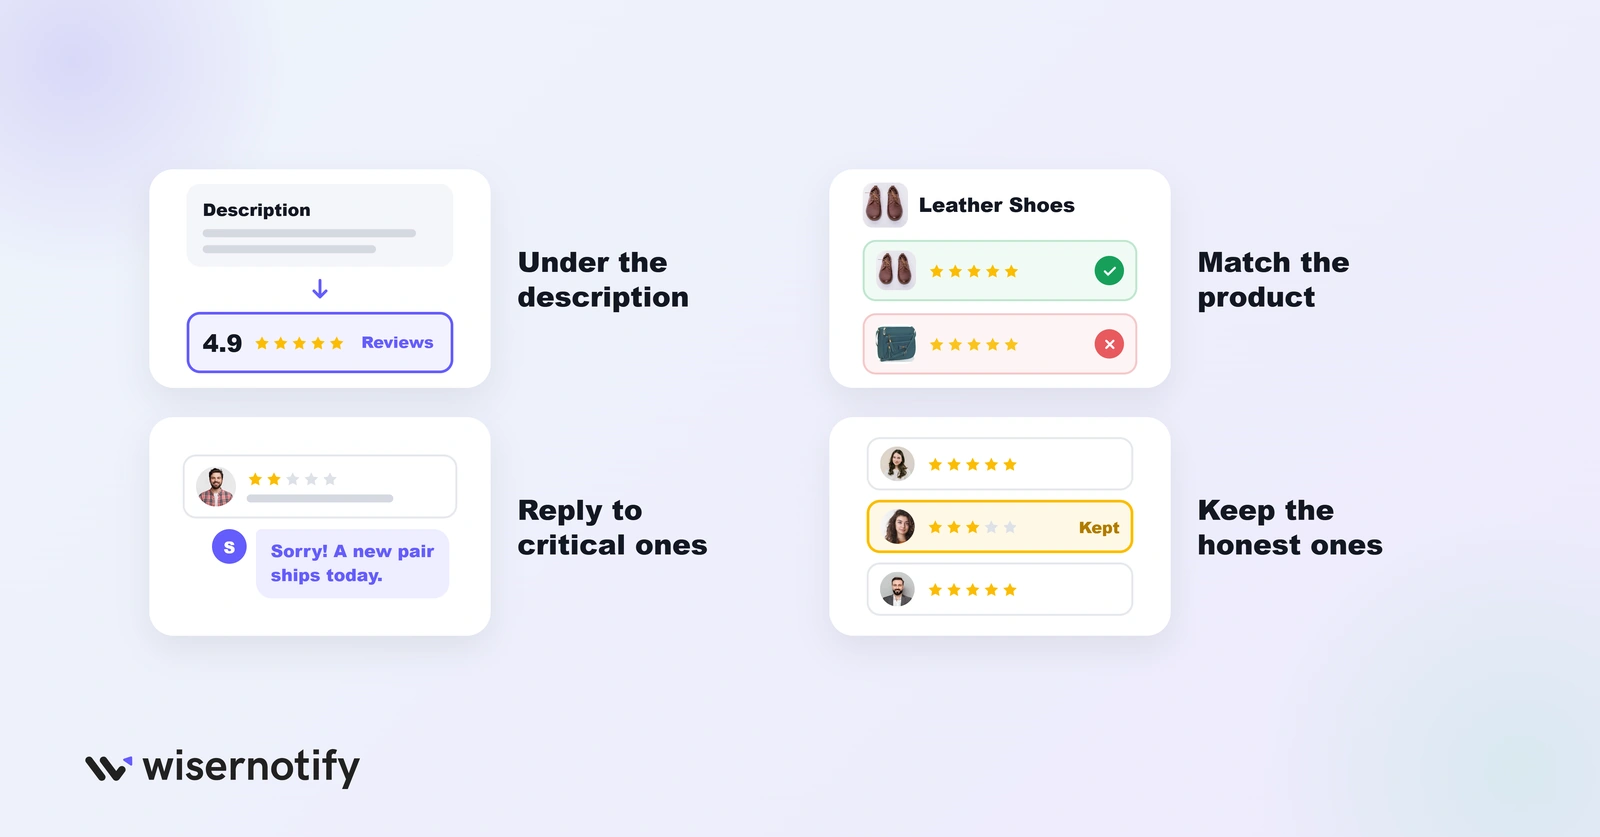
- Put the review section right under the description. Shoppers read the description first, then look for proof before they buy.
- Show reviews that match the product. Tag reviews by product or category, then filter each widget by tag so a shoe page never shows bag reviews.
- Reply to the critical ones. A short, calm reply under a 2-star review shows future buyers how you treat problems.
- Keep the honest ones. A few 3-star reviews look more believable than a wall of perfect scores, so don’t hide every one.
Moderation sits in Manage Reviews. You can approve or hide a review before it goes live, tag it for the right widget, and reply from the same screen.
For more on placement, these product page examples show where 15 stores put their reviews and other proof.
Shopify Reviews Not Showing?
When reviews don’t appear on the live store, the cause is almost always one of these.
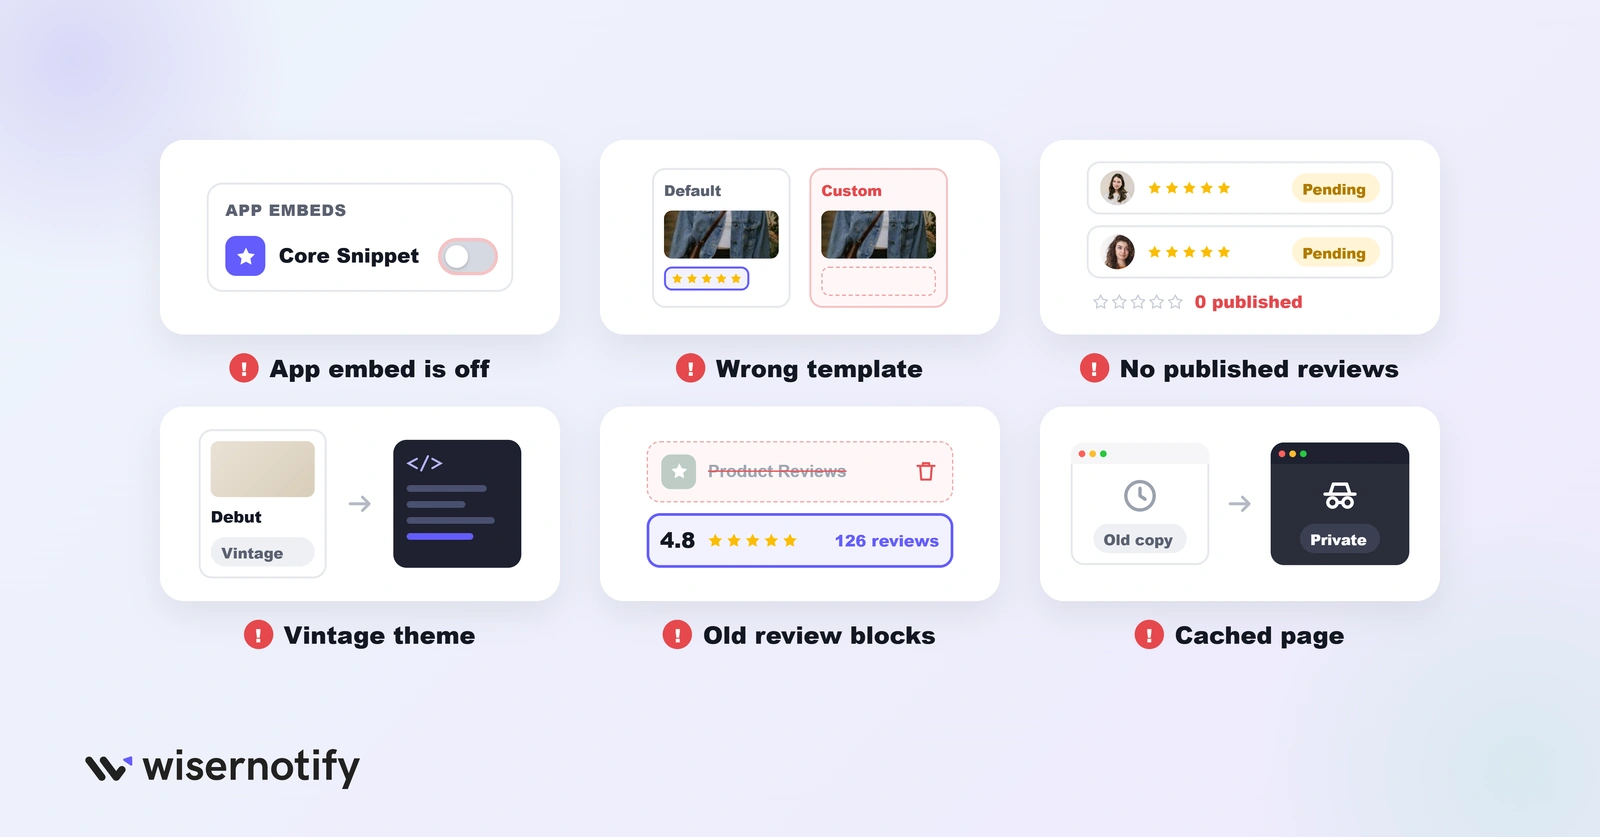
- The app embed is off. Turn on Core Snippet under App embeds and save (Step 8).
- The section went on the wrong template. If your products use a custom template, add the review section to that one too.
- There are no published reviews yet. Approve at least a couple of reviews, or import some, before you judge the widget.
- Your theme is a vintage theme. It needs the code method, not the drag-and-drop section.
- Old review blocks are still in the theme. Remove leftover blocks from the retired Shopify Product Reviews app so they don’t clash.
- You’re seeing a cached page. Check the product page in a private window before changing settings.
Want Google Reviews on Shopify Too?
Product reviews and Google reviews are different things. Product reviews describe one item. Google reviews describe your business and live on your Google Business Profile.
If you want those Google reviews on your store as a widget, follow our guide on how to add Google reviews to Shopify. It covers the Business Profile widget, Google Customer Reviews, and product ratings in Google Shopping.
More Review Types for Shopify
How to Add Testimonials to Shopify
How to Add Facebook Reviews to Shopify
How to Add Amazon Reviews to Shopify
All your reviews in one place
Collect reviews, manage every response, and display them where they matter most.
Wrap Up
Shopify doesn’t come with reviews anymore, but adding them is a short job. Install the app, switch on requests, and drop the review section under your product description.
Then turn on the app embed and check a live product page. After that, the reviews keep coming in on their own.
Frequently Asked Questions
Does Shopify have built-in product reviews?
No. Shopify removed its Product Reviews app in 2024, so stores now use a third-party app such as WiserReview to collect and show reviews.
Is there a free way to add reviews to Shopify?
WiserReview’s Shopify app has a free plan that covers 50 review requests a month plus the product review and star rating widgets.
Do I need coding skills to add reviews on Shopify?
No. On Online Store 2.0 themes, the review widget is added as an app section in the theme editor. Only older vintage themes need a code line pasted into the product template.
Can I show star ratings on Shopify collection pages?
Star ratings can sit under the product title through the WiserReview Star Rating section. Stars on collection grids depend on whether the theme supports app ratings there.
Can I import reviews from another app into Shopify?
Yes. WiserReview imports reviews from a CSV file, including exports from apps like Judge.me, through the Import button in Manage Reviews.
Why are my reviews not showing on Shopify?
The most common cause is the app embed being off. Open the theme editor, click App embeds, turn on the WiserReview Core Snippet, and save.

Krunal Vaghasiya is a marketing tech expert who boosts e-commerce conversion rates with automated social proof and FOMO strategies. He loves to keep posting insightful posts on online marketing software, marketing automations, and improving conversion rates.




 Capterra