How to embed testimonials on wordpress in under 5 minutes
 Krunal Vaghasiya|Jan 8, 2025
Want to show real customer feedback on your WordPress site but don’t want to deal with complex setups? You’re in the right place. Testimonials build trust fast and help turn visitors into paying customers.
Adding them to your website shouldn’t take more than a few minutes. Whether you sell products, services, or run a blog, embedding testimonials can boost your credibility instantly.
In this guide, I’ll show you the fastest way to add testimonials to WordPress using Wisernotify —without needing to code. You’ll get clear steps, plugin suggestions, and a method that actually works.
Let’s get your testimonials live in under 5 minutes.
Why Add Testimonials to WordPress?

Visitors often leave your site without taking action because they aren’t sure if they can trust you.
That’s where testimonials step in. They act as social proof, helping you build credibility through the voices of your past customers.
According to Wisernotify, 72% of consumers say positive testimonials and reviews increase their trust in a business. Displaying reviews can boost conversion rates by up to 270% for lower-priced products.
By adding testimonials to your WordPress site, you’re not just sharing feedback—you’re confidently guiding new visitors toward a buying decision.
Key benefits:
Builds Instant Trust: Real customer words carry more weight than sales copy.
Reduces Drop-offs: People who see others are satisfied are less likely to leave without acting.
How to Add Testimonials to WordPress

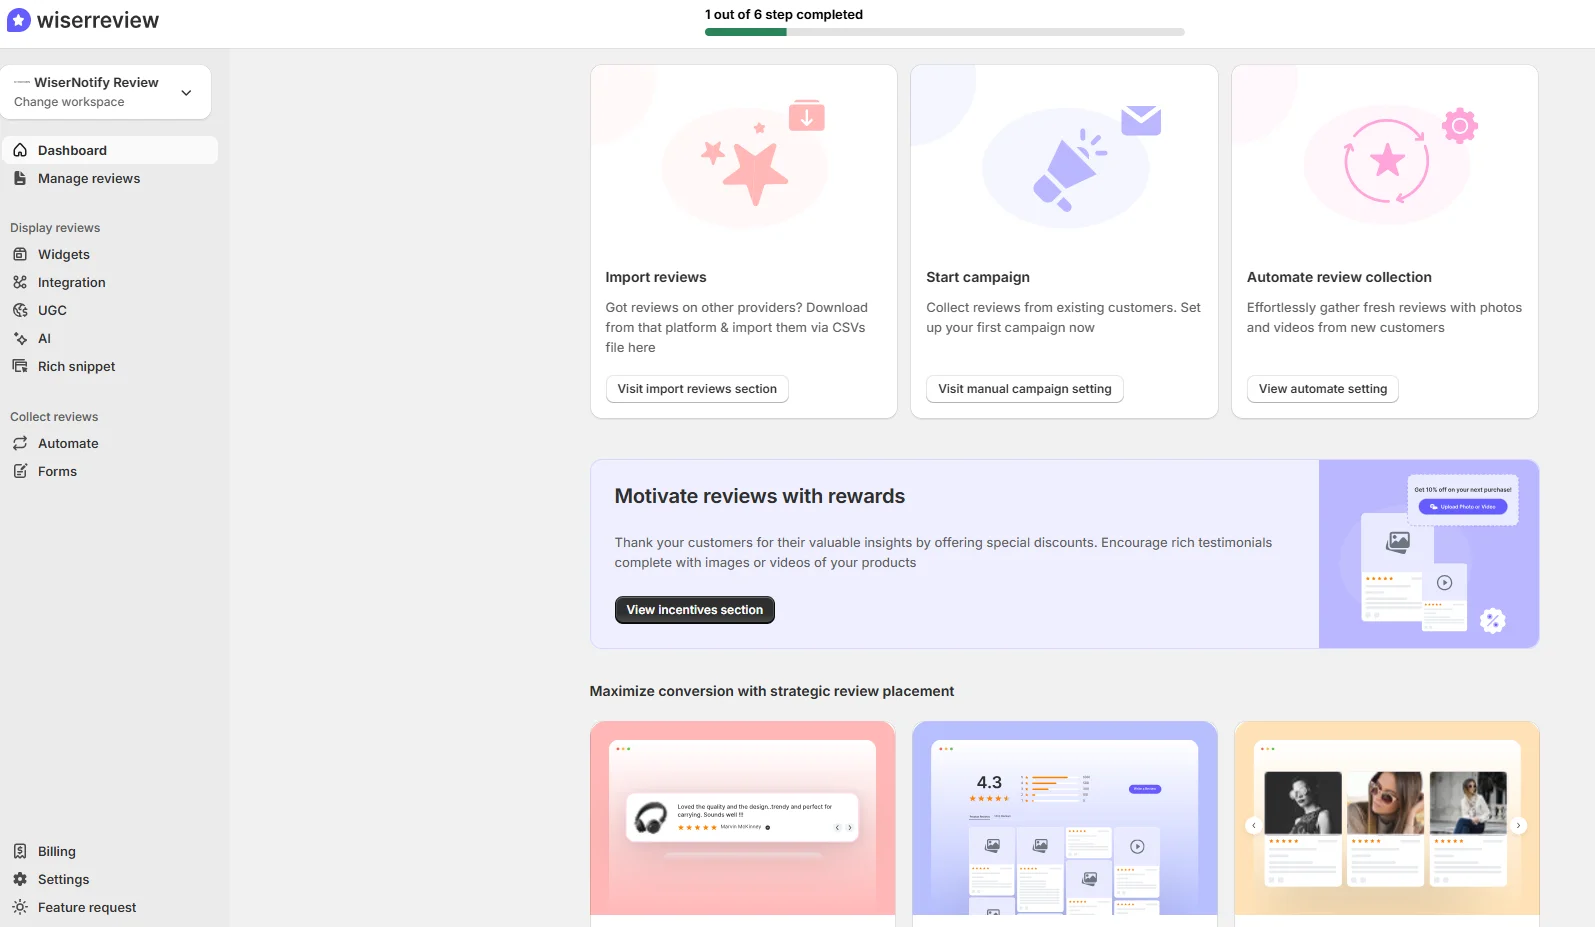


Using WordPress Plugins
1. Install a Testimonial Plugin
- Go to Plugins > Add New in your WordPress dashboard.
- Search for plugins like Strong Testimonials, WP Testimonials, or WiserNotify.
2. Activate and Configure
- After installation, activate the plugin.
- Configure settings such as layout, number of testimonials, and customization options.
3. Add Testimonials to Pages or Posts
- Use shortcodes provided by the plugin to embed testimonials anywhere on your site.
4. Customize Display
- Choose from grid, slider, or carousel layouts.
- Add customer photos, names, and logos for personalization.
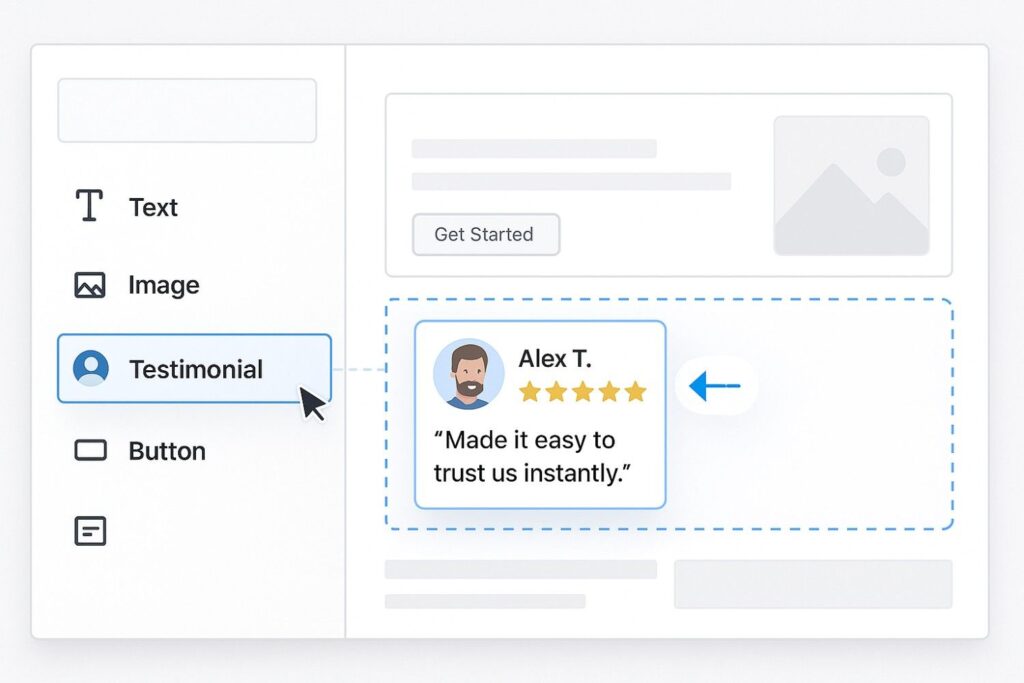
Using WordPress Gutenberg Editor
Add a Testimonial Block
- In the WordPress Editor, click the “+” button and search for “Testimonial.”
- Drag the block to your desired location.
Enter Testimonial Content
- Input customer quotes, names, and any additional details like star ratings.
Style Your Block
- Use Gutenberg’s built-in tools to adjust fonts, colors, and alignment.
Using Page Builders (Elementor, Divi, etc.)
Select a Testimonial Widget
- In Elementor, Divi, or WPBakery, search for a testimonial widget.
- Drag it into your desired section.
Customize Content and Design
- Add customer feedback, images, and names.
- Style the widget to match your site’s theme.
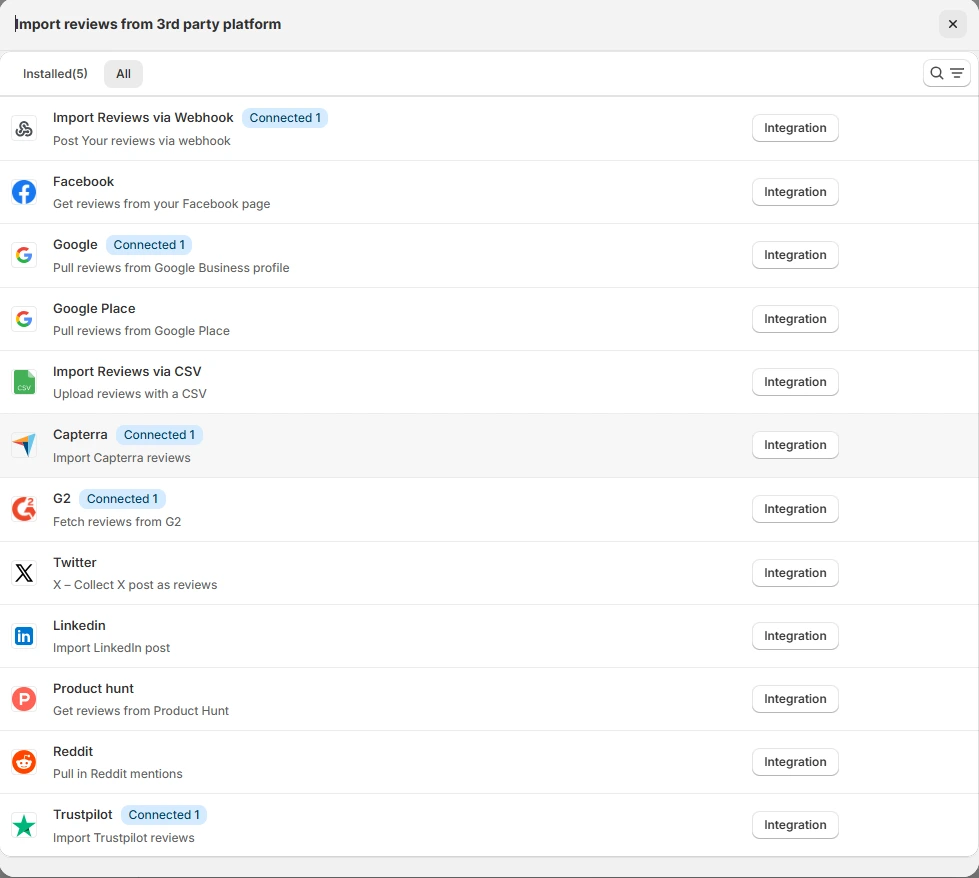
Integrating WiserNotify Testimonials
To embed testimonials on your WordPress site using WiserNotify, follow these quick steps:
1. Install the WiserNotify Plugin
- Log in to your WordPress dashboard. Go to Plugins → Add New, search for “WiserNotify”, and install the official plugin. Activate it once installed.
2. Connect your WiserNotify Account
- After activation, you’ll see a new menu for WiserNotify. Click it and enter your API key from the WiserNotify dashboard. This connects your site to your account.
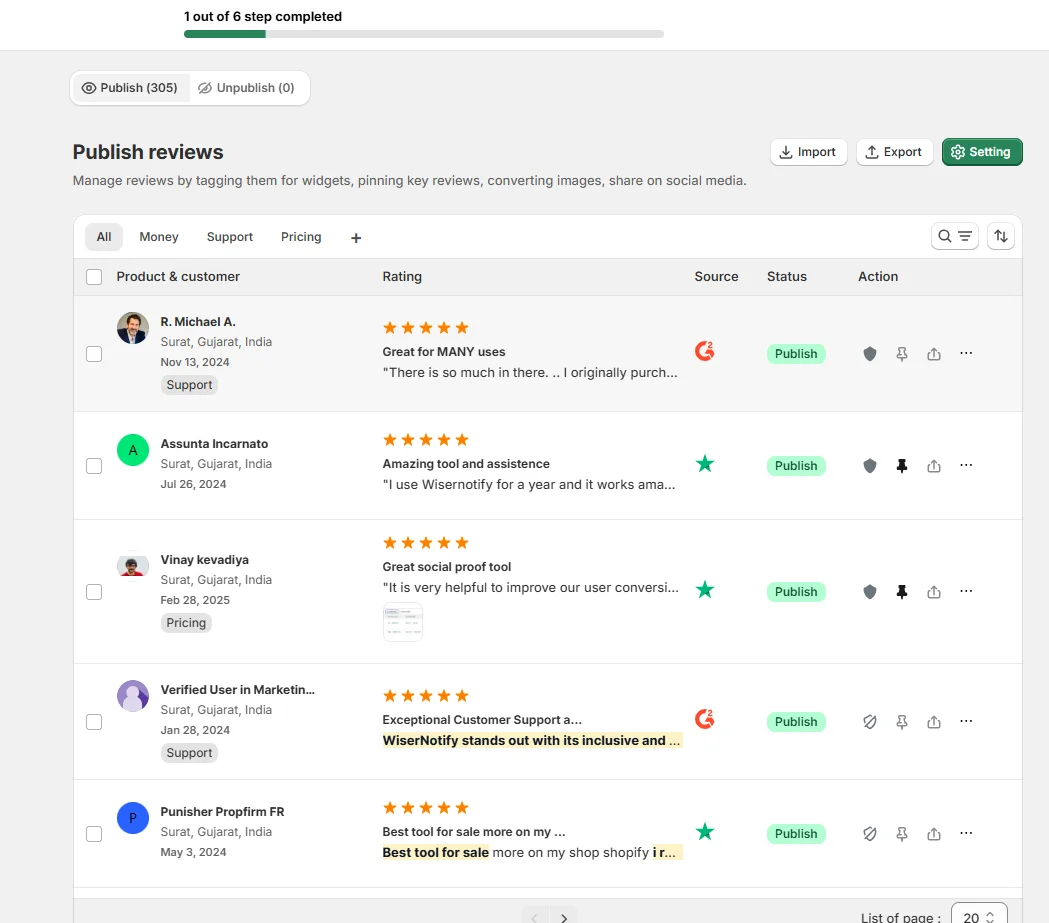
3. Create a Testimonial Widget
- In your WiserNotify dashboard, go to Widgets → Create New Widget, choose the Testimonial type, and customize it as per your design needs—text, images, layout, etc.
4. Copy the Installation Code
- Once your widget is ready, copy the embed code provided.
5. Paste it on your WordPress Page
- Go to the WordPress page or post where you want to show testimonials. Use the Custom HTML block and paste your copied code. Save or update the page.
3 Testimonial Optimization Tips for WordPress

1. Show Testimonials Where People Decide
First, Place testimonials where visitors are most likely to make a decision, like product pages, pricing sections, or near call-to-action buttons. This builds trust right when it matters most.
For example, if you sell services, add a short quote next to your booking form. If you sell products, show a review carousel just below the “Add to Cart” button. Let social proof support the next step the visitor is about to take.
2. Use Clear and Honest Words
When writing testimonials, make sure they sound real and easy to understand. Keep it natural, like how a customer would actually speak. Use simple words that highlight the real benefits they got from your product or service.
For Example, “It helped me save hours every week and made my job easier.”
3. Add Real Details Like Name and Photo
Generic reviews won’t build trust. Make sure each testimonial includes the customer’s real name and a clear photo. These small details make a big difference—people connect more when they see a real face and a name they can relate to.
If possible, add extra context like the customer’s job title, company name, or location. Just make sure you get their permission before sharing personal info. Authenticity builds trust, and trust drives conversions.
Best Places to Show Testimonials on WordPress

Placing testimonials on the right pages isn’t just about adding praise. It’s about showing the right proof at the right time — when your visitors are deciding whether to trust you, buy from you, or leave.
Here are the top spots where testimonials work best:
1. Homepage
Your homepage is the first impression. Most visitors land here before checking any other page. Adding a few well-placed testimonials here can instantly build trust and keep people exploring your site.
How to do it:
-
Add 2–3 short, strong quotes from satisfied customers.
-
Place them just below the hero section or right above your first call-to-action button.
-
Use real names, photos, or logos if you can.
Example: A coaching website can show a testimonial like:
“Before working with Sarah, I was stuck. Three sessions in, I already landed two new clients!” – John, Marketing Consultant
2. Product or Service Pages
This is where buyers look for proof that your product or service works. Adding testimonials from people who’ve used that exact product helps remove doubts.
How to do it:
-
Use specific quotes that highlight results or experience with the product.
-
Add them near pricing tables, feature lists, or “Add to Cart” buttons.
-
Use product-specific tags or filters to show the right reviews if using a plugin.
Example: On a skincare product page:
“My acne cleared in just 4 weeks! This cream worked better than anything I’ve tried.” – Priya R.
3. Checkout Page or Booking Page
At this point, visitors are close to buying — but some still hesitate. A quick testimonial right here can push them to complete the action.
How to do it:
-
Add 1–2 short testimonials near the “Buy Now” or “Book Now” button.
-
Focus on feedback that speaks about satisfaction, delivery, or results.
Example:
“Super fast shipping and the product quality was amazing. I’ll be ordering again!” – Max T.
4. Sidebar or Footer
Sidebars and footers are seen on many pages. You can use them to keep trust-building messages visible as users browse.
How to do it:
-
Use a rotating slider or a featured testimonial.
-
Keep it short and clear — no more than 20 words.
Example:
“WiserNotify helped us increase demo bookings by 42% in 2 weeks!” – Kevin, SaaS Founder
5. Dedicated Testimonials Page
A full page of reviews helps build deep trust, especially for visitors doing research or coming from ads. It’s also a good link to share in email sequences or retargeting campaigns.
How to do it:
-
List testimonials by category or use case (e.g., “Small Business Clients,” “Agency Clients”).
-
Include customer photos, logos, videos, or star ratings.
-
Make sure it’s linked in your menu or footer.
Example:
You can title it something like “Why 5,000+ Users Trust [Your Brand]” and show review tiles with filters by service type or rating.
Other Ways to Add Testimonials to WordPress
Use a Testimonial Plugin
Plugins like Wisernotify, Strong Testimonials, or Site Reviews help you collect and display user feedback.
These plugins offer layouts like sliders, grids, or cards, and let you add photos, star ratings, and even video testimonials. You can place them anywhere using shortcodes or blocks.
Use Gutenberg Blocks or Elementor Widgets
Both the block editor (Gutenberg) and Elementor have built-in testimonial blocks. You can easily add a customer name, quote, and image with drag-and-drop.
These tools work well for static testimonials and give you full design control without coding.
Add Testimonials Using Shortcodes
If you’re using a testimonial plugin, it usually gives you a shortcode like [testimonial_view id="1"].
You can paste this inside a blog post, landing page, or even sidebar. It auto-loads a set of reviews styled as per your theme or plugin settings.
Manually Create a Testimonial Section
For a simple setup, you can just use a regular section in your page builder or post editor and add quotes, names, and customer photos manually. This works best for just a few testimonials and gives you total design freedom.
Display Testimonials Using Widgets
Most testimonial plugins come with ready-made widgets you can place in your site’s sidebar or footer.
You can also use the default WordPress text widget to paste shortcodes or HTML-based reviews manually. This keeps testimonials visible on all pages.
3 Testimonial Mistakes to Avoid on WordPress

Here are three critical mistakes:
1. Using Fake or Generic Testimonials
One big mistake people make is showing fake or made-up testimonials. Some even write their own reviews and just add a name and photo. But visitors can usually tell when something isn’t real.
It feels forced or too perfect. A short “Great service!” without any real story or name won’t build trust. Real reviews from real people work better. If you don’t have many yet, that’s okay.
Just share the ones you do have, even if it’s just one or two. What matters most is that they sound honest and believable.
2. Hiding Testimonials Where No One Looks
If you add your testimonials to a page that no one clicks on, they won’t help. Many websites have a separate “Reviews” page that barely gets any views.
Instead, try putting a few strong testimonials right where people are making decisions.
That could be on your homepage, pricing page, or near a “Buy” or “Sign Up” button. When visitors see others are happy with what you offer, they feel more confident to move forward.
3. Leaving Old Testimonials Without Updating
It’s easy to forget about testimonials once you’ve added them. But if they’re from years ago, they might feel outdated. Maybe your product has changed since then, or your service is now better.
It helps to update them once in a while. Ask recent customers for a quick review and add it in. If you’ve got a lot of reviews, you can show a few at a time using a slider or rotate them on the page.
This way, your site always feels fresh and current, and visitors see that people are still buying from you and enjoying it.
Wrap-Up
You’ve just seen how easy it is to embed testimonials on WordPress in under 5 minutes. From copying the embed code to pasting it into the right spot, the whole process is quick and beginner-friendly.
Whether you’re using Elementor, Gutenberg, or a classic editor, showcasing real customer reviews takes only a few clicks. Keep your site trustworthy and conversion-focused—don’t wait to add those testimonials.
A tool like Wisernotify is the easiest way to add testimonials to WordPress.
Related Posts:
How to add testimonials on Squarespace
How to embed testimonials on Webflow
How to embed testimonials on Shopify
How to embed testimonials on a Carrd
Krunal Vaghasiya is a marketing tech expert who boosts e-commerce conversion rates with automated social proof and FOMO strategies. He loves to keep posting insightful posts on online marketing software, marketing automations, and improving conversion rates.