
How to Add Reviews to Teachable (2026)
Teachable has no review widget of its own. To show student reviews on a course page, paste a review widget’s code into a Custom HTML block and click Update.
Key takeaways
- In WiserReview, the code sits under Widgets, then Install, then the Custom tab.
- Inline widgets go in a Custom HTML block. Floating badges go in Site > Code Snippets, which needs the Builder plan or higher.
- Tag reviews by course so each sales page shows feedback from its own students.
Does Teachable Have a Reviews Feature?
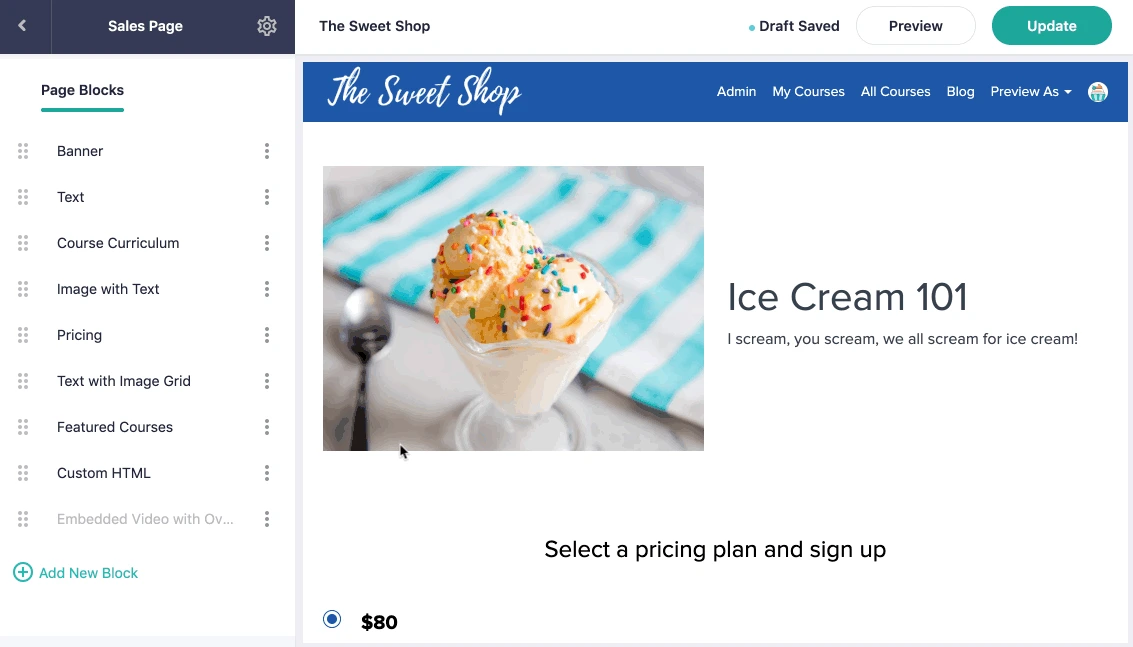
No. The page editor’s blocks cover curriculum, images, text, buttons, video, pricing and lead forms, and none of them collects reviews or shows star ratings.
Lecture comments do exist, but they live inside the course where only enrolled students see them. A visitor on your sales page never reads them.
You could type a few quotes into Image with Text blocks by hand. That holds up for three quotes on one course. With five courses and new students every week, it falls behind fast.
This guide pairs Teachable with WiserReview, which gathers student feedback and turns it into a widget you can embed.

Reviews for every Teachable course
Collect student reviews, tag them by course and show them on any sales page.
How to Add Reviews to Teachable
The job splits across two dashboards. Steps 1 to 6 build a course-filtered widget in WiserReview. Steps 7 to 9 drop its code onto a Teachable sales page.
Step 1: Sign Up or Log In to WiserReview
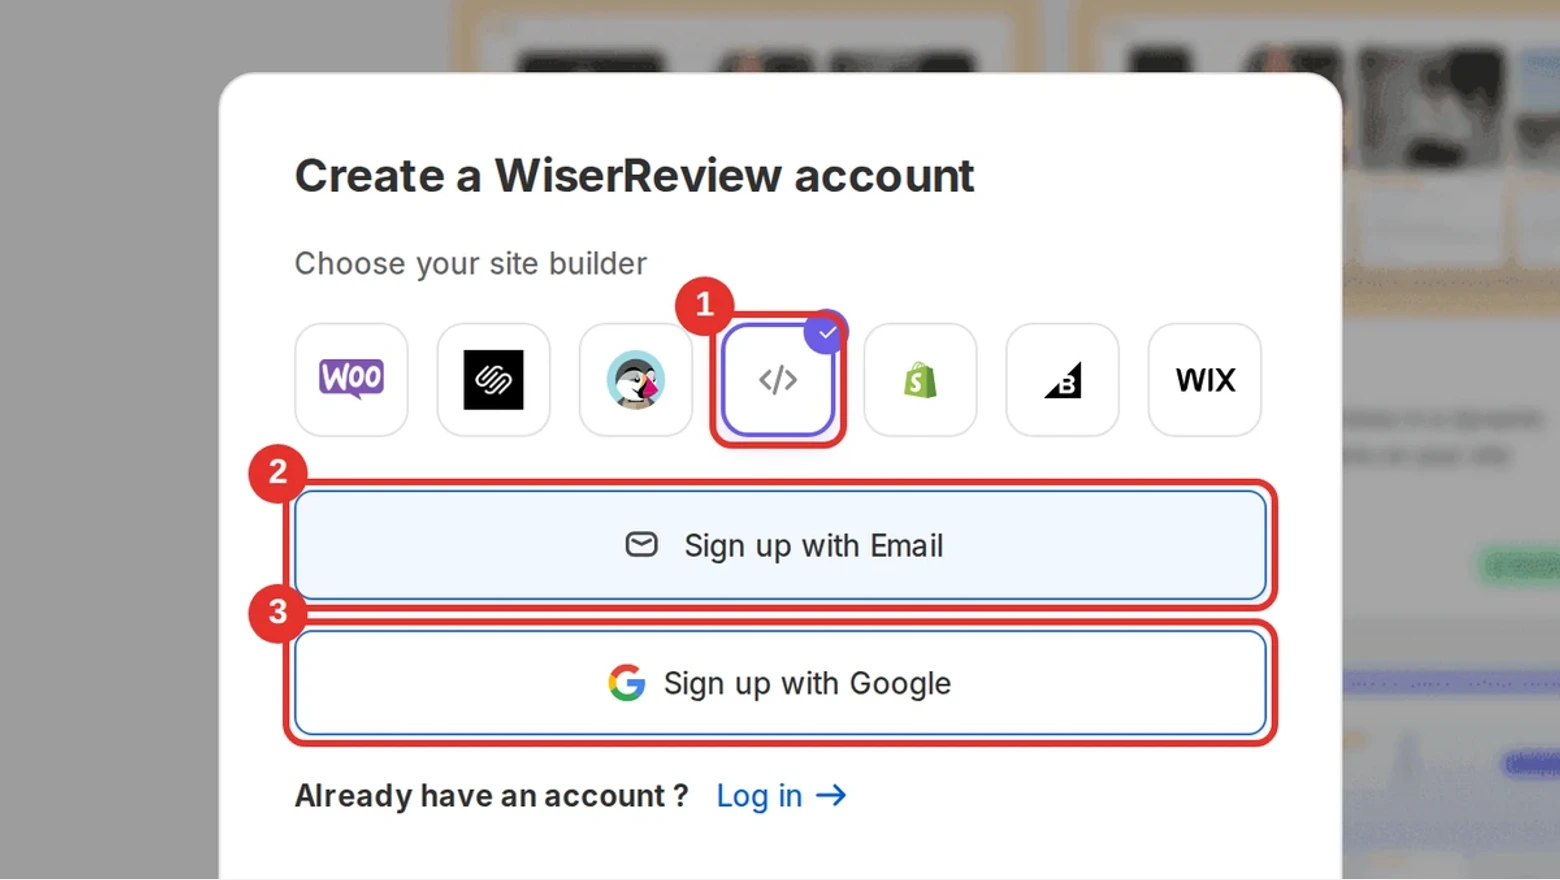
- Click Sign up for WiserReview.
- Teachable doesn’t appear among the site builders, so pick the custom code option (the </> icon). It fits any platform where you can paste a script.
- Register with your email or your Google account. Every plan starts on a 7-day free trial.
- Returning user? Pick Log in from the same window and move on to Step 2.
Step 2: Add Your First Reviews
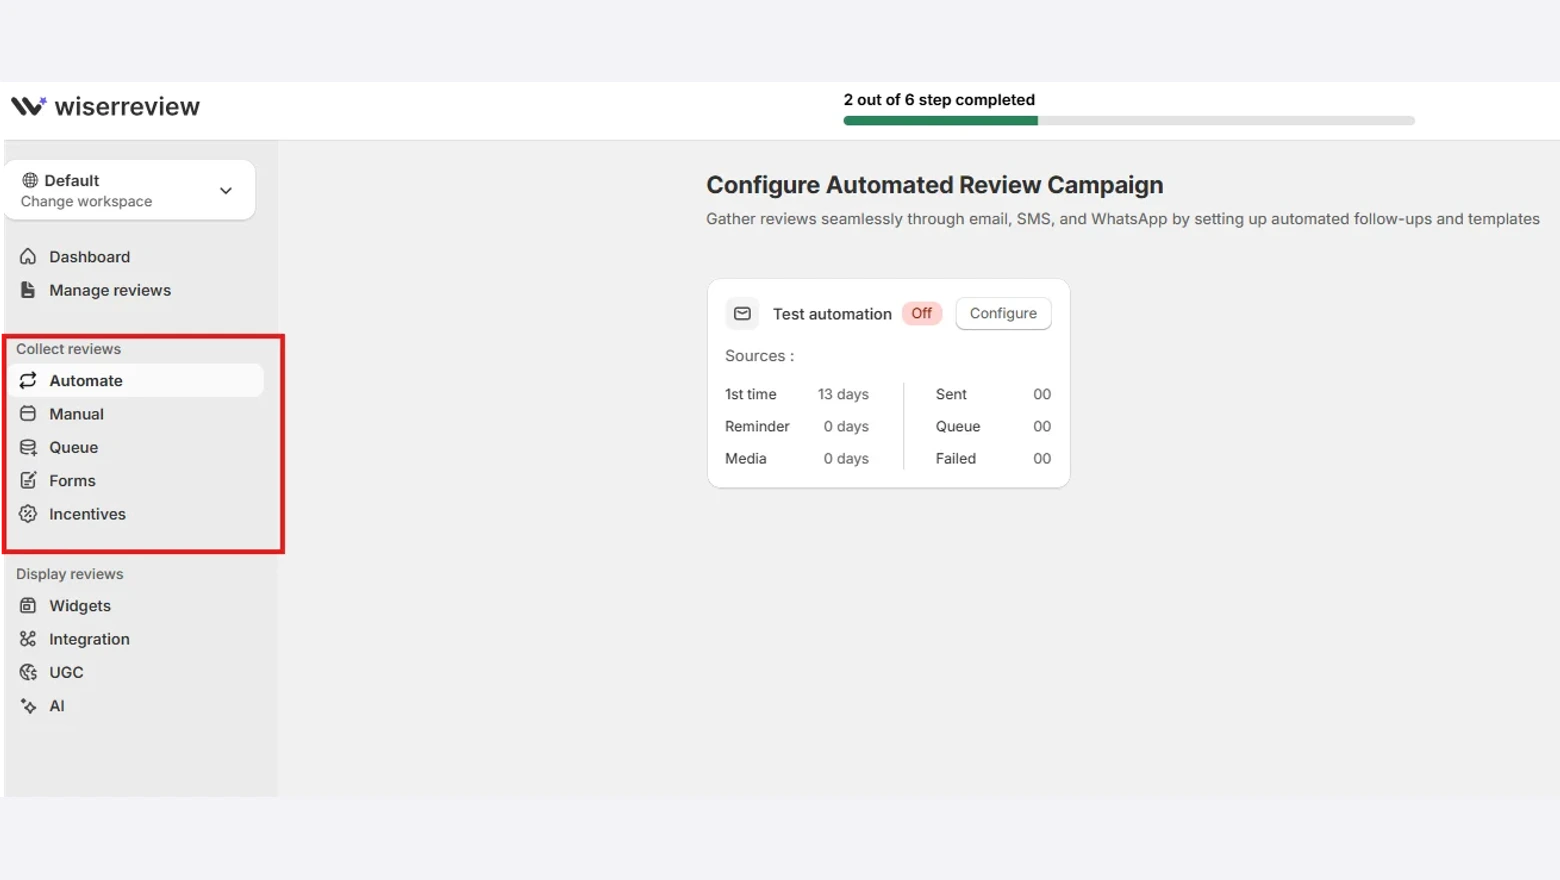
- If past students already left feedback in a spreadsheet or on Google, bring it over with Import under Manage reviews.
- No reviews yet? Build a review form from Collect reviews > Forms.
- Send that form to course graduates through Collect reviews > Manual. These review collection email templates help with the wording.
Step 3: Label Reviews With a Course Tag
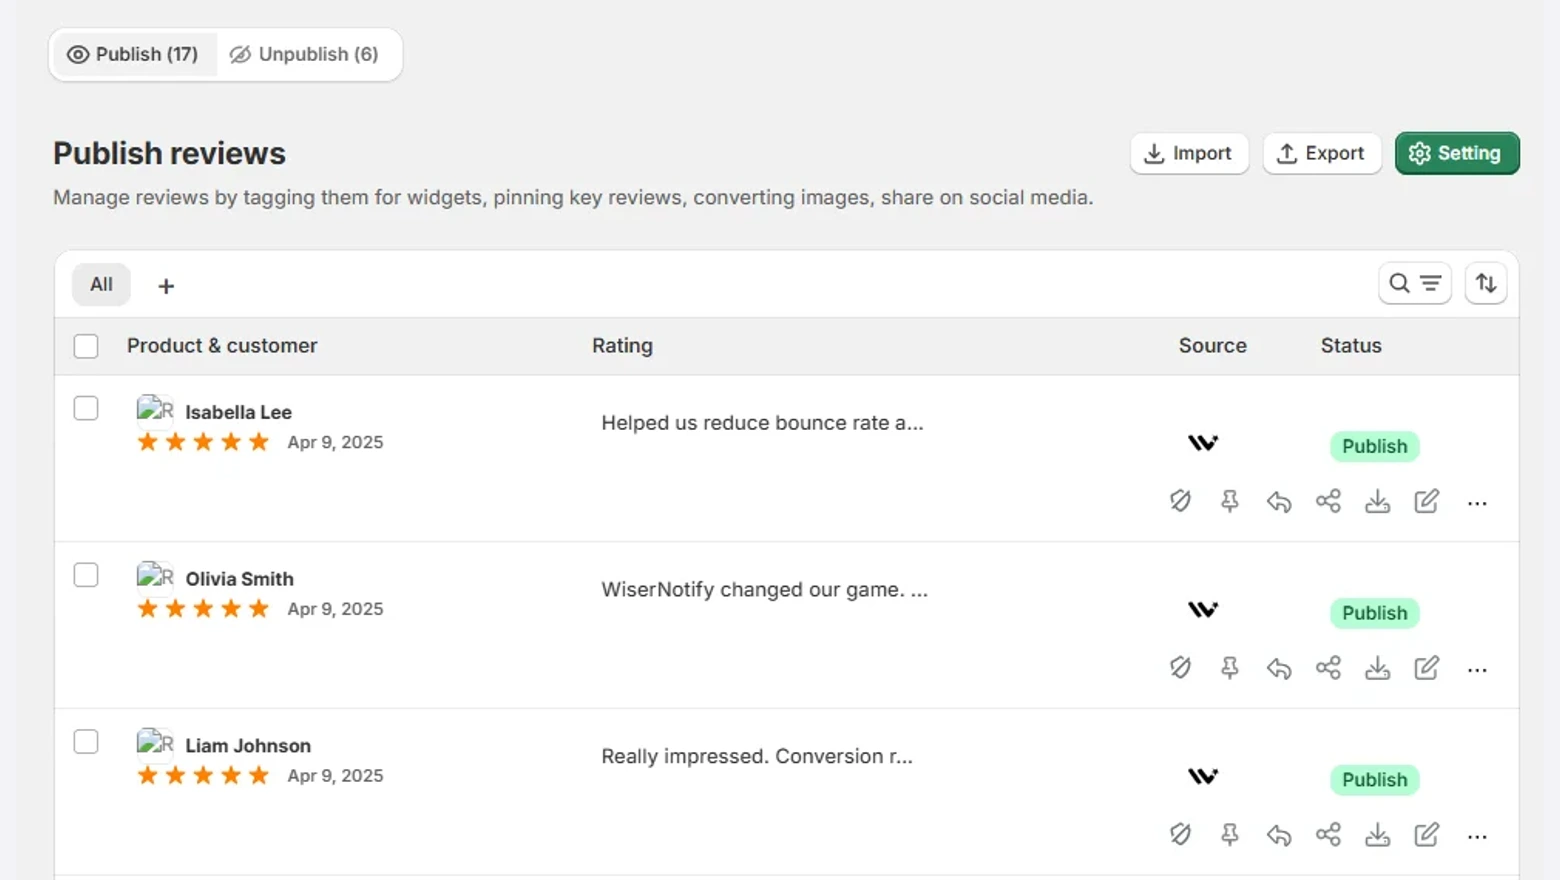
- In Manage reviews, publish the ones you want on your sales pages.
- Give each a course tag, like photography-basics.
Step 4: Pick the Wall of Love Layout
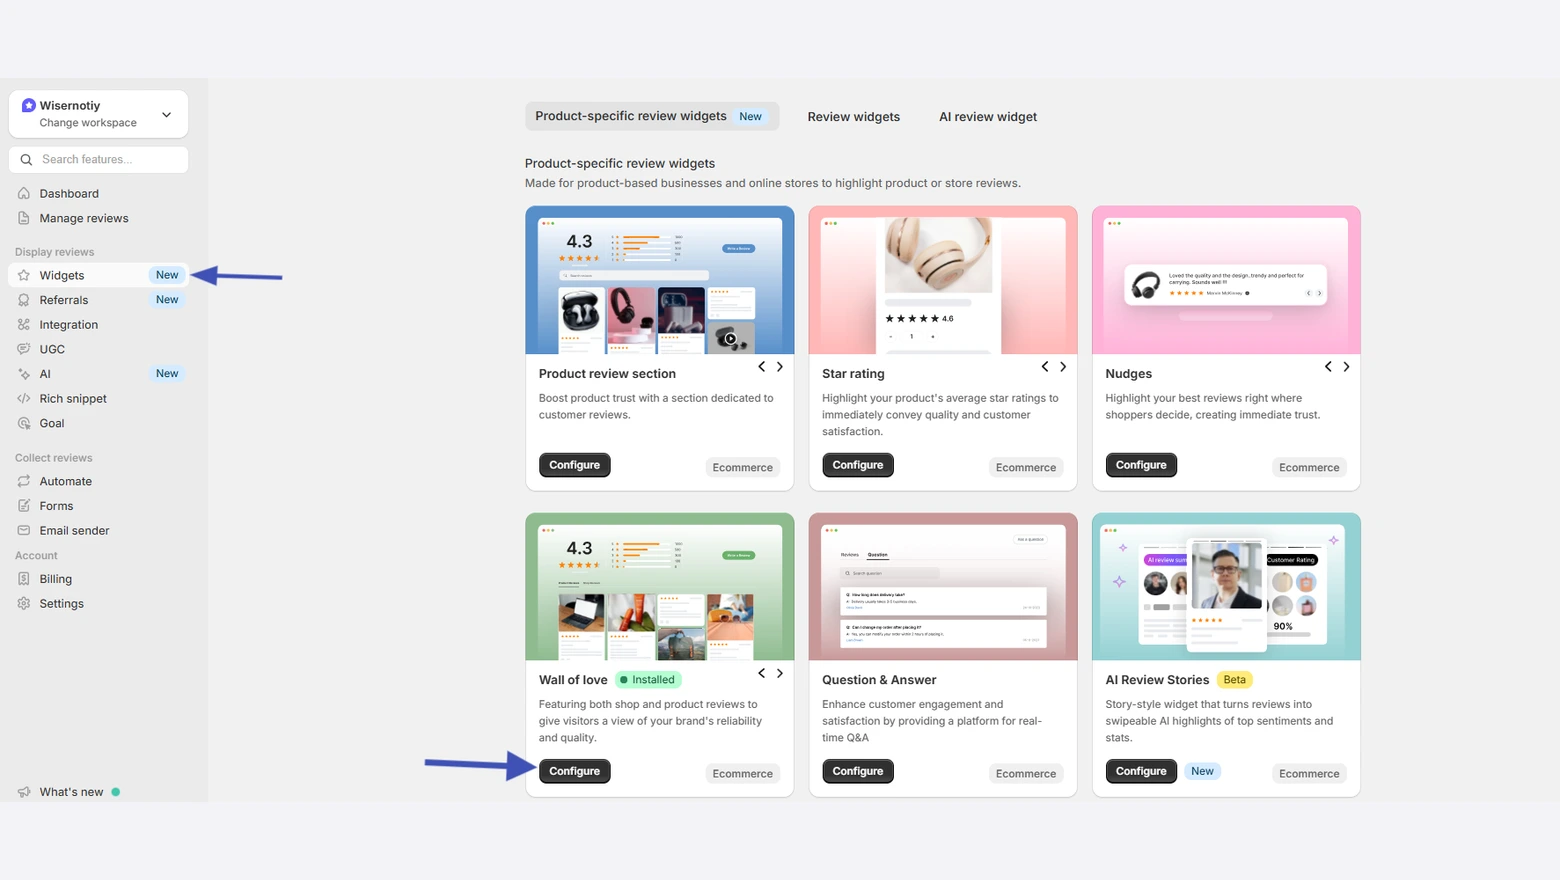
- From the left menu, go to Display reviews > Widgets.
- Hit Configure under the Wall of love layout.
- Prefer a slider or a compact badge? The same page lists those layouts too.
Step 5: Show One Course’s Reviews Only
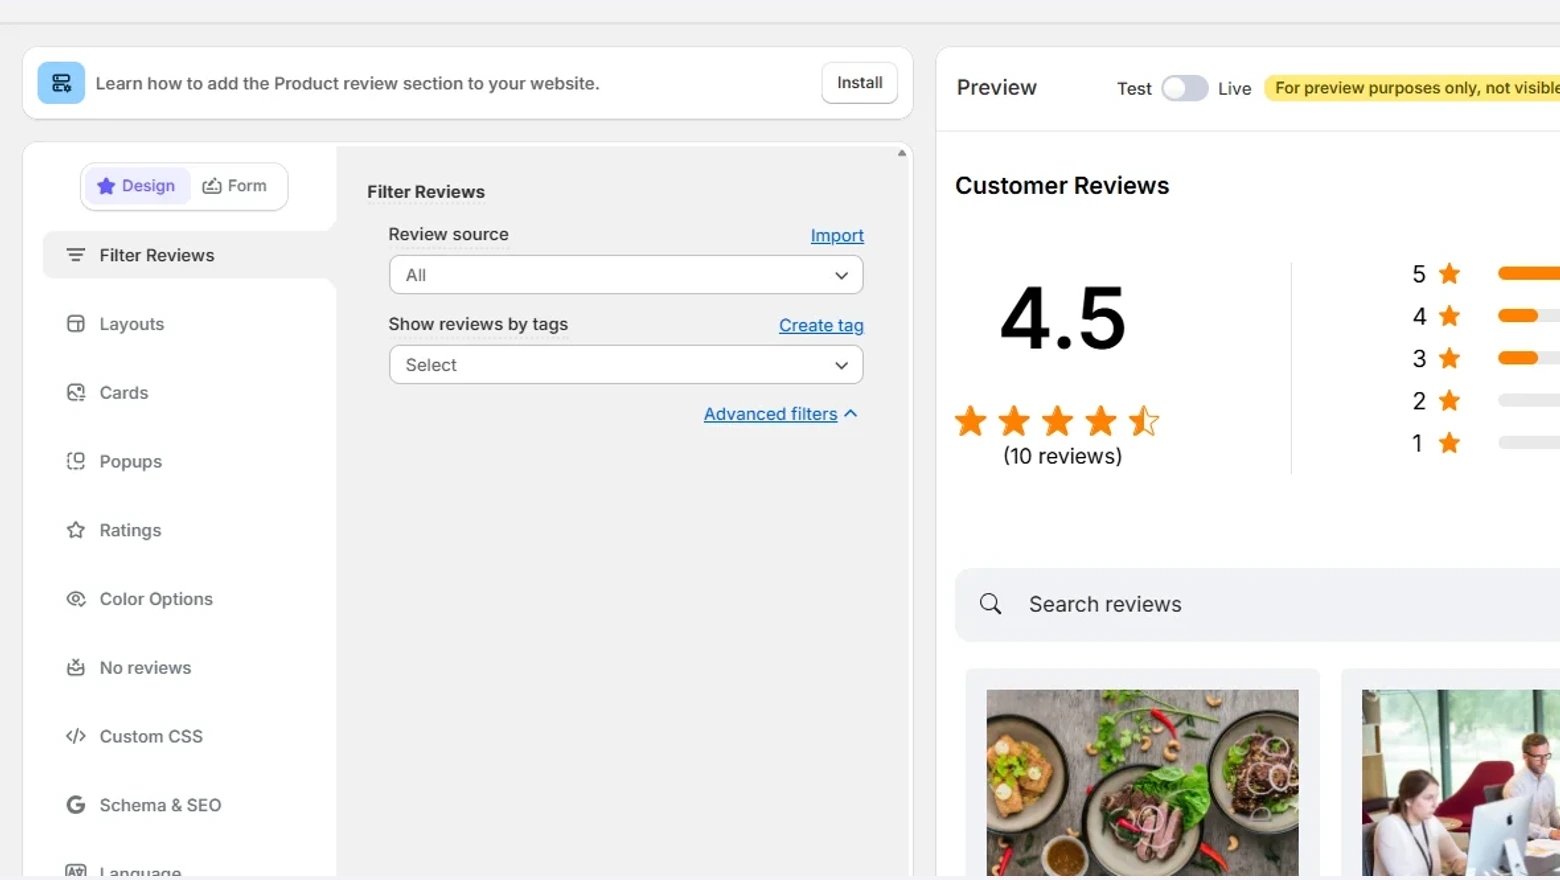
- Inside the editor, expand Filter Reviews.
- Pick your course tag from the Show reviews by tags list.
- Set colors and fonts to suit your Teachable school, then save.
Step 6: Grab the Embed Code
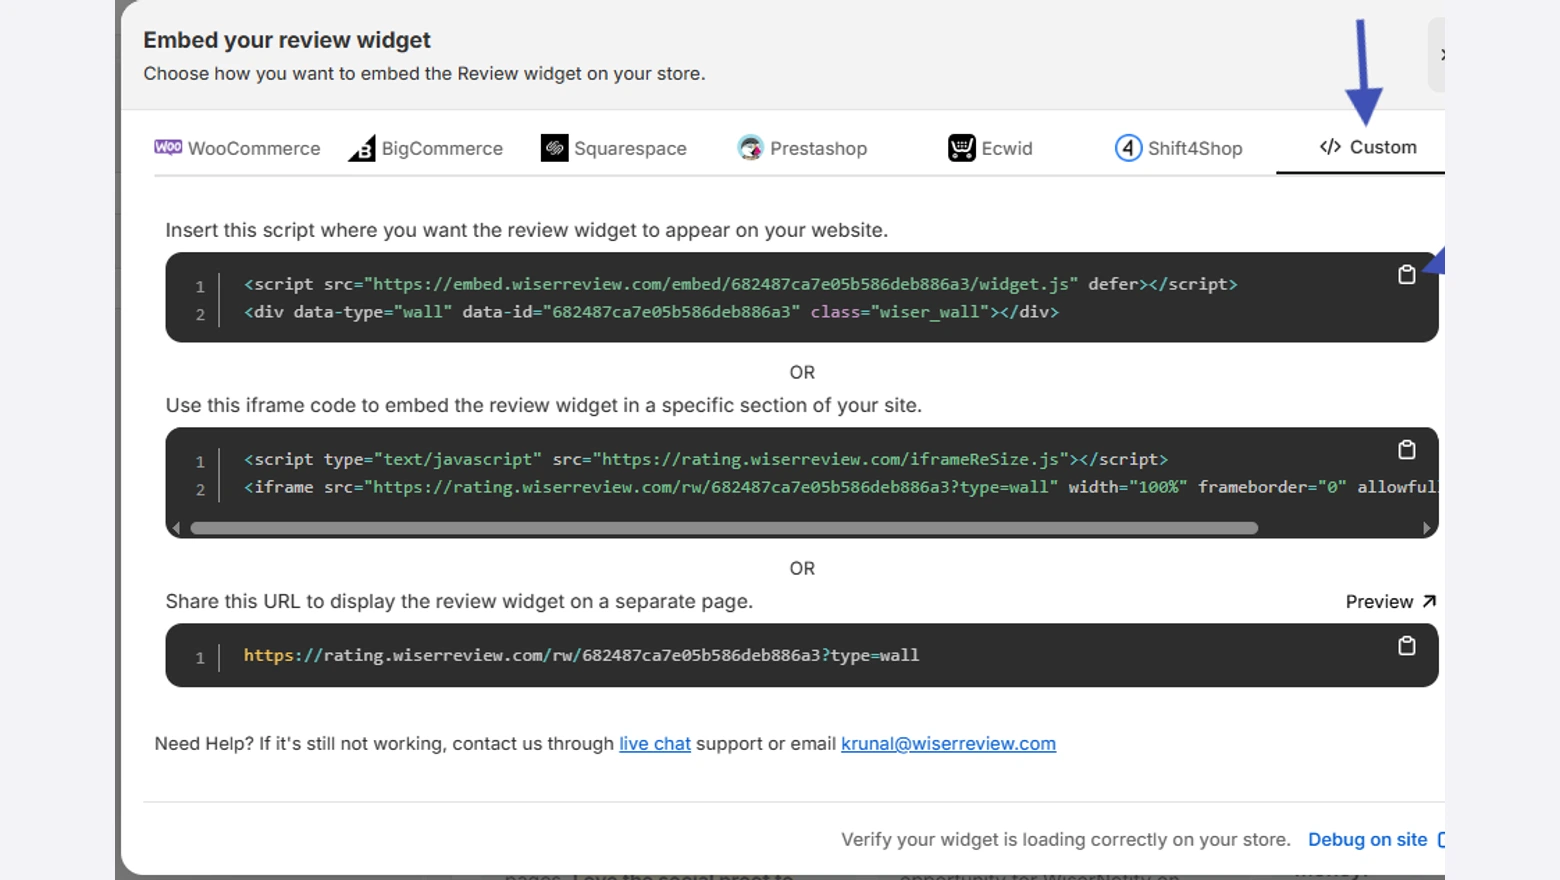
- Press Install in the editor’s top right corner.
- Switch to the Custom tab.
- Copy the first code box. It holds both the script and the widget.
Step 7: Open the Page in Teachable
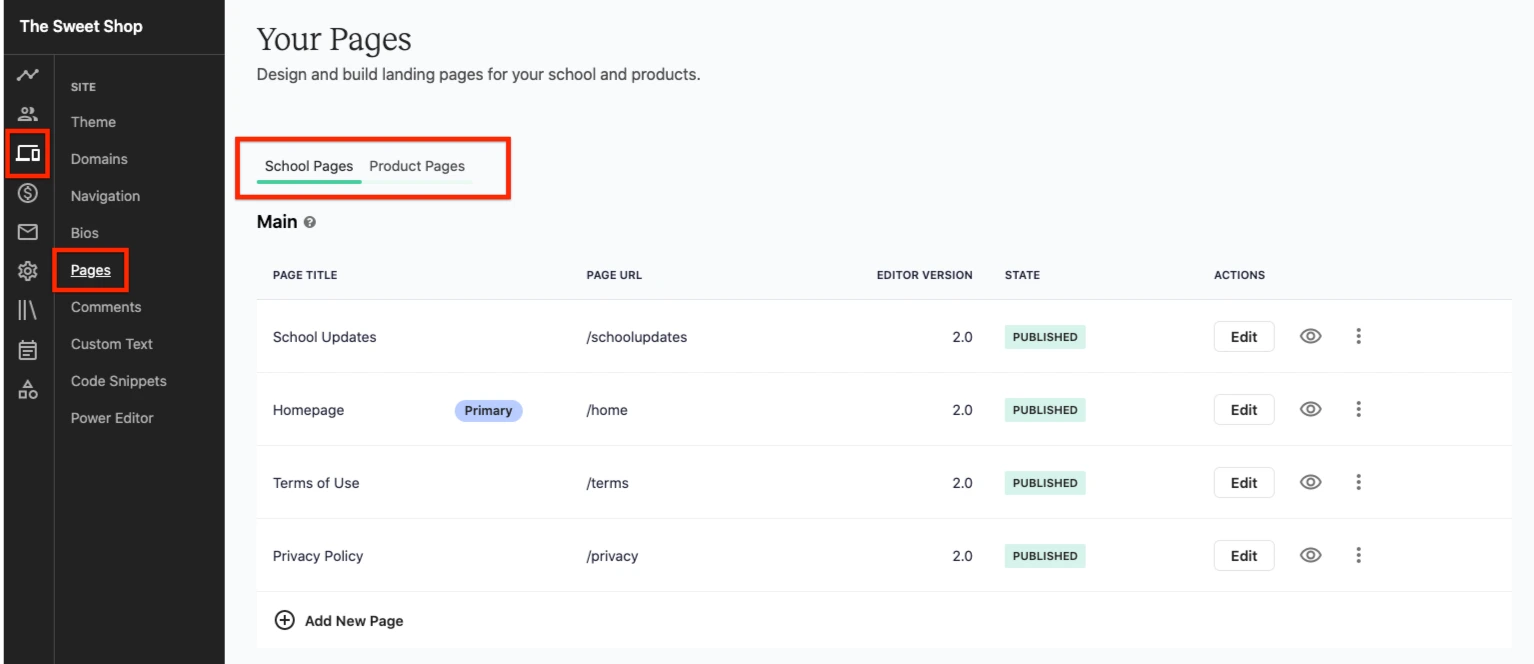 Pages screen with the School Pages and Product Pages tabs and the Edit buttons” width=”1534″ height=”664″ />
- Log in to your Teachable school as the owner.
- Go to Site, then Pages.
- For a course sales page, click the Product Pages tab and choose the course. For the homepage, stay on School Pages.
- Click Edit next to the page.
Step 8: Add a Custom HTML Block
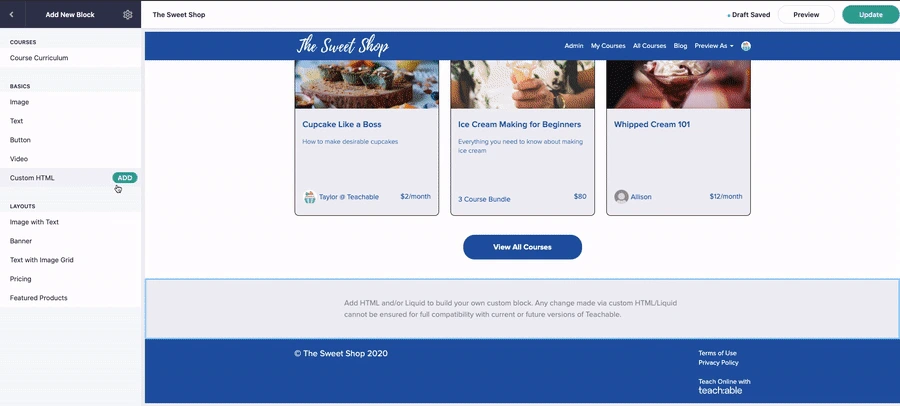
- Click Add New Block at the bottom of the Page Blocks list.
- Under Basics, hover over Custom HTML and click ADD.
- Drag the new block to where the reviews should sit, such as above Pricing.
Step 9: Paste the Code and Update
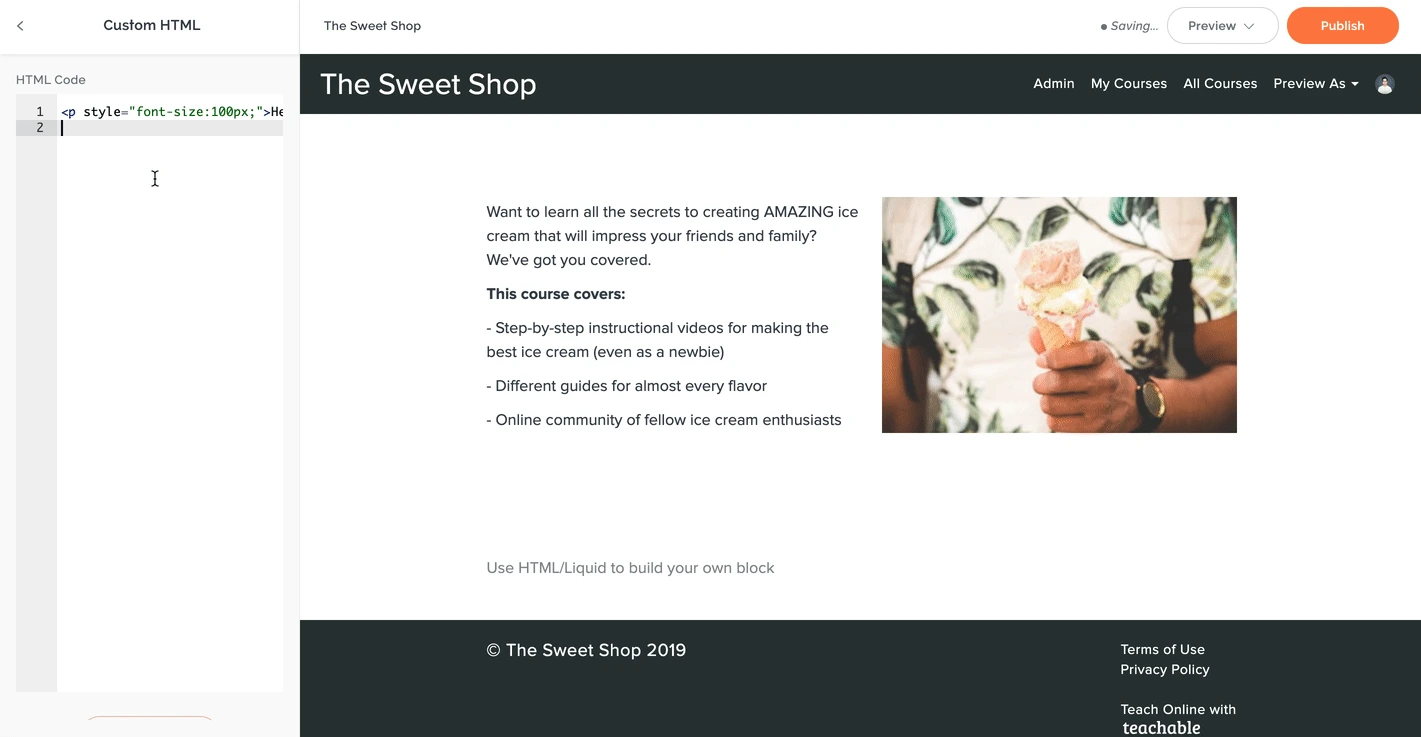
- Click the Custom HTML block to open its HTML Code box.
- Paste the WiserReview code into the box.
- Click Preview to check the page, then click Update, or Publish on a new page.
Add a Sitewide Badge With Code Snippets
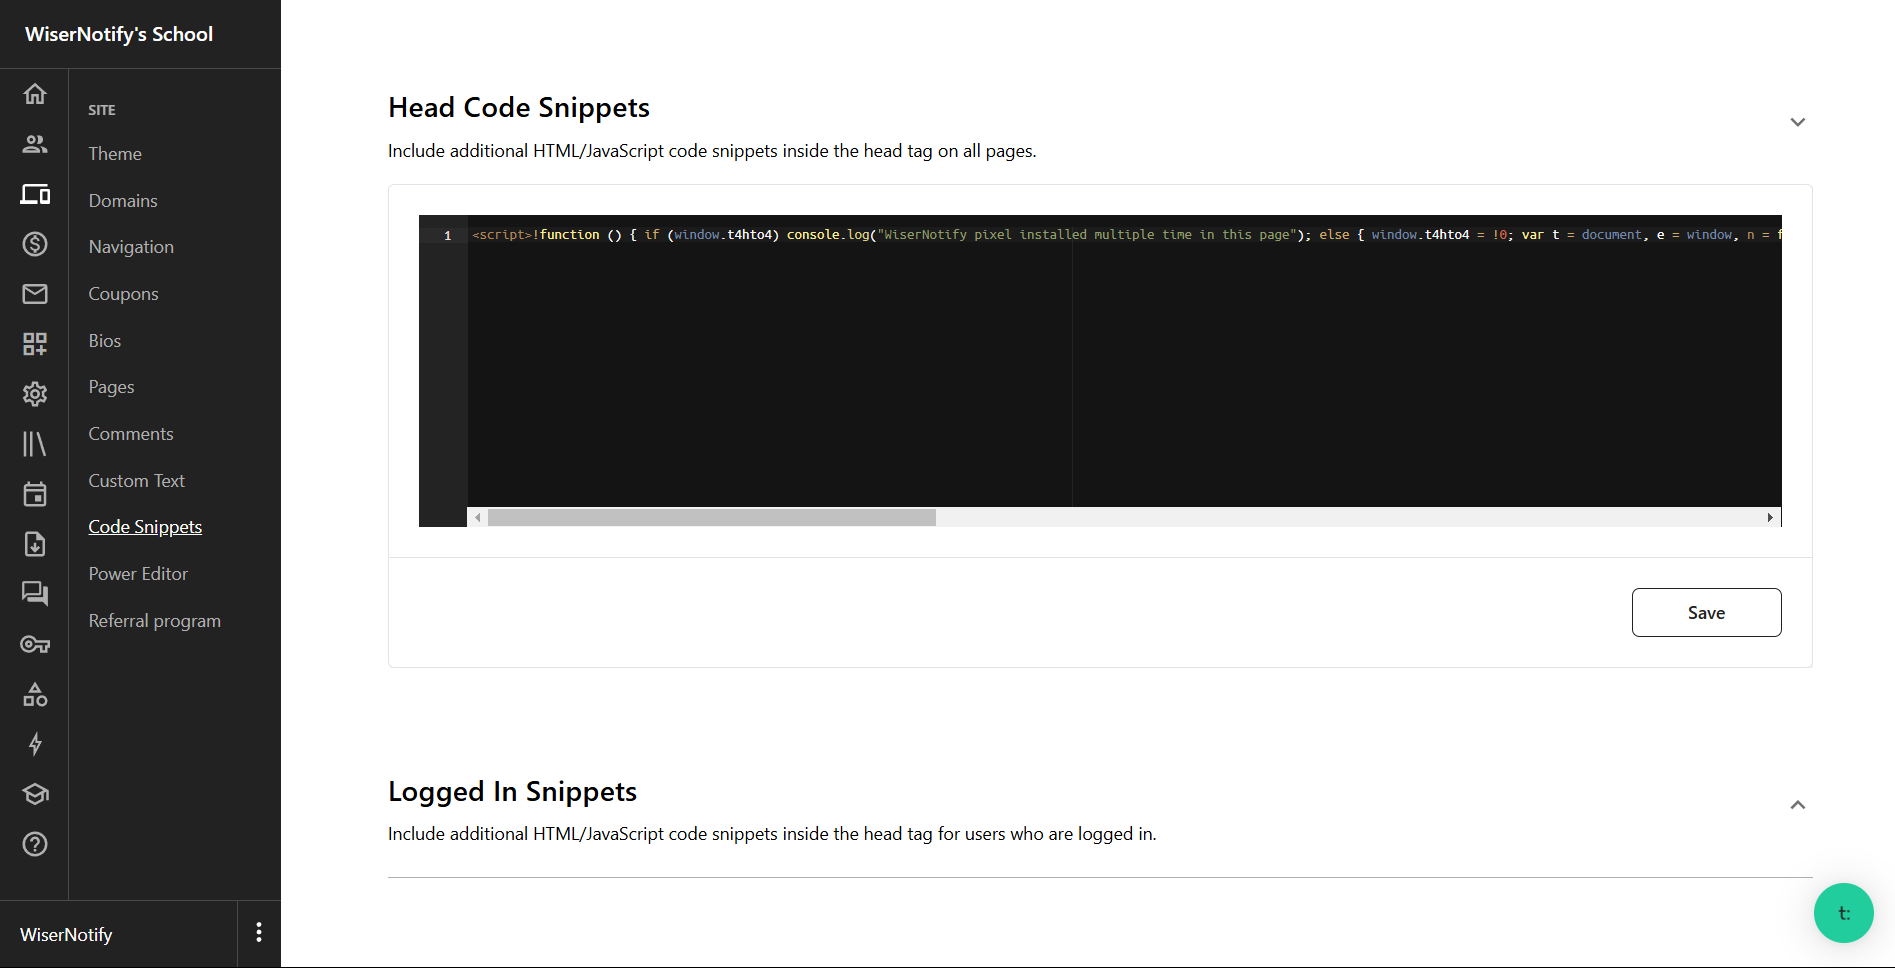
A floating badge sits in the corner of every page, so it needs a sitewide spot rather than a page block. Teachable’s Code Snippets load code across the whole school from one paste.
- Go to Site, then Code Snippets.
- Paste the widget code into Head Code Snippets.
- For visitors only, use Logged Out Snippets instead, so enrolled students don’t see it inside their courses.
- Save, then open your school in an incognito tab to see it the way a visitor does.
Code Snippets need the Builder plan or higher. If your school uses Teachable’s SSO sign-in, snippets don’t load on the sso.teachable.com login and checkout pages.
No Custom HTML Block? Link a Review Page
Teachable keeps Custom HTML off for new schools until Support switches it on. In the meantime, a button can still send visitors to your reviews.
- In the WiserReview Install window, copy the share URL from the Custom tab.
- In Teachable, add a Button block to the sales page.
- Set the button text to something like Read student reviews and paste the URL as its link.
One widget per course page
Filter by course tag, match your theme and paste one code into Teachable.
Ask for a Review When a Student Finishes
The widget stays empty until students write something. On Teachable’s Growth plan or higher, a course completion can trigger the review email for you.

This WiserReview walkthrough covers the automation screens.
Start a Service Businesses Automation
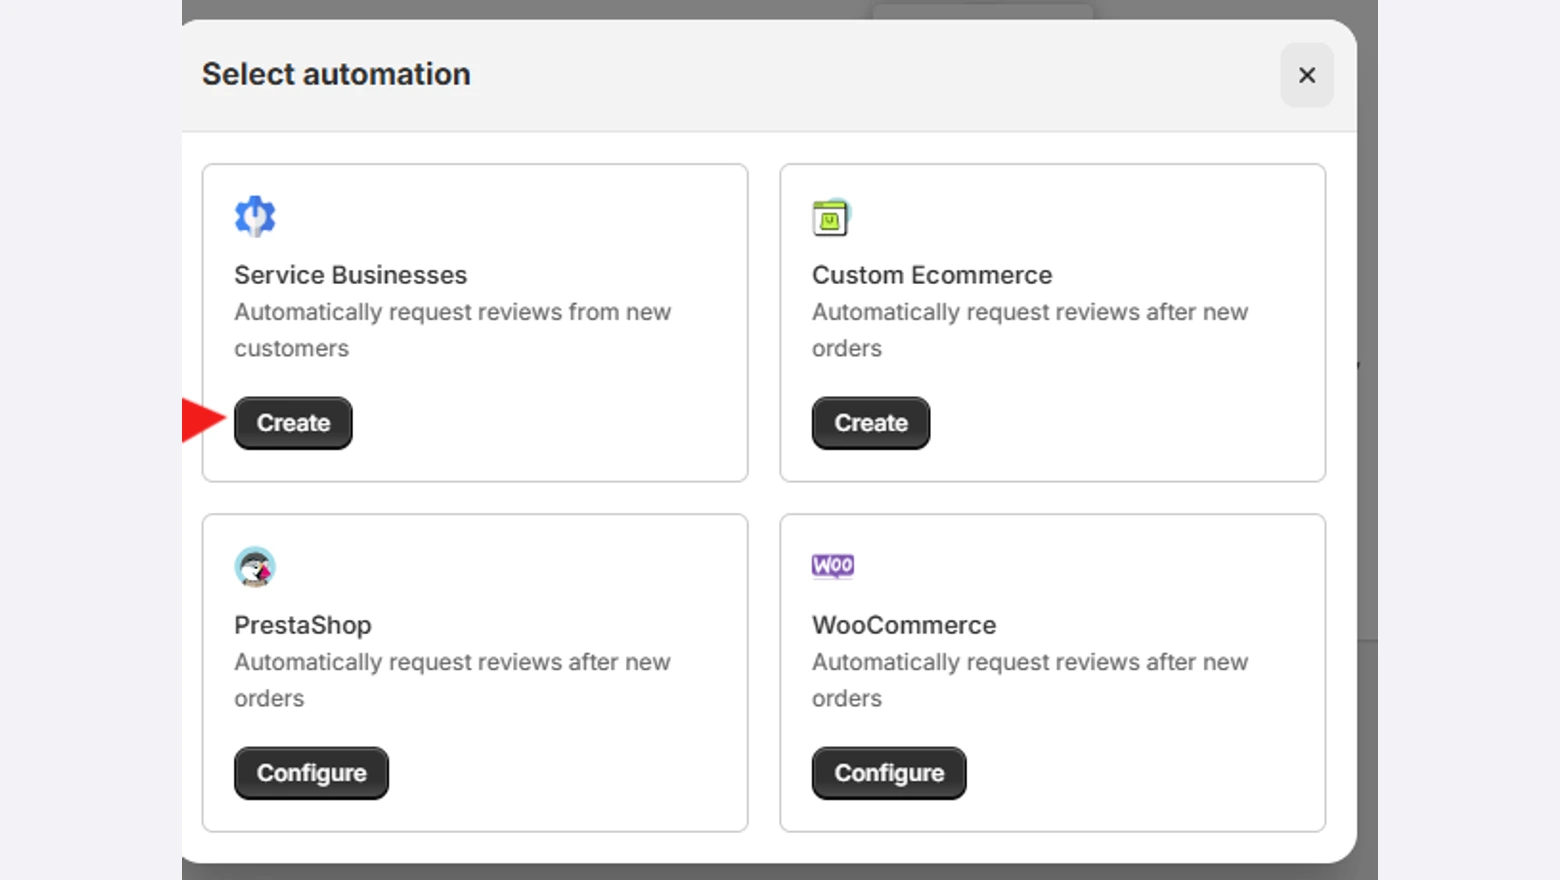
- In WiserReview, open Automate under Collect reviews.
- Click Add automation.
- Under Service Businesses, click Create. The store flows wait for an order to ship, and a course never ships.
- Name the automation after the course, pick the review form the email should open and save.
Connect a Webhook Source
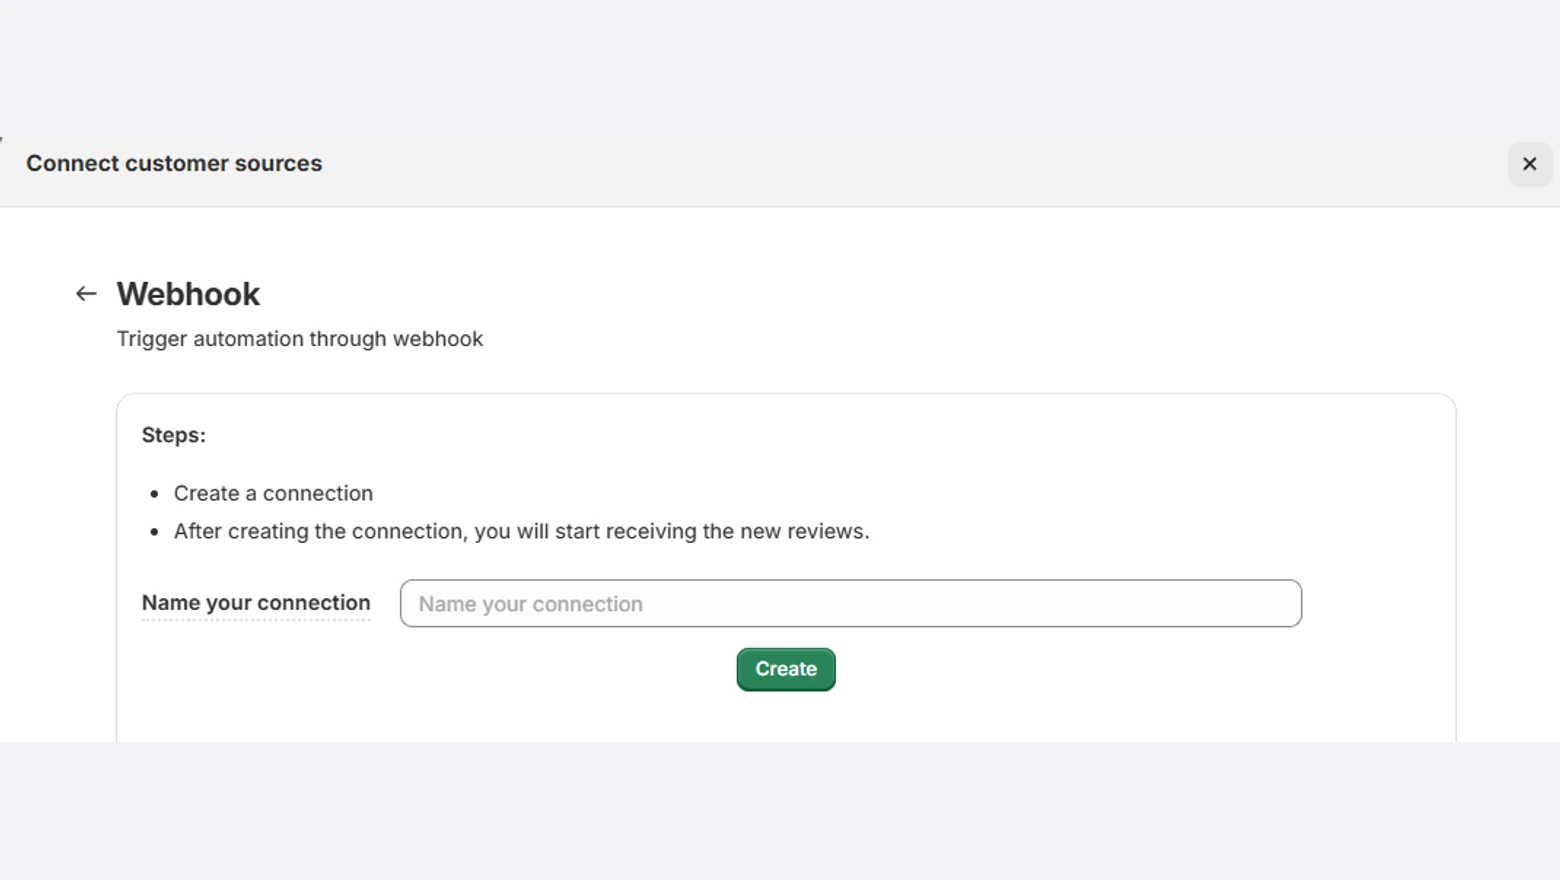
- In the Set review triggers box, click Add a new customer source.
- Pick Webhook from the list.
- Type a name such as Teachable course finished and click Create.
Copy the URL and Turn On Listening
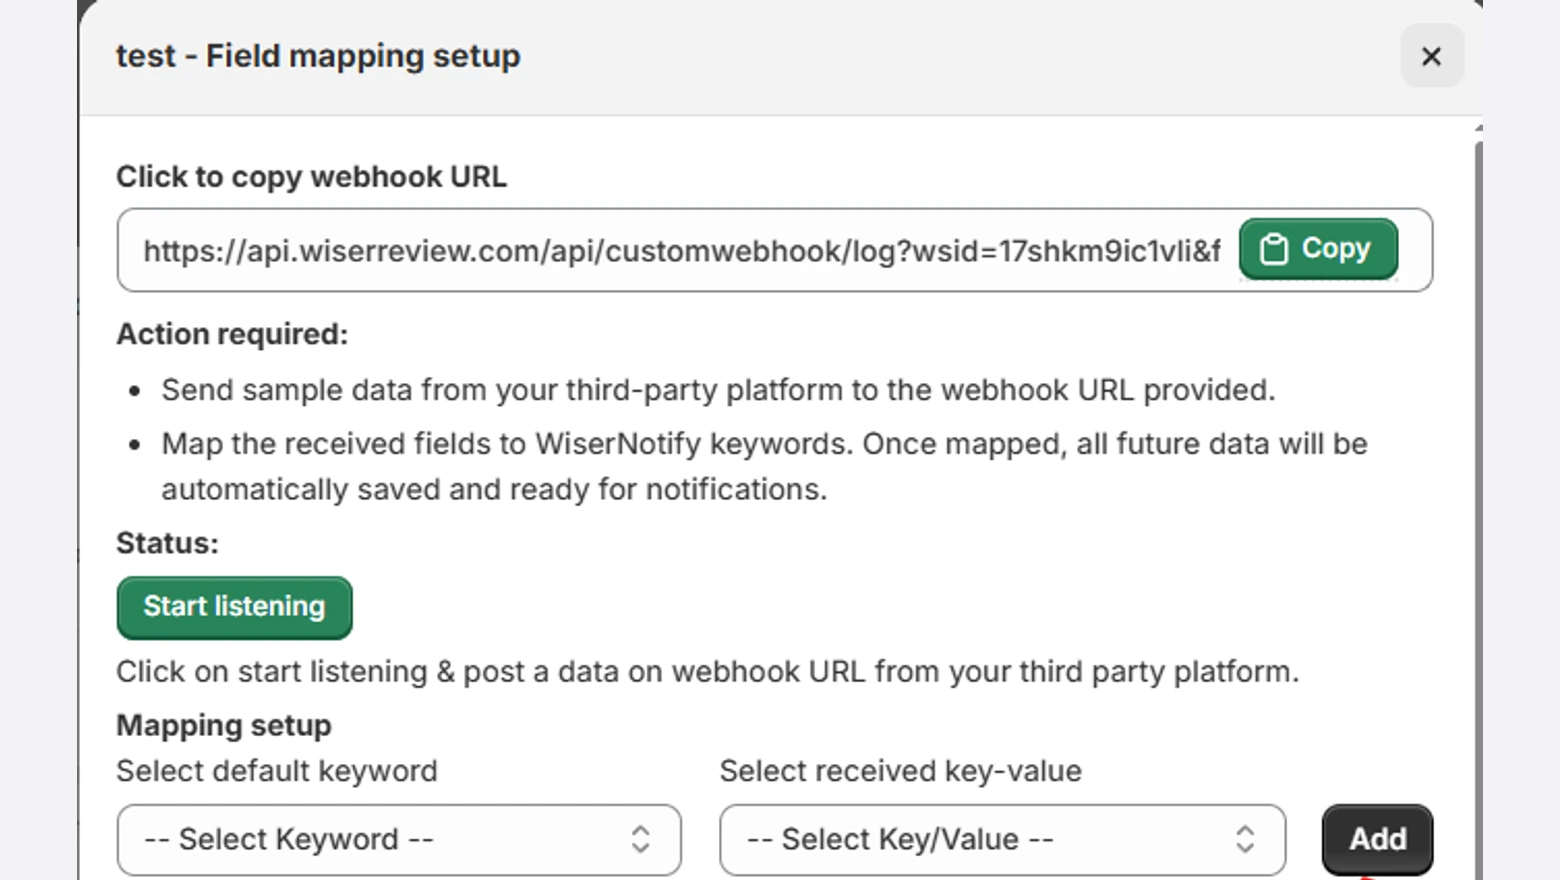
- Open Configure on the connection you just made.
- Copy the webhook URL.
- Click Start listening and leave the window open while you work in Teachable.
Open Webhooks in Teachable
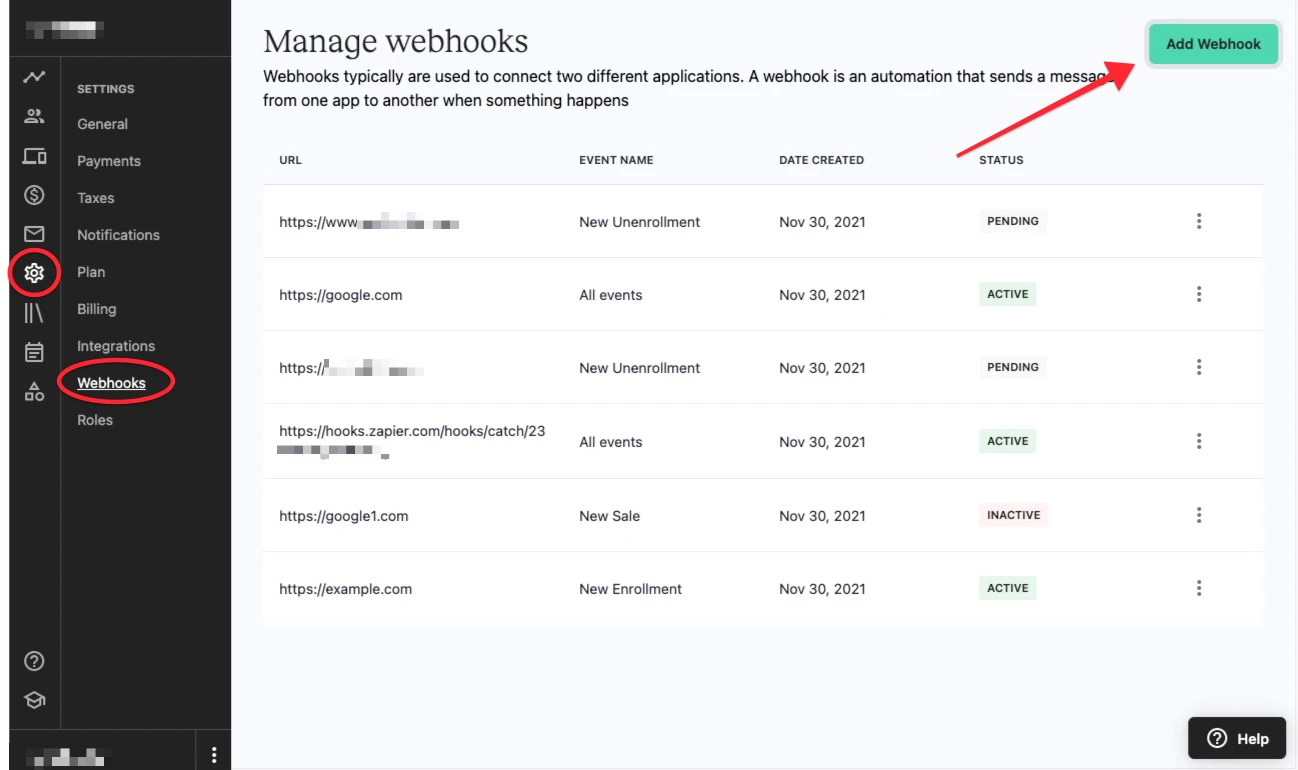
- In your Teachable admin, click Settings in the sidebar.
- Open Webhooks.
- Click Add Webhook, then put the copied WiserReview link in the Webhook URL field.
Choose the Enrollment Completed Event
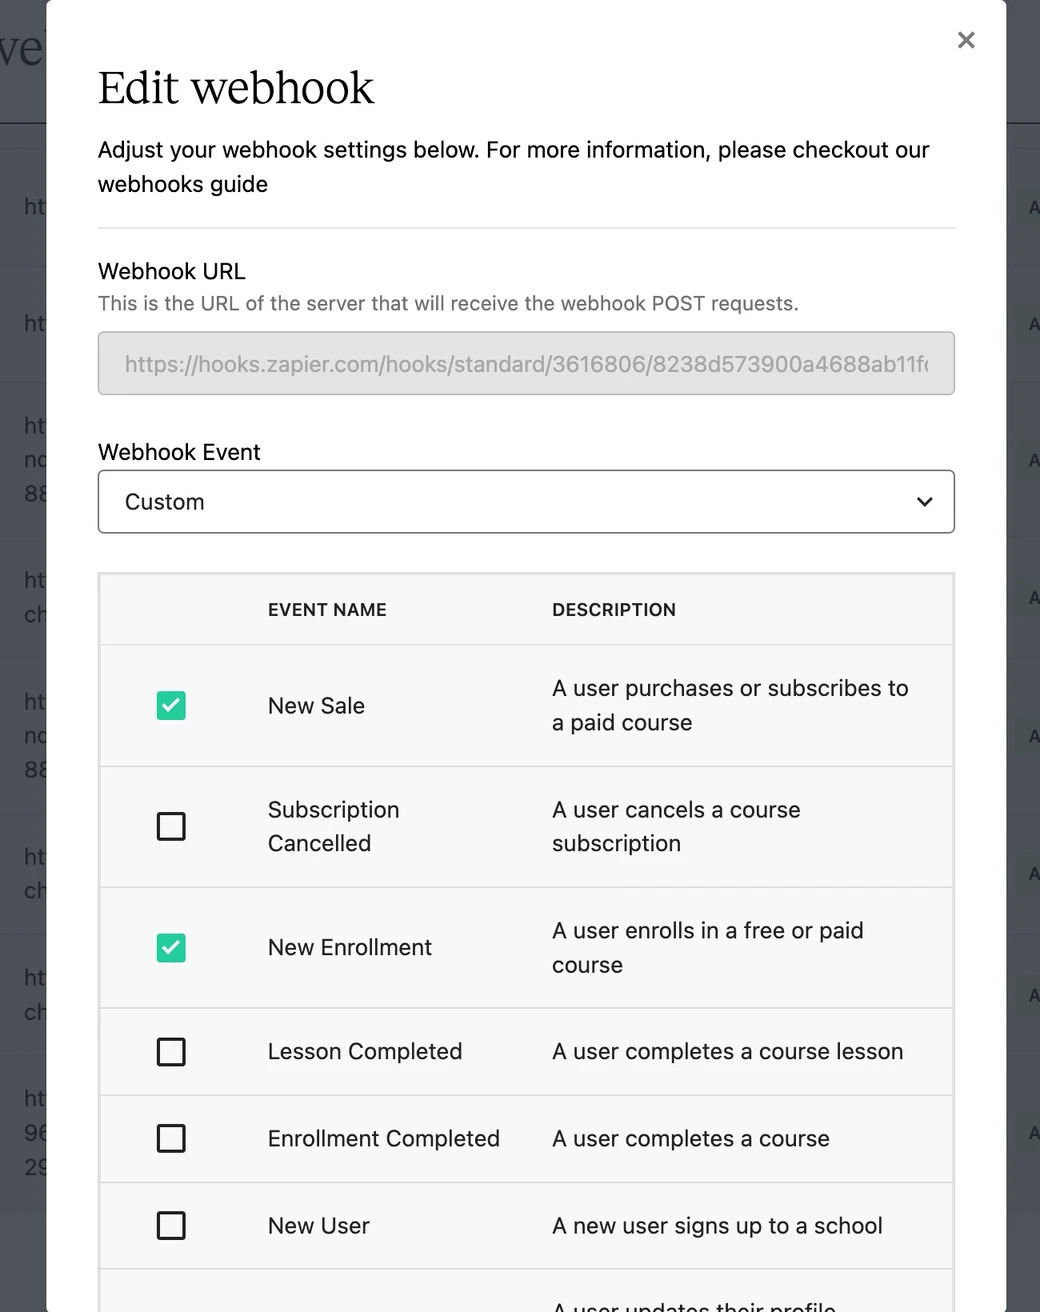
- Set Webhook Event to Custom.
- Tick Enrollment Completed and leave the other events empty.
- Click Save.
Map the Student Fields and Delay
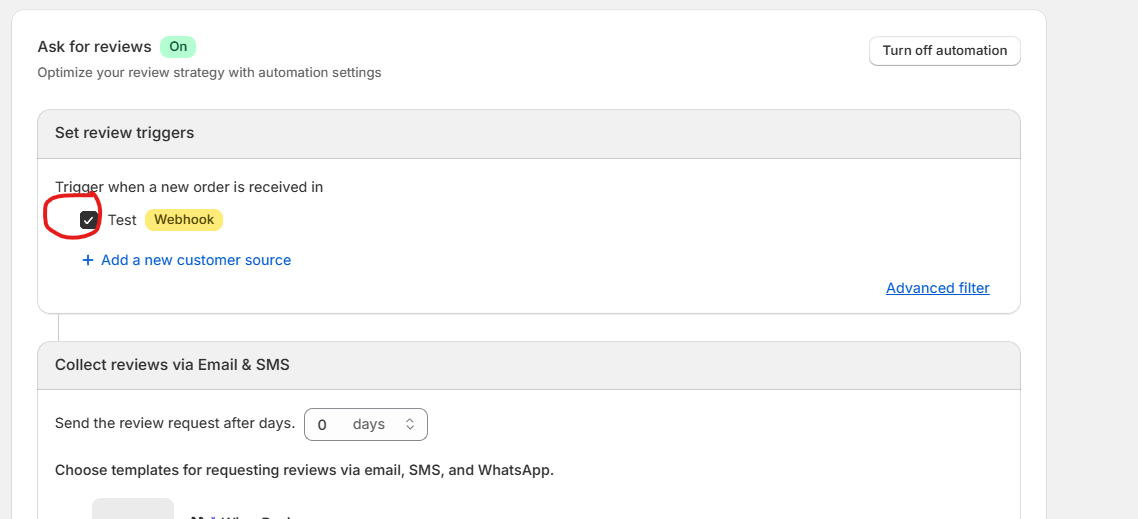
- Have a test student finish the course so Teachable sends sample data.
- Back in WiserReview, map Email to the student’s email and First Name to their name. Press Add after each one.
- Close the mapping window, then tick Teachable course finished in the trigger list.
- Set how many days to wait before the email goes out.
Enrollment Completed fires only when a student reaches 100% of a course. If many stop short of the final lecture, send them the manual request from Step 2.
Where Should Reviews Go on a Teachable Course Page?

On a Teachable sales page, reviews work best between the curriculum and the pricing block. That’s the moment a visitor has seen what’s inside and starts weighing the price.
Each spot calls for a different widget type.
| Widget type | Teachable page | Where it belongs |
|---|---|---|
| Wall of love filtered to one course | Course sales page | Below Course Curriculum, above Pricing |
| Carousel | School homepage | Under the Featured Products block |
| Trust badge with the star average | Sales page hero | Right under the first enroll button |
| Video reviews | Coaching or high-ticket course page | Next to the pricing plans |
| Floating badge | Every public page | Site > Code Snippets, logged out |
Keep reviews off lecture pages. Your students already paid, and a popup over a video lesson only gets in the way.
Reviews pair well with live enrollment proof, like a sales notification popup on Teachable on the same sales page.
Want a handful of curated quotes with student photos instead? That’s a testimonial job, covered in the add testimonial to Teachable guide.
Star ratings from your Google Business Profile follow a separate setup, explained in add Google reviews to Teachable.
Reviews Not Showing on Teachable?
When reviews don’t load on Teachable, the page usually wasn’t updated after the paste, the code sits in the wrong snippet, or the filter has nothing to show.

- Pasted but not saved: the code only goes live after you click Update or Publish.
- Logged-in snippet only: code in Logged In Snippets never loads for visitors. You’re logged in as the owner, so it looks fine to you.
- Tag with nothing published: the widget only shows published reviews that carry the tag. Publish two or three, or drop the filter while you test.
- Script blocked: paste the iframe code from the same Custom tab instead.
- Nothing at all: reopen Install in WiserReview and run Debug on site. It reports whether the script reaches the page.
Let past students sell the next seat
Turn course feedback into star ratings on your Teachable sales pages.
Wrap Up
Teachable leaves reviews to you, and one Custom HTML block fills the gap.
Pick the course that already sells best and test there first. Once its wall is live, repeat the block on the next course and swap the tag.
Related Post
Frequently Asked Questions
Does Teachable have a built-in review feature?
No. Teachable has no review or star rating block, so course reviews come from a widget you embed in a Custom HTML block.
How do I add reviews to a Teachable course page?
Build a review widget in WiserReview, copy its code and paste it into a Custom HTML block on the course sales page. Click Update to make it live.
Why can't I find the Custom HTML block in Teachable?
Teachable keeps Custom HTML switched off for new schools. Ask Teachable Support to turn it on, or link a button to your review page in the meantime.
Which Teachable plan do I need for Code Snippets?
Site Code Snippets start on the Builder plan, so a sitewide review badge needs Builder or higher.
Can each Teachable course show only its own reviews?
Yes. Tag each review with its course in WiserReview, then filter the widget by that tag before you copy the code.

Krunal Vaghasiya is a marketing tech expert who boosts e-commerce conversion rates with automated social proof and FOMO strategies. He loves to keep posting insightful posts on online marketing software, marketing automations, and improving conversion rates.




 Capterra