
How to Add a Sales Popup on Wix (Step-by-Step)

To add a recent sales popup to Wix, paste the WiserNotify pixel into Settings > Advanced > Custom code, then build a Recent Sales popup in the dashboard. Custom code needs a Wix premium plan with a connected domain.
There is no free plan, but every plan starts with a 7-day free trial, so you can test the popup on your live site first.
Do Sales Popups Work on Wix?
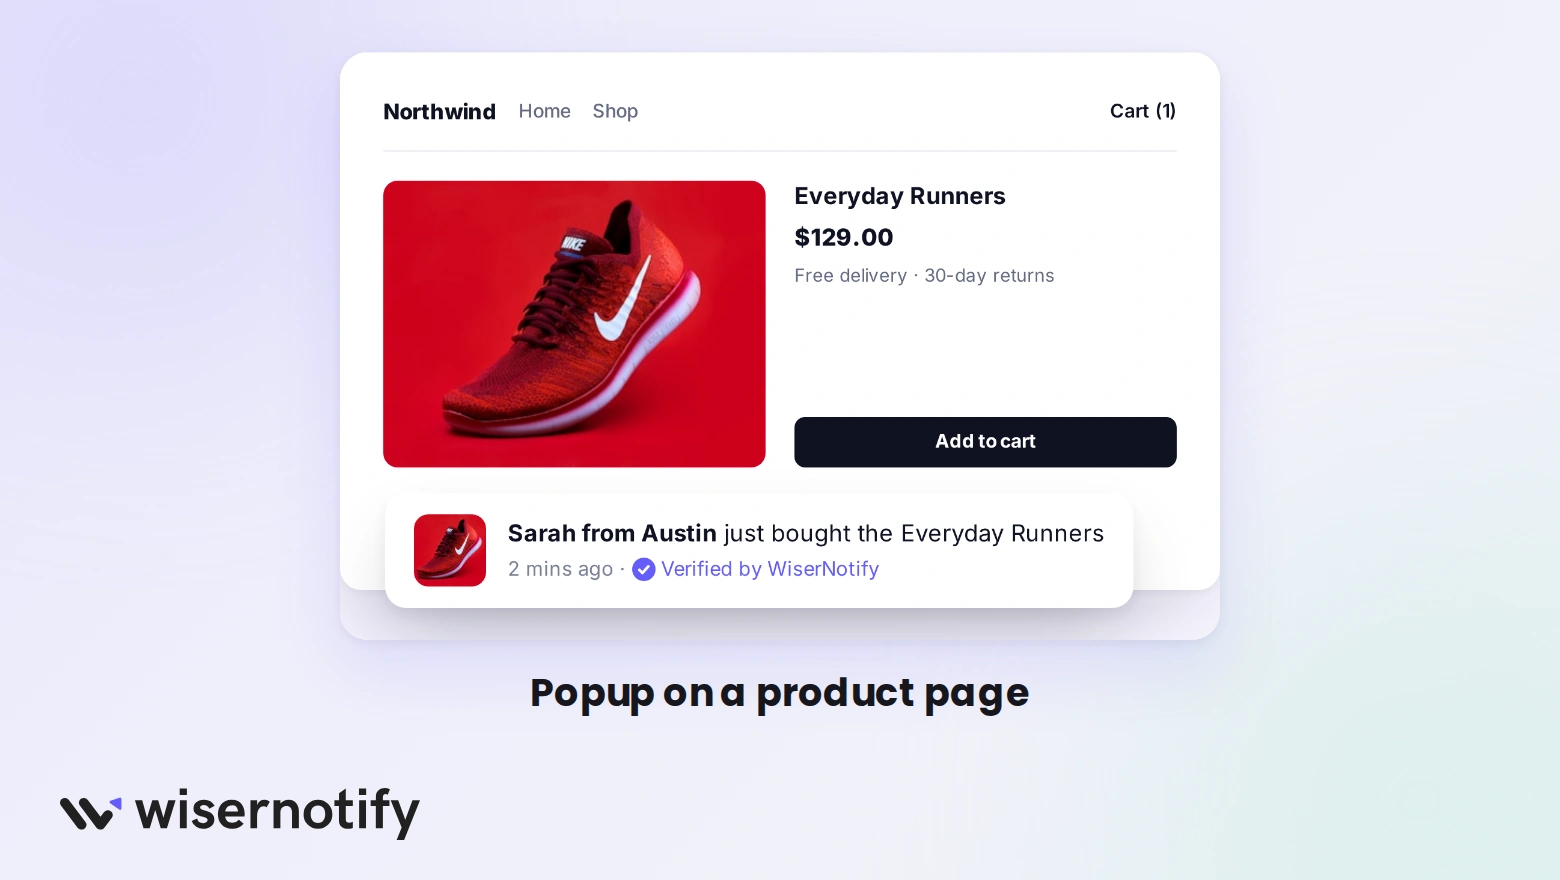
Yes, when they show real purchases. A popup like “Sarah from Austin just bought the Everyday Runners” tells a first-time visitor that other people already trust your store.
That matters on Wix, where many stores are new and have few reviews. A popup puts social proof on the page at the moment someone is deciding, which eases doubt and helps cut cart abandonment.
It also points shoppers toward what is selling, so your popular products get more attention.
What Can a Wix Sales Popup Show?
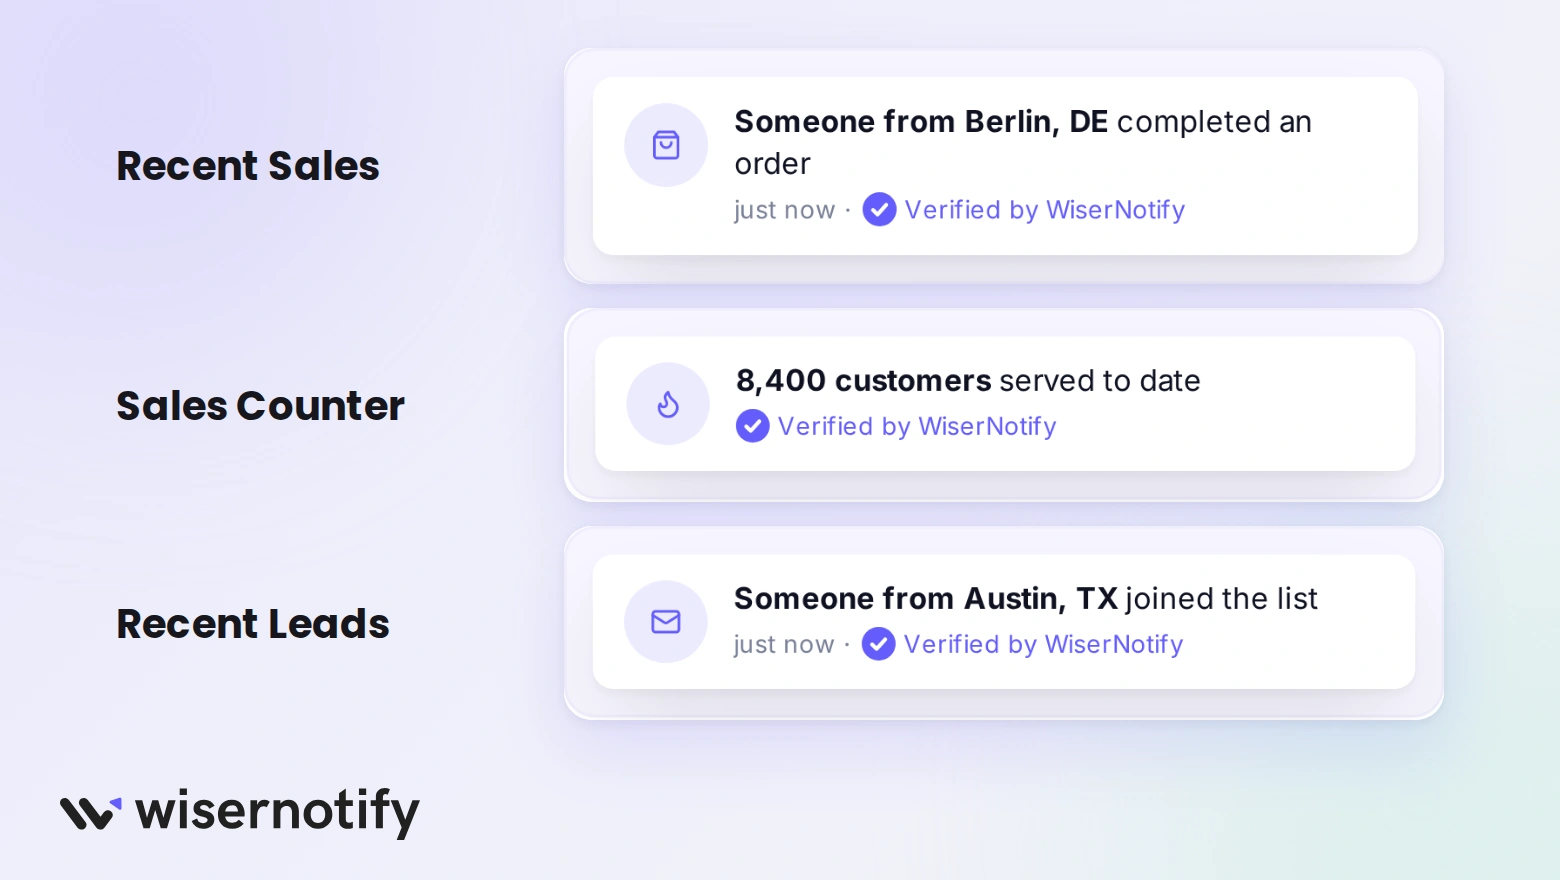
- Recent Sales: the buyer’s name, location, product, and how long ago they bought.
- Sales Counter: the number of sales over a period you pick, such as the last day.
- Recent Leads: sign-ups from your Wix forms, which the pixel captures on its own.
What You Need Before You Start
- A Wix site on a premium plan with a connected domain, since Custom code is locked on free Wix sites.
- A WiserNotify account, which step 1 sets up.
- Orders or form sign-ups on the site, so the popup has real activity to show.
How to Add a Sales Popup on Wix
WiserNotify’s Wix video is below, and every step is written out under it.
Step 1: Sign Up for WiserNotify
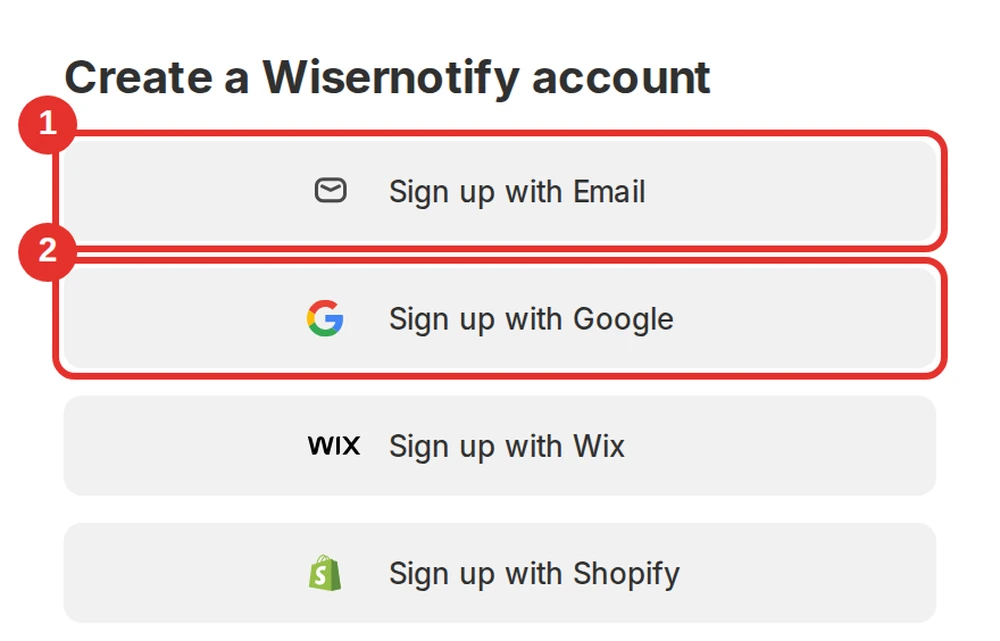
- Go to the WiserNotify sign-up page. Your 7-day free trial starts right away.
- Choose Sign up with Email or Sign up with Google, then complete the form.
Already registered? Press Log in and move on to step 2.
Step 2: Copy Your Pixel

- In WiserNotify, open the Install Pixel page.
- Press Copy code.
Step 3: Open Custom Code in Wix
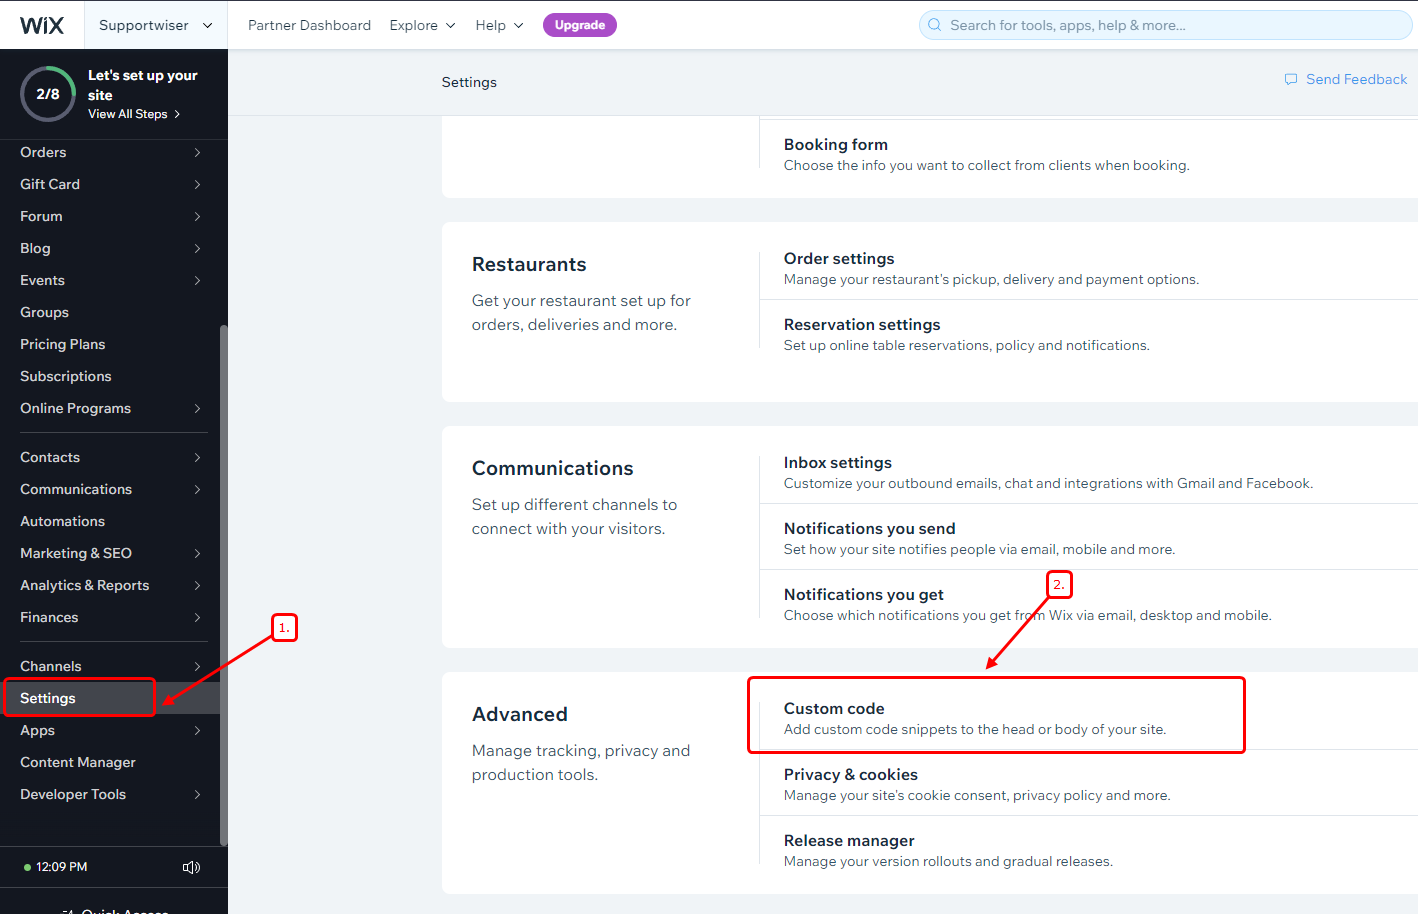
- Log in to your Wix dashboard.
- Click Settings.
- Under Advanced, click Custom code.
Step 4: Add Code in the Head Section
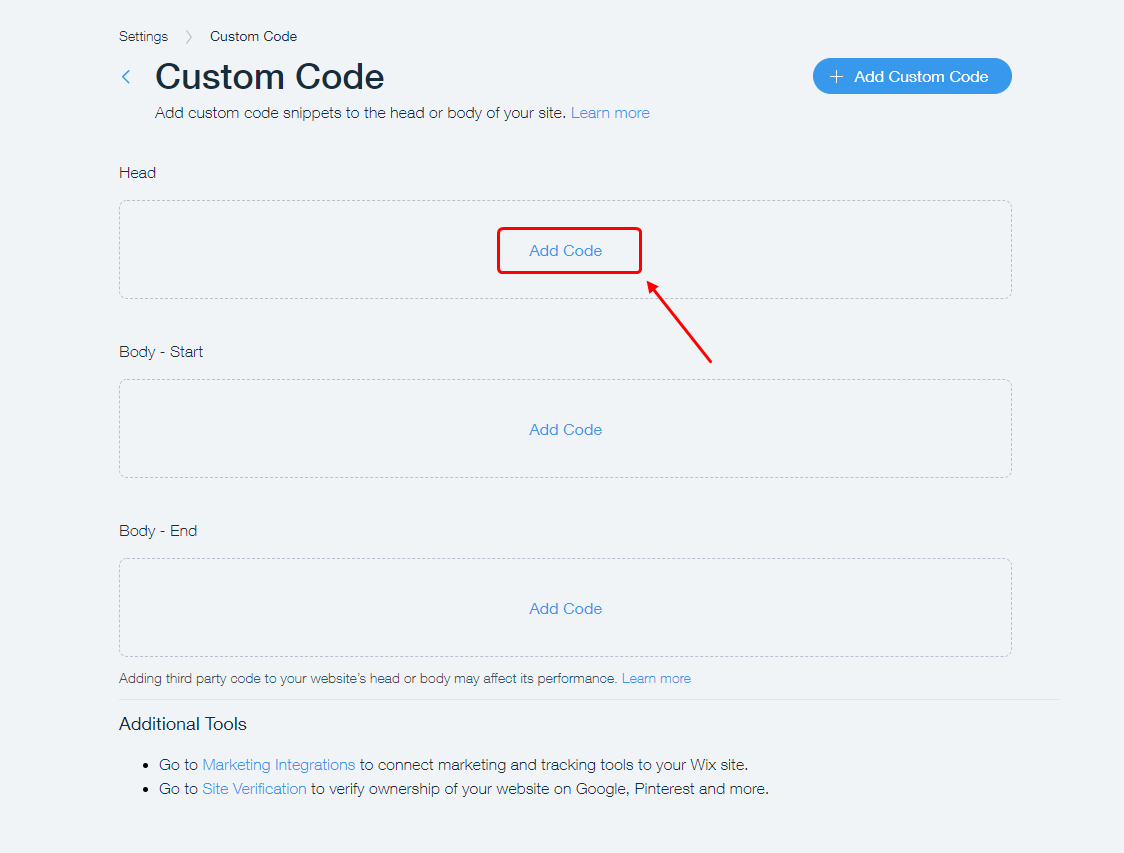
- On the Custom Code page, find the Head section.
- Click Add Code.
Step 5: Paste the Pixel and Apply
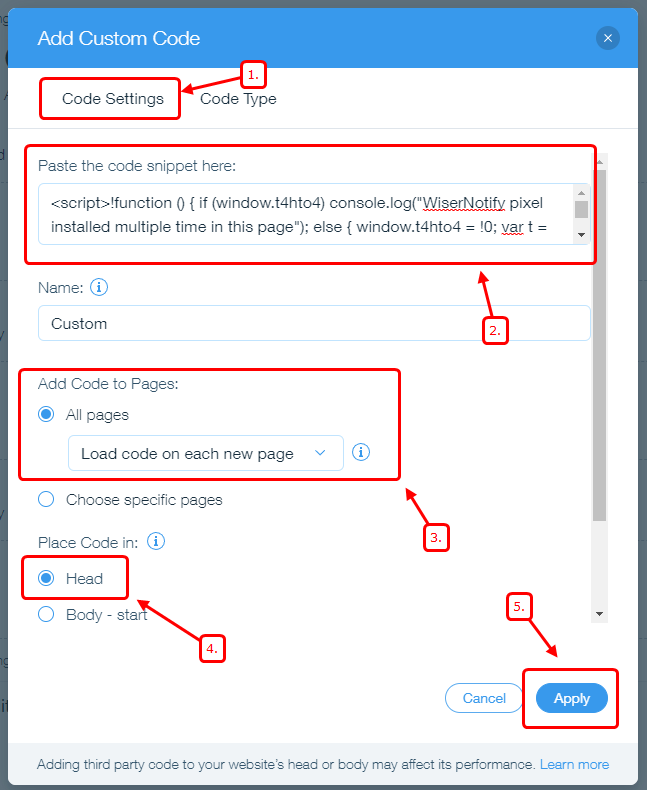
- Paste the pixel into the Paste the code snippet here box.
- Type a name, such as WiserNotify.
- Under Add Code to Pages, choose All pages and Load code on each new page.
- Under Place Code in, choose Head.
- Click Apply.
Step 6: Verify the Pixel

- Open your Wix site once so the pixel loads.
- Go back to the WiserNotify Install Pixel page.
- Press Verify pixel installation and look for the Pixel Active message.
Step 7: Create a Recent Sales Popup
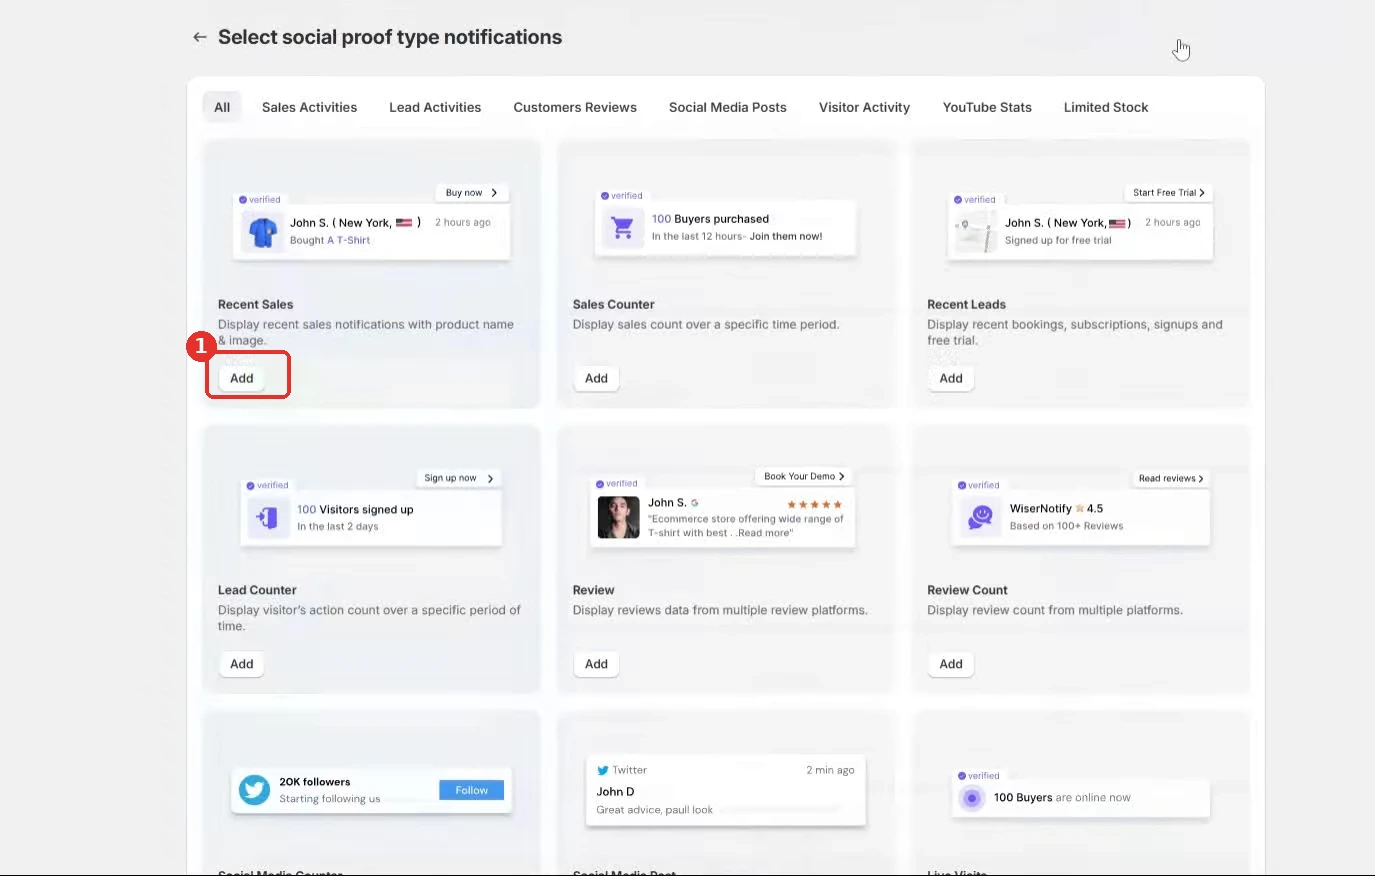
- In WiserNotify, press + Add notification.
- Find Recent Sales and press Add.
Prefer a running total? Pick Sales Counter instead. Every other step stays the same.
Step 8: Name It and Add Your Site
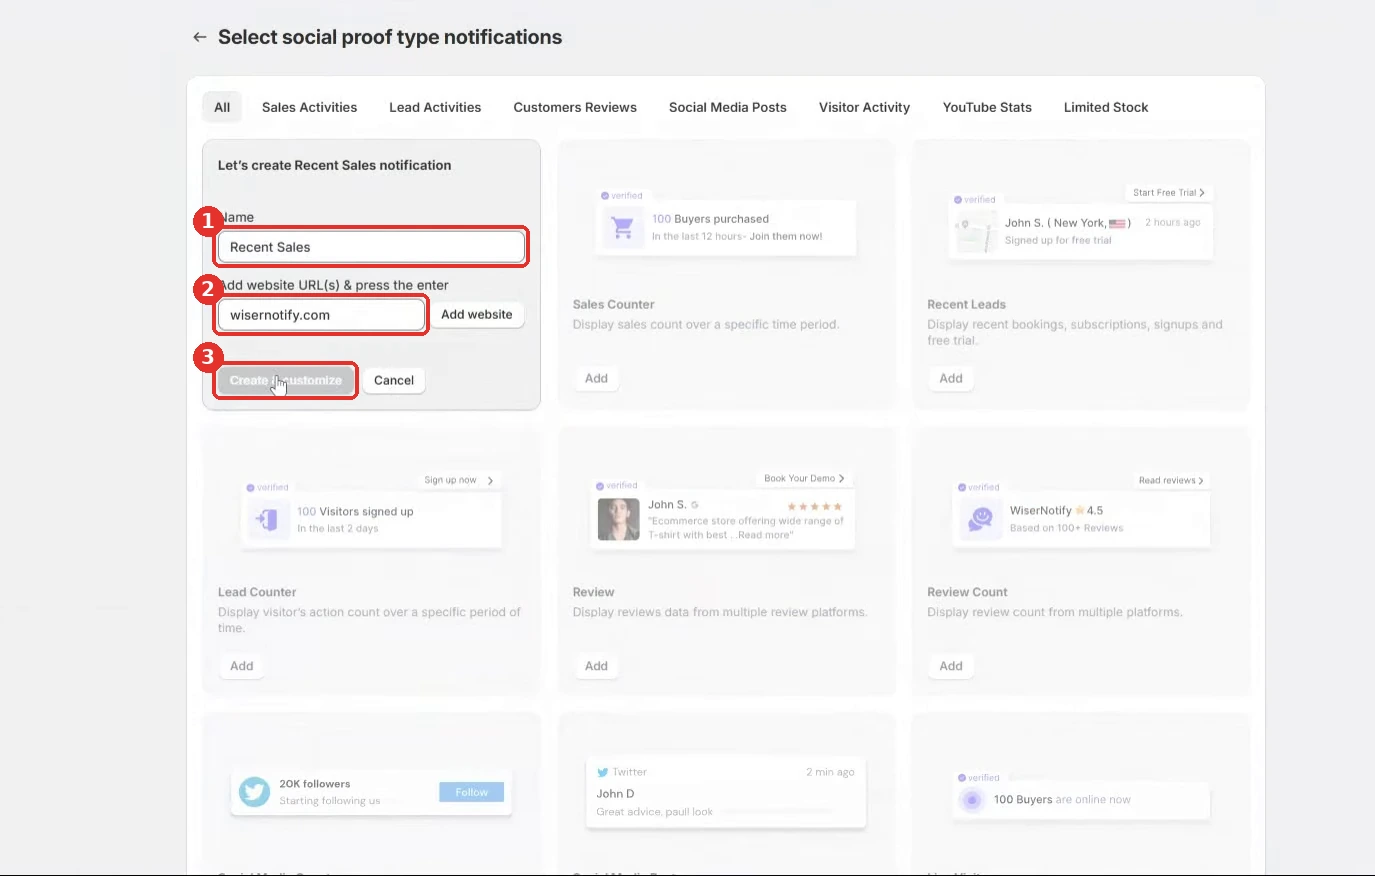
- Type a name, such as Wix store sales.
- Enter your Wix site URL and press Add website.
- Press Create & Customize.
Step 9: Design the Popup
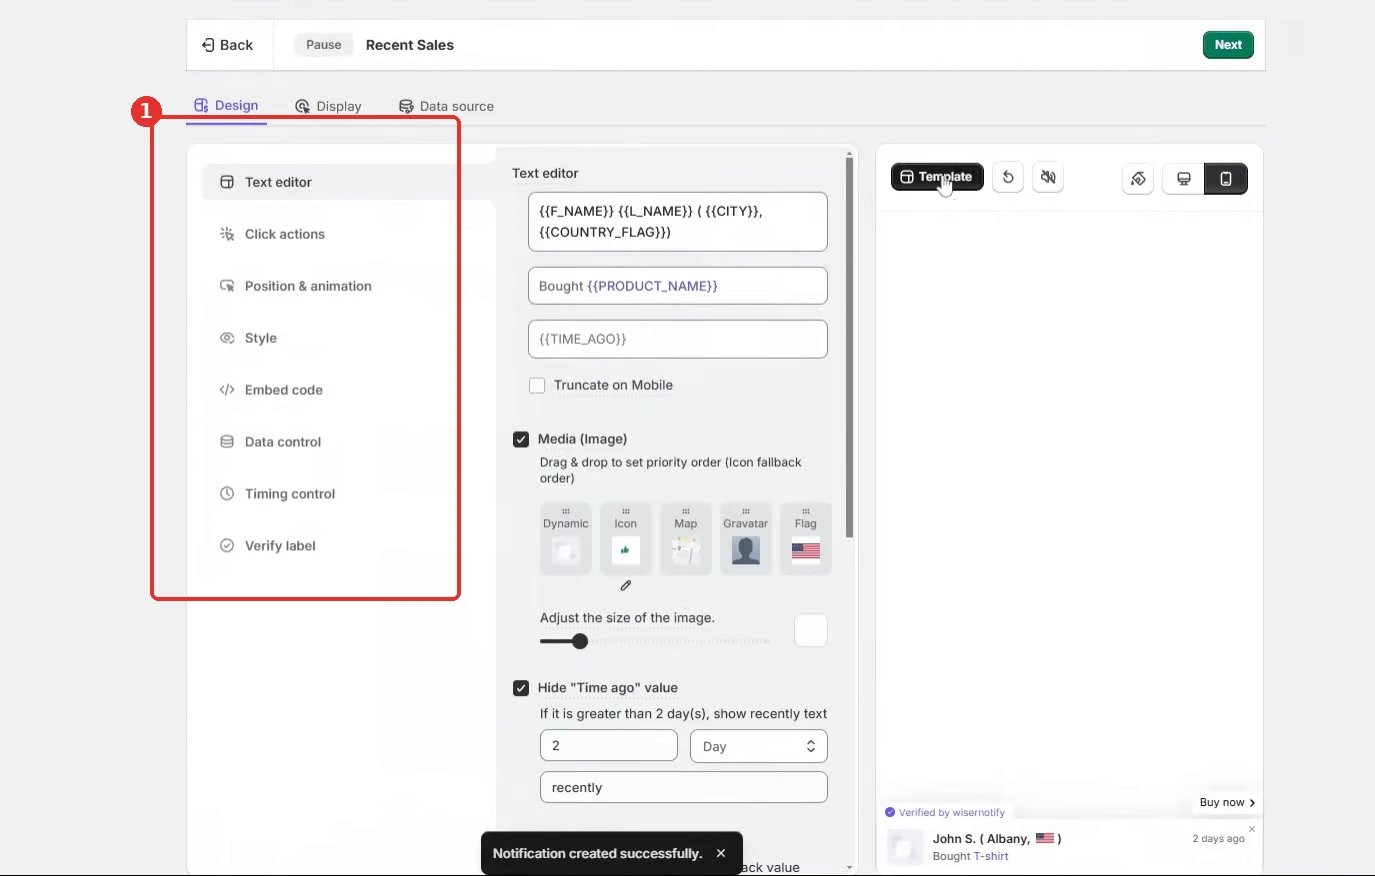
- In Text editor, edit the wording. Placeholders like {Name}, {Location}, and {Product} fill in real details.
- In Click actions, turn on a button such as Buy now that links to a product page.
- In Position & animation and Style, match your Wix theme colors and pick a corner.
- In Timing control, set a short delay before the first popup.
- Press Save.
Step 10: Choose Where It Shows
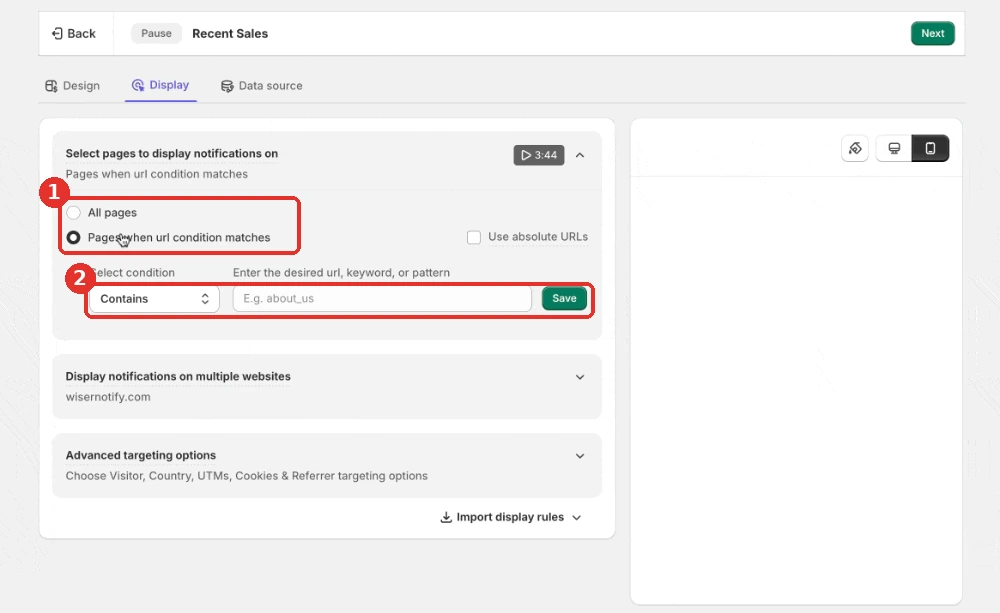
- Use Next to reach the Display tab.
- Choose All pages, or set Pages when URL condition matches.
- To keep the popup on product pages, add a rule for /product-page/, which Wix product URLs usually contain.
Step 11: Connect Data and Publish
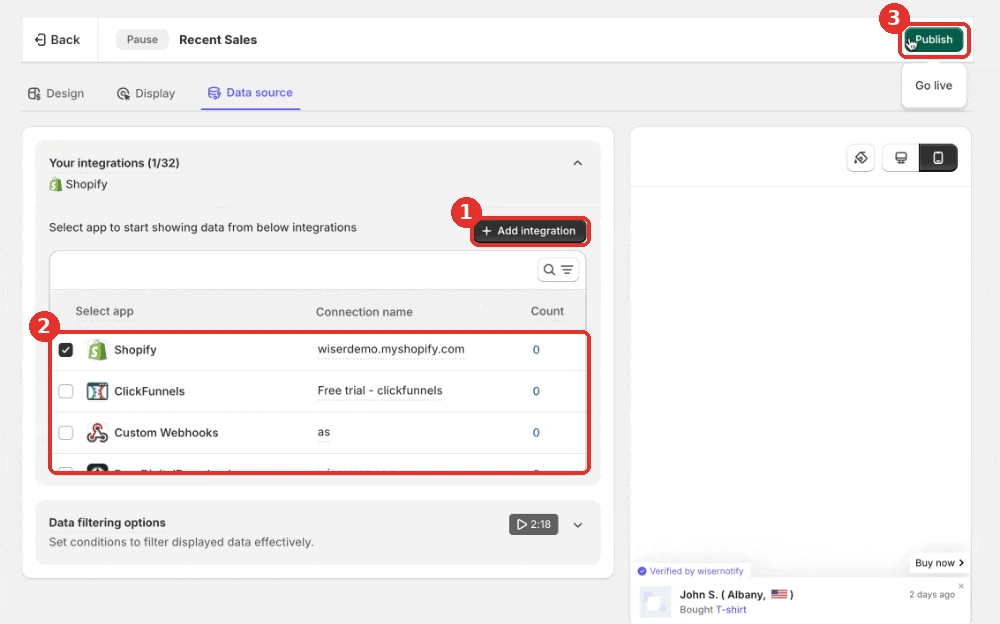
- Use Next to reach the Data source tab.
- Tick your Wix connection. Not listed? Press + Add integration and choose Wix.
- Press Publish, then Turn on when asked.
- Publish your Wix site if you have other unpublished edits.
- Load your Wix site in a private window to see the popup live.
For more detail, see WiserNotify’s Wix pixel guide and Recent Sales guide.
Build trust & FOMO
Highlight real-time activities like reviews, sales & sign-ups.
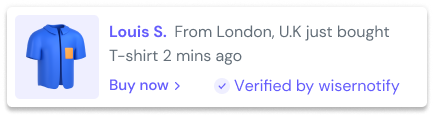

Show Wix Form Sign-Ups as Popups
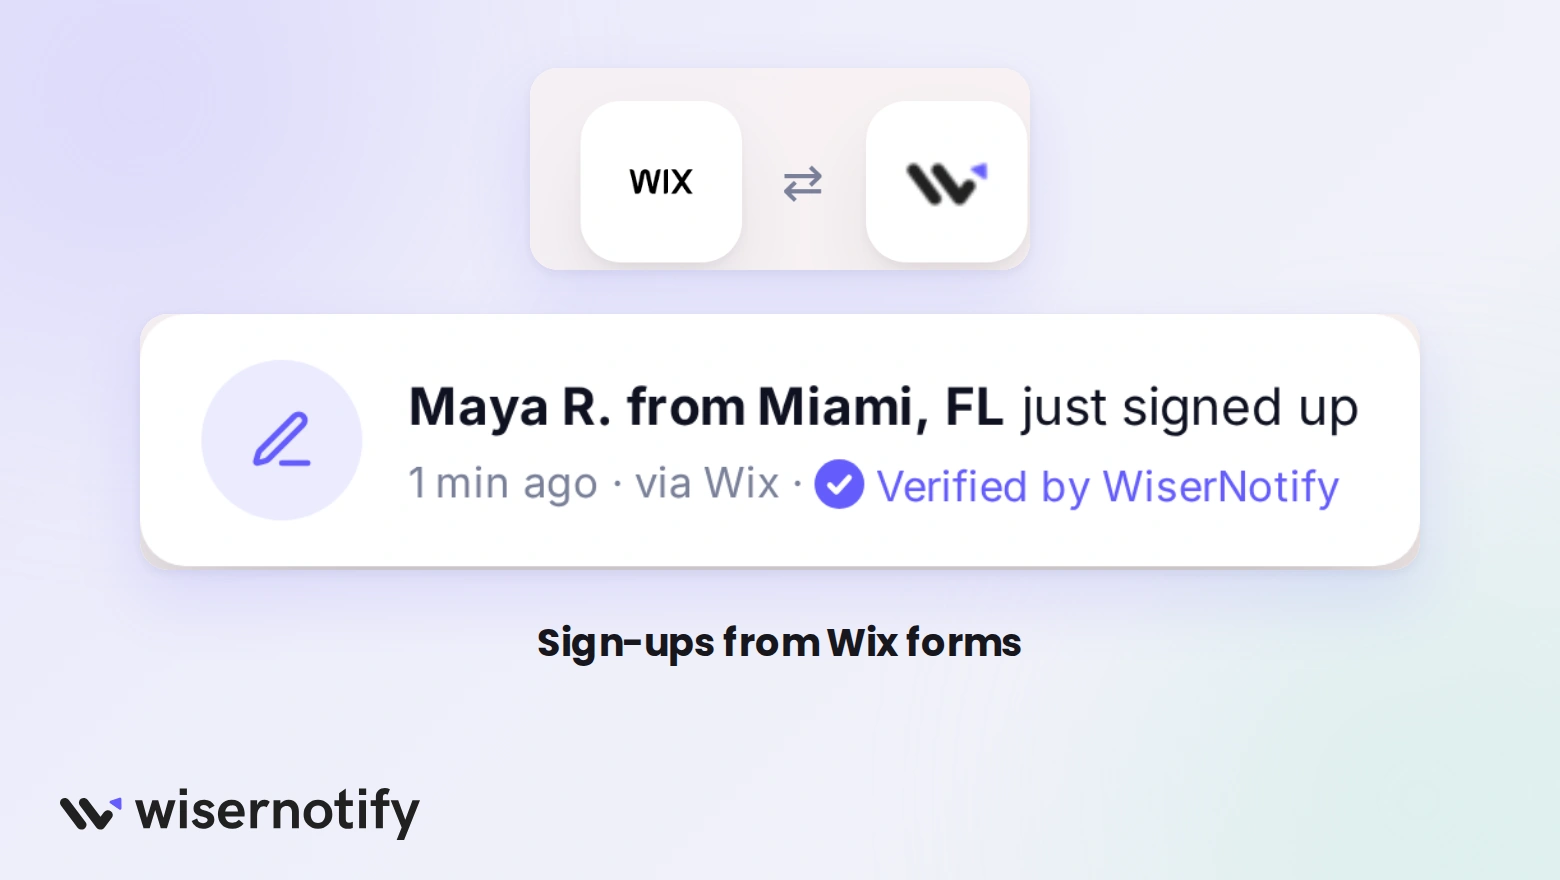
The pixel also catches form submissions on your Wix site, so newsletter joins and contact forms can show as Recent Leads popups.
- Create a Recent Leads notification in step 7 instead of Recent Sales.
- In the Data source tab, capture from all pages or only from pages that match a rule.
- The pixel collects the name, IP, and location from the form.
See the form capture guide for the URL rules.
Popup Not Showing Up on Wix?
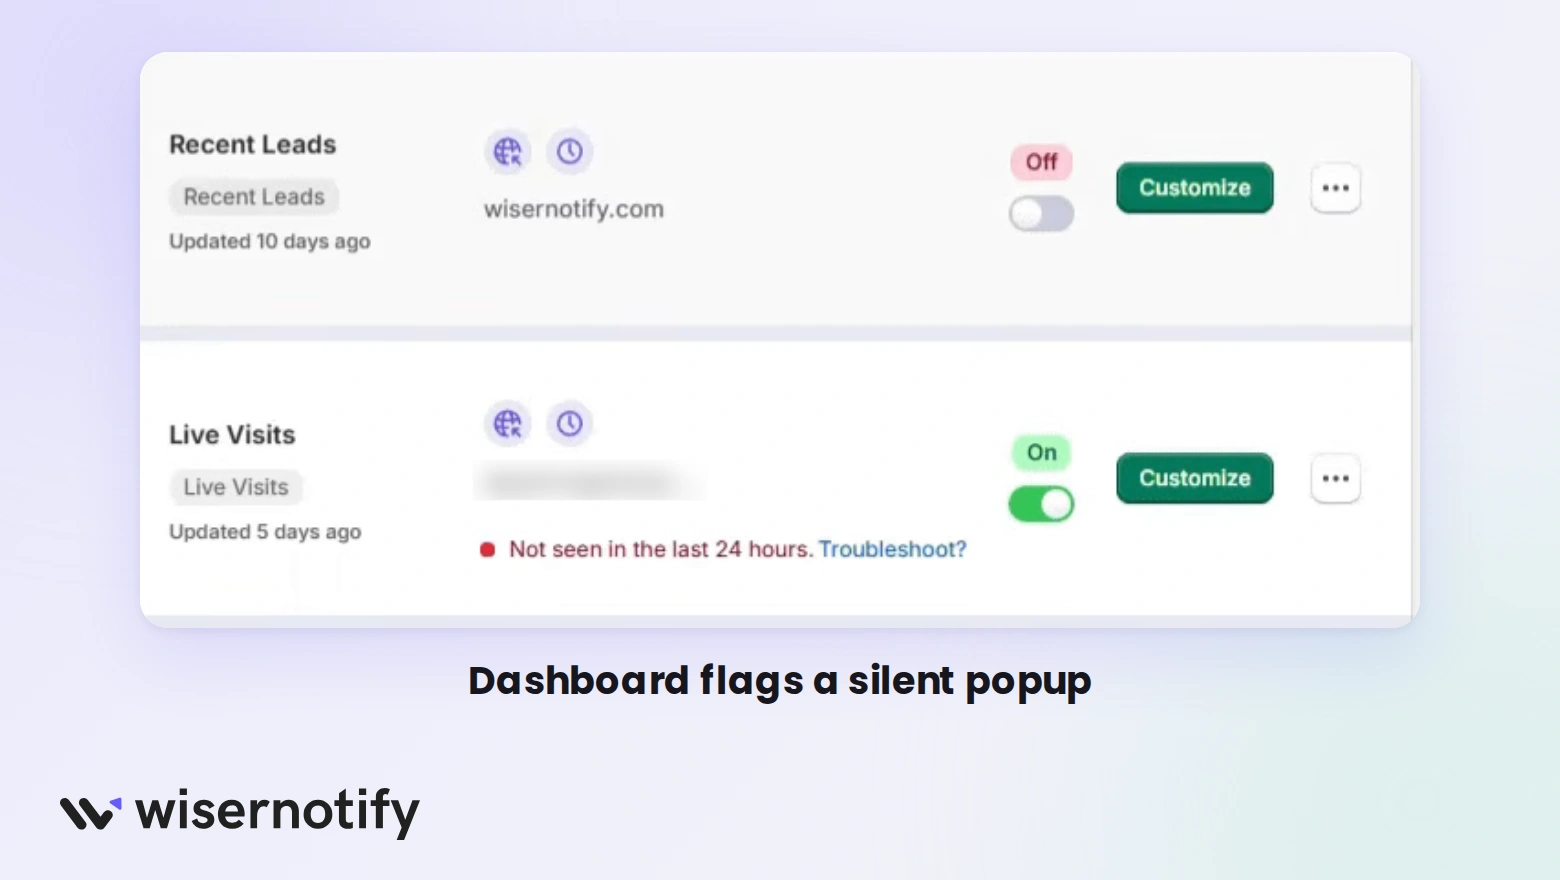
Start in your notification list. WiserNotify flags a live popup it has not seen in the last 24 hours and adds a Troubleshoot link. If that does not explain it, check these.
- Custom code is locked: it needs a Wix premium plan and a connected domain.
- Pixel not in the Head: the code must sit under Custom code, placed in Head, on all pages.
- Pixel unverified: visit your site, then press Verify pixel installation and wait for Pixel Active.
- Site not published: publish your Wix site so the new code goes live.
- Data source not ticked: the popup only reads the connection ticked in its Data source tab.
- Page rules: the Display tab may exclude the page you are checking.
- Old page: check from a private window, since a cached copy can hide the popup.
Still stuck? Live chat inside your WiserNotify dashboard can help, and the support team can install the pixel with you on chat or a screen-share call.
Is the Wix Sales Popup Free?
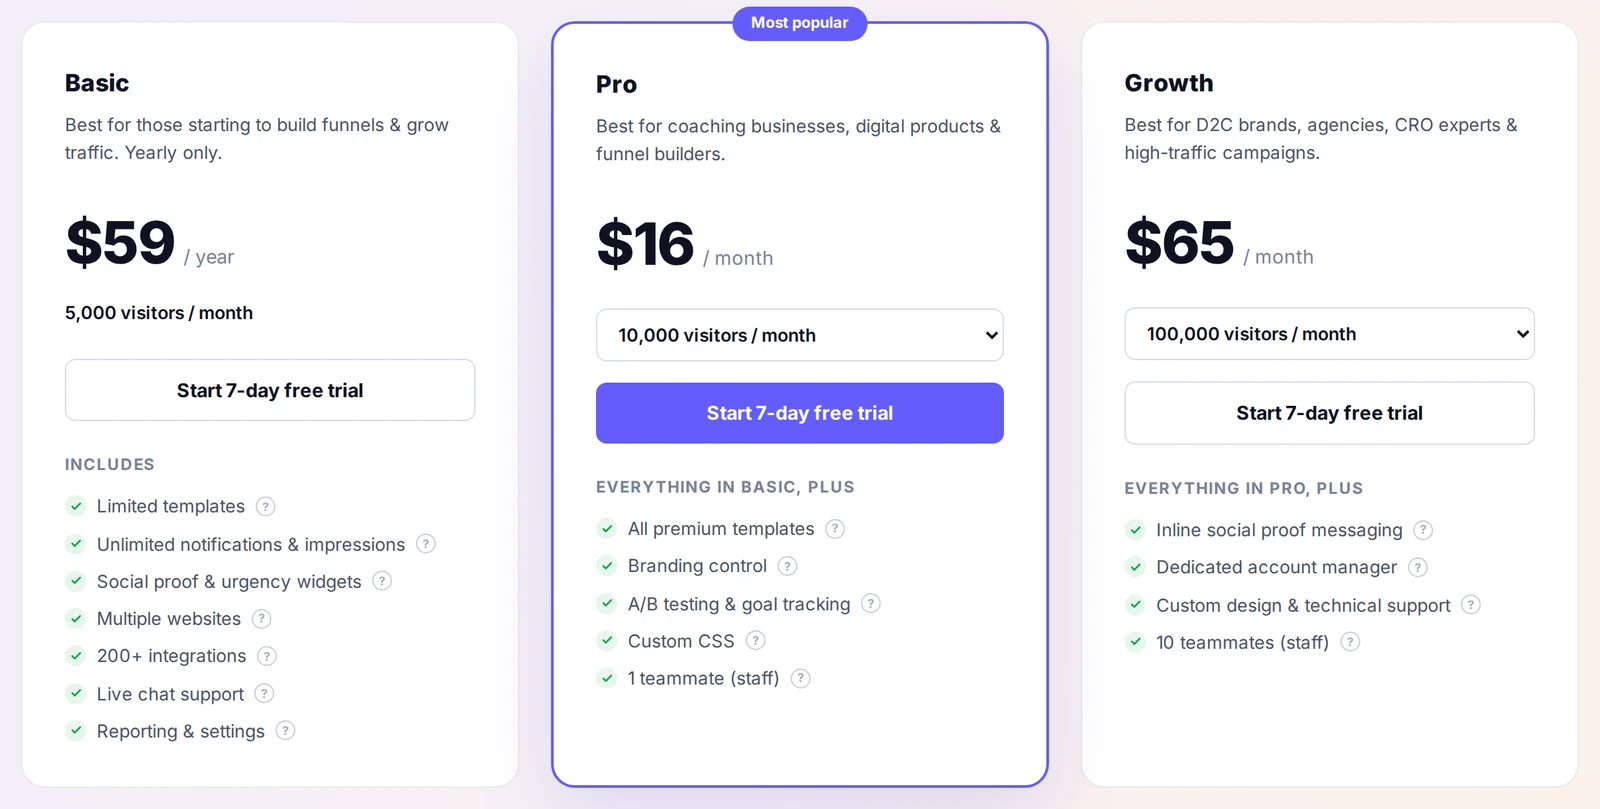
No. WiserNotify has no free plan, but every plan starts with a 7-day free trial. That gives you time to add the pixel, build the popup, and watch it run on your site.
After the trial, Basic costs $59 a year, Pro starts at $16 a month, and Growth starts at $65 a month. Higher plans unlock more widgets and features.
To compare other tools first, see the apps that lift conversions on Wix.
Build trust & FOMO
Highlight real-time activities like reviews, sales & sign-ups.
Sales Popup Tips for Wix
- Match your site design: use your store’s colors and fonts so the popup looks like part of the page, not a random ad.
- Name the product: “Liam just ordered the Eco Yoga Mat” reads as real, while “someone bought something” does not. The social proof examples guide shows how other brands word it.
- Wait before the first popup: a 10 to 15 second delay, or a scroll, lets shoppers see your page first.
- Target the right pages: product pages and checkout are where a small nudge helps most.
- Space the popups out: use Timing control so they appear now and then, not back to back.
Sales Popup Mistakes to Avoid on Wix
- Ignoring mobile: a popup that covers a button or image on a phone costs you sales, so test it on a small screen.
- Vague text: include the product, the buyer’s city, and the time so the message sounds real.
- Wrong pages: popups on your blog or About page feel intrusive, so keep them where buying happens.
- Stale data: make sure the Wix connection is ticked so popups show recent orders.
- Set and forget: check impressions, clicks, and conversions, then adjust.
Build trust & FOMO
Highlight real-time activities like reviews, sales & sign-ups.
Wrap-Up
A Wix store that shows real activity earns trust faster. The setup is one pixel in Custom code and one popup in the dashboard.
Put a WiserNotify sales popup on your Wix site and give every product page the proof it needs.
Related guides
Setting up a sales notification popup on a different platform? These walk through it:
Frequently Asked Questions
How do I add a sales popup to Wix?
In Wix, open Settings, then Advanced, then Custom code, and add the WiserNotify pixel to the Head on all pages. Then build a Recent Sales popup in the dashboard.
Do I need a Wix premium plan?
Yes. Custom code needs a Wix premium plan with a connected domain.
Where does the sales data come from?
Tick your Wix connection in the notification’s Data source tab. The pixel also captures form sign-ups on its own.
What can the popup show?
Recent Sales shows the buyer’s name, location, product, and time. Sales Counter shows how many sales happened over a period you choose.
Can I show Wix form sign-ups too?
Yes. The pixel captures form submissions, so they can appear as Recent Leads popups.
Is there a free plan?
No, but every plan starts with a 7-day free trial.

Krunal Vaghasiya is a marketing tech expert who boosts e-commerce conversion rates with automated social proof and FOMO strategies. He loves to keep posting insightful posts on online marketing software, marketing automations, and improving conversion rates.




 Capterra