
Need Higher Conversion? Add Testimonial to Thinkific
Thinkific, a leading online course platform, empowers educators and businesses to create and sell courses with ease.
However, in the competitive world of e-learning, standing out requires more than just high-quality content—it requires trust. Testimonials provide the social proof you need to convert potential students into enrolled learners.
In this guide, we’ll explore why testimonials are essential for Thinkific, how to seamlessly add them, and best practices to maximize their impact.
Why Add Testimonials to Thinkific?
Build Trust Through Social Proof: Research indicates that 88% of people trust testimonials as much as personal recommendations. For Thinkific course creators, testimonials reassure potential students about the quality of your courses and teaching.
Increase Course Enrollment: Testimonials can increase conversion rates by up to 34% on landing pages. By addressing common hesitations, they encourage more users to take action and enroll.
Showcase Expertise: Customer and student testimonials validate your expertise and highlight your ability to deliver value, setting you apart from competitors.
Improve SEO Rankings: Testimonials containing natural language keywords can enhance SEO performance. Adding schema markup to testimonials further boosts visibility in search engines.
Address Objections: Testimonials provide answers to common objections, such as course relevance, instructor expertise, and return on investment (ROI).
Build trust & FOMO
Highlight real-time activities like reviews, sales & sign-ups.


How to Add Testimonials to Thinkific




Using Thinkific’s Built-In Features
1. Navigate to Your Course Landing Page
- Log in to your Thinkific dashboard and go to Manage Learning Content > Courses.
- Select the course for which you want to add testimonials.
2. Add a Testimonial Section
- Use the Page Builder to add a new Section.
- Select Testimonials from the section options.
3. Input Testimonial Details
- Add the customer’s name, role, and their feedback.
- Upload a photo or video (if available) to enhance credibility.
4. Style the Testimonial Section
- Customize fonts, colors, and layout to align with your course branding.
- Use Thinkific’s preview feature to ensure the section looks great across devices.
Using WiserNotify Integration
1. Set Up a Widget in WiserNotify
- Log in to WiserNotify and create a testimonial widget tailored for your Thinkific site.
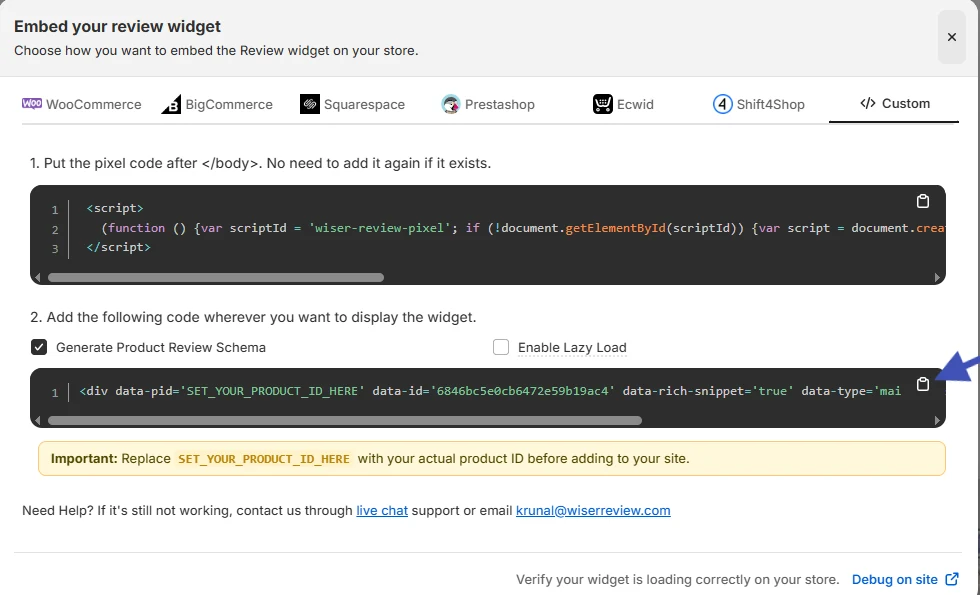
2. Generate and Copy the Code
- Copy the JavaScript code snippet provided by WiserNotify.
3. Embed the Code in Thinkific
- Go to Settings > Code & Analytics in Thinkific.
- Paste the code into the Header or Footer section.
4. Save and Verify
- Save changes and preview your course page to ensure the widget is displaying correctly.
Adding Video Testimonials
Upload to Thinkific Media Library
- Collect video testimonials from past students.
- Upload the videos to your Thinkific Media Library.
Embed on Course Pages
- Use the Video Section in Thinkific’s Page Builder to add testimonials directly to the course landing page.
Best Places to Showcase Testimonials on Thinkific
Homepage
- Display testimonials prominently on your homepage to make a strong first impression and build trust immediately.
Course Landing Pages
- Place testimonials from past students who’ve benefited from the course. Highlight specific outcomes, such as career advancements or skills gained.
Checkout Page
- Add testimonials near the checkout section to reassure potential students and reduce last-minute hesitation.
Thank You Page
- After a student enrolls, show additional testimonials to reinforce their decision and encourage them to explore other courses.
About Page
- Use testimonials to emphasize your credibility as an instructor or course creator, along with your commitment to student success.
Other Ways to Incorporate Testimonials on Thinkific
Video Testimonials
- Video testimonials are highly engaging and authentic. Embed them directly onto landing pages or in the course curriculum overview.
Dynamic Widgets
- Use WiserNotify to display real-time testimonials, reviews, or course sign-ups dynamically across your site. This creates urgency and builds trust.
Social Media Reviews
- Embed positive social media comments or reviews directly onto your Thinkific site using screenshots or social proof tools.
Email Campaigns
- Include testimonials in email campaigns to nurture leads and encourage course enrollment. Highlight success stories to inspire action.
3 Testimonial Optimization Tips for Thinkific
Use Real, Detailed Testimonials: Include names, photos, and specific outcomes achieved by your students to make testimonials relatable and impactful.
Align Design with Branding: Customize testimonial sections to match your course branding for a cohesive and professional look.
Update Regularly: Rotate testimonials periodically to highlight new success stories and keep the content fresh.
3 Testimonial Mistakes to Avoid on Thinkific
Overloading Pages with Testimonials
- Don’t overwhelm potential students with too many testimonials on a single page. Focus on a few high-impact reviews.
Using Generic Feedback
- Avoid vague testimonials like “Great course!” Instead, use detailed reviews that address specific benefits and outcomes.
Neglecting Mobile Optimization
- Ensure testimonials are fully responsive. Thinkific’s responsive design tools can help you preview and adjust layouts for mobile devices.
Wrap-Up
Testimonials are a powerful tool for increasing trust, engagement, and conversions on your Thinkific site. By strategically incorporating them into key pages and leveraging dynamic tools like WiserNotify, you can transform student feedback into a driving force for your course success.
Start adding testimonials to your Thinkific courses today and let your students’ stories inspire the next wave of learners.
Related Posts:
Frequently Asked Questions
How do I add testimonials to my Thinkific course?
You can add testimonials to your Thinkific course by using the “Text & Media” section in your course builder. Simply insert a quote, image, or video of the testimonial and format it to fit your course design. For dynamic display, consider integrating third-party tools like WiserNotify.
Why are testimonials important for my Thinkific course?
Testimonials build trust and credibility by showcasing real feedback from students who have taken your course. They help potential learners feel confident about enrolling, which can increase sign-ups and conversions.
Can I display video testimonials on my Thinkific course page?
Yes, Thinkific allows you to embed video content. You can upload video testimonials to platforms like YouTube or Vimeo and embed them directly into your course or sales page for a more engaging presentation.
Are there tools to automate testimonial collection for Thinkific?
Yes, tools like WiserNotify or Trustpilot can help you collect and showcase testimonials automatically. These platforms integrate with Thinkific and make it easy to display real-time student reviews and feedback.
Where should I place testimonials on my Thinkific site?
For maximum impact, place testimonials:
- On your course sales page to attract new students.
- In your course introduction to reassure hesitant buyers.
- On your homepage to showcase overall course success stories.

Krunal Vaghasiya is a marketing tech expert who boosts e-commerce conversion rates with automated social proof and FOMO strategies. He loves to keep posting insightful posts on online marketing software, marketing automations, and improving conversion rates.




 Capterra