
How to Add Reviews to Your Website: Widget or Review Page

Visitors trust what other customers say more than anything you write about yourself. Putting real reviews on your site, close to the moment someone decides to buy, is one of the simplest ways to earn that trust.
You have two options. You can add a review widget inside pages you already have, like product pages or your homepage. Or you can build one review page that holds everything in one place. Most sites end up using both.
This guide walks through the full setup, from creating an account to checking the widget on your live page. It then covers how to build a review page and which widget type suits each part of your site.
Why Add Reviews to Your Website?

- More sales. Shoppers read reviews before they buy. Seeing other people’s experience right on the page removes doubt at the moment it matters.
- More trust. Reviews from real customers, with names and photos, show new visitors that others bought and were happy.
- Better search visibility. Reviews add fresh, natural wording to your pages, and review markup can show star ratings in search results.
Review Widget or Review Page?
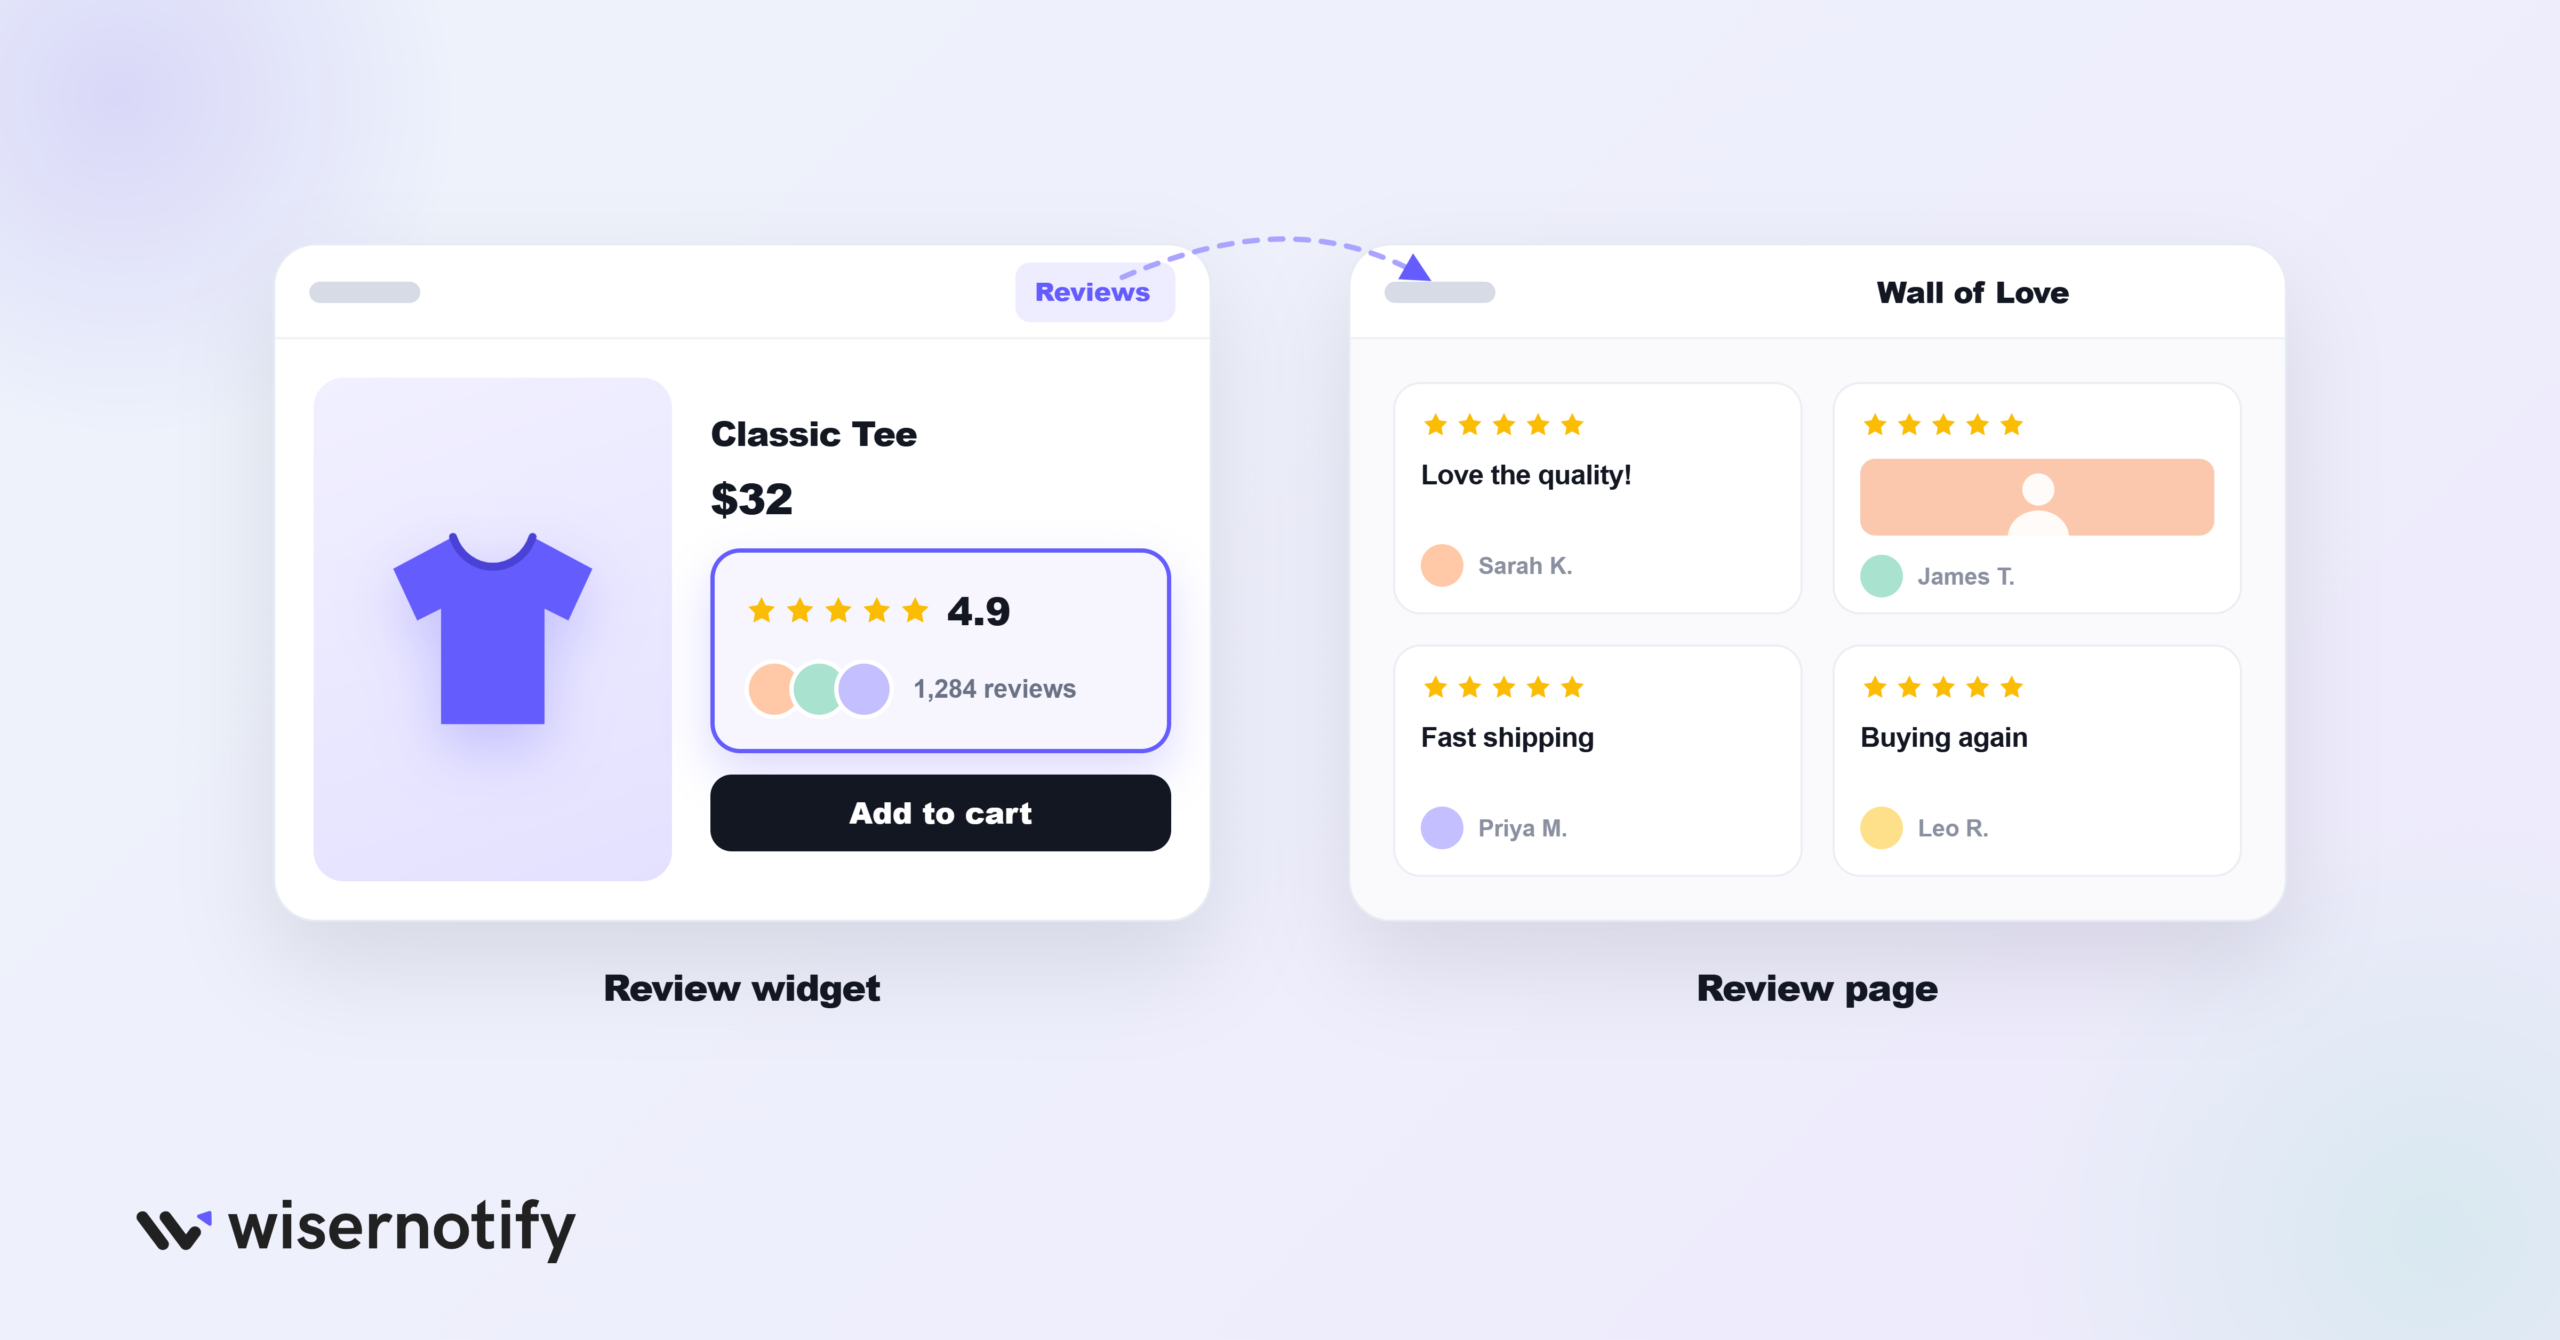
- A review widget sits inside a page you already have, like a product page, homepage or checkout. It puts proof right where people decide.
- A review page is one place that holds all your reviews, like a “Wall of Love” or a “Reviews” link in your menu. It’s where skeptical visitors go to dig deeper.
Most sites use both: widgets on the pages that sell, and one review page linked from the menu and footer.
How to Add Reviews to Your Website
These steps follow the WiserReview setup from sign-up to live widget. They work on any site where you can add HTML, and take about 15 minutes.
Watch this quick overview of WiserReview first, then follow the steps below.
Step 1: Create Your Account
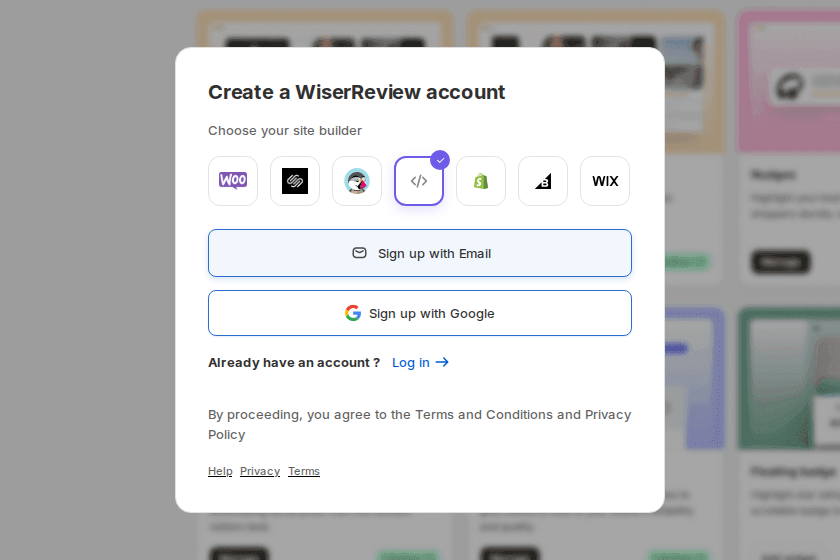
Go to the WiserReview sign-up page and start a free trial. Choose your site builder: WooCommerce, Squarespace, PrestaShop, Shopify, BigCommerce, Wix, or the code icon for any other site. Then sign up with email or Google.
Step 2: Connect Your Website
On Shopify, Wix and the other listed platforms, install the WiserReview app and it connects your store for you.
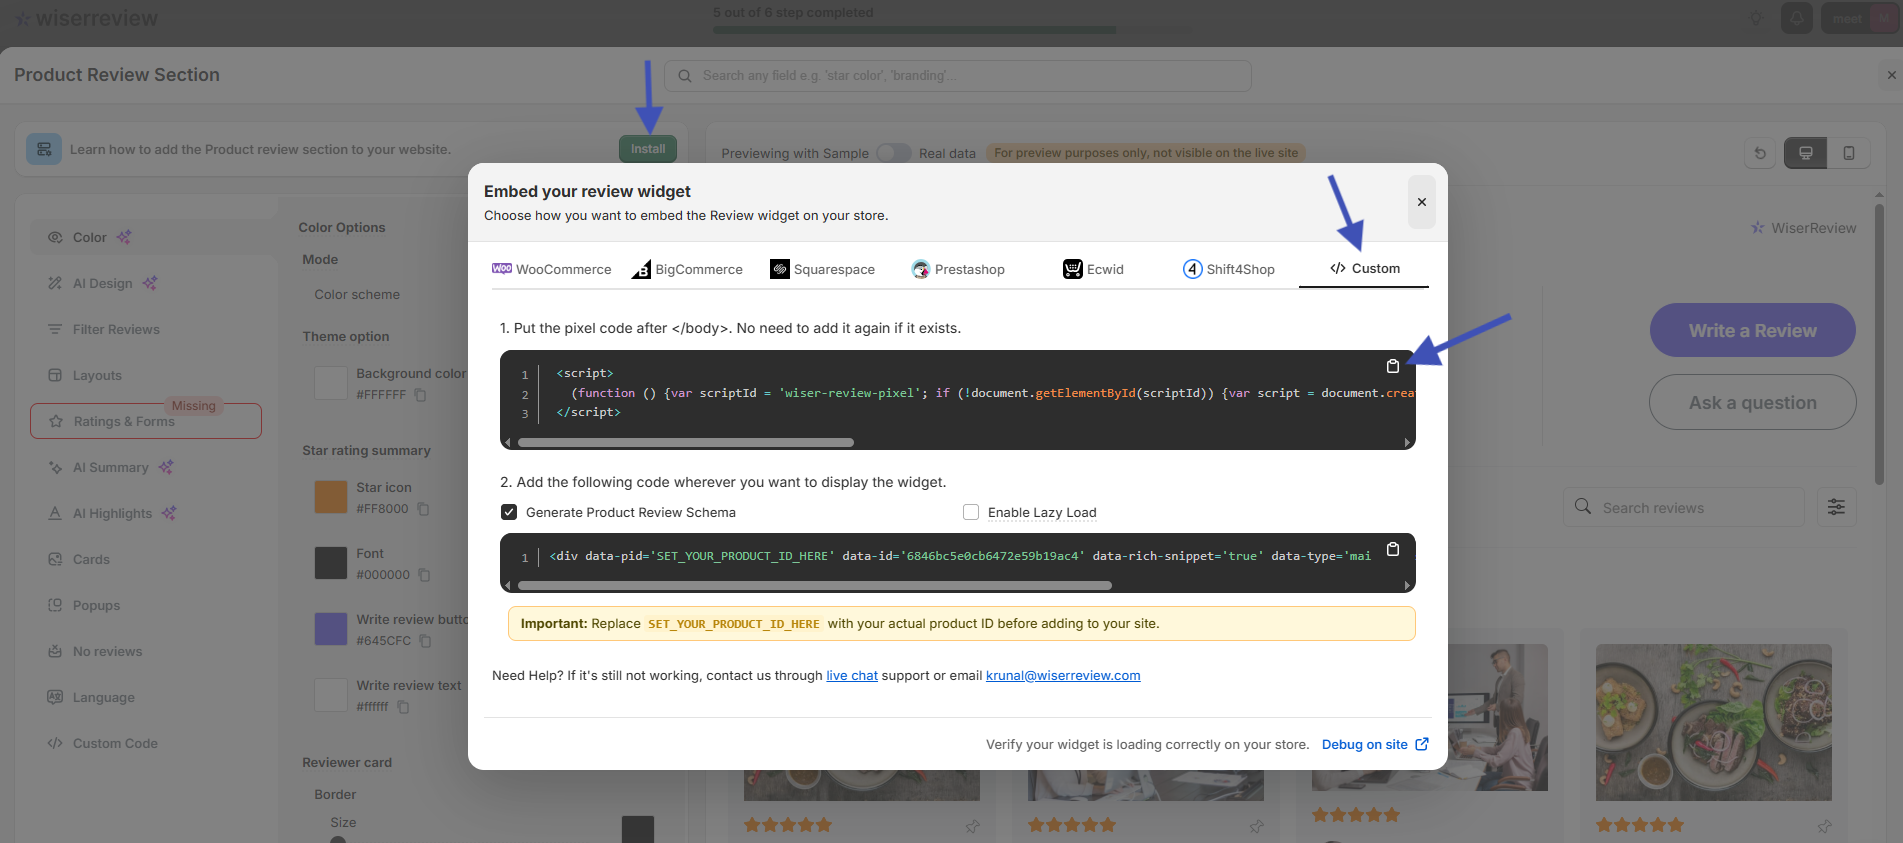
On any other site, open a widget’s Install window, go to the Custom tab and copy the pixel code. Paste it once before the closing body tag of your site. You never need to add it again.
Setup guides for each platform are in the WiserReview platform docs, including one for custom-built sites.
Step 3: Import Your Existing Reviews
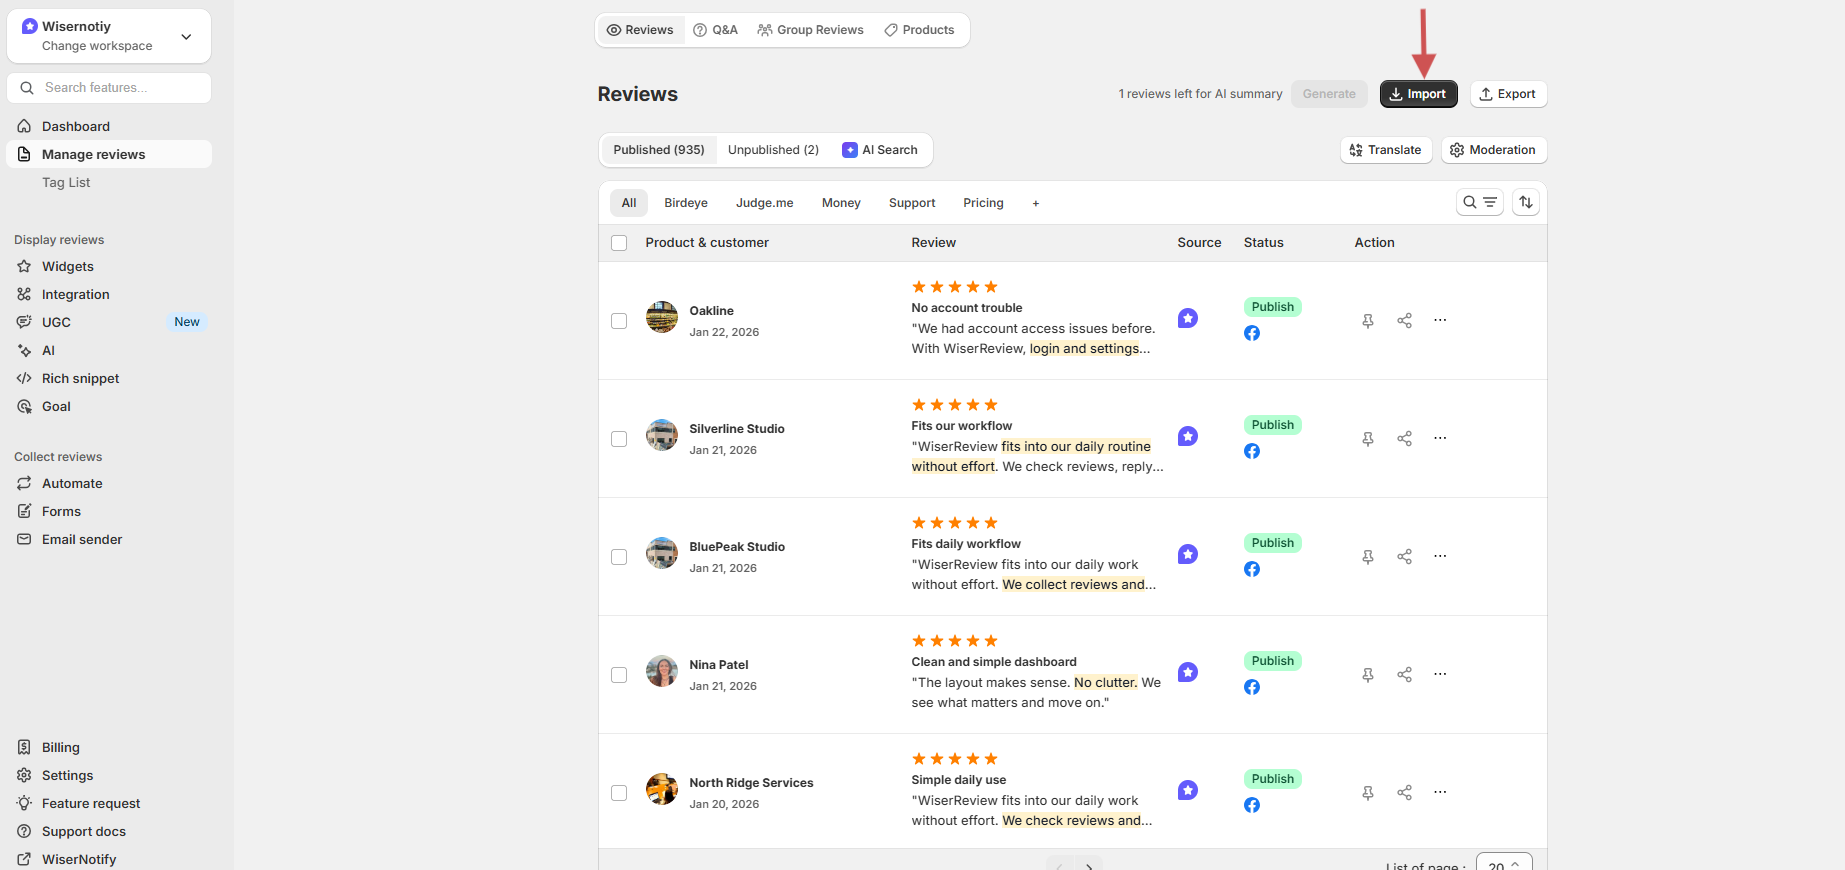
Already have reviews elsewhere? Go to Manage reviews and click Import. You can pull them from Google, Facebook, Amazon, Etsy and other review apps, or upload a CSV file. The import guides cover each source.
On the same screen you can publish or unpublish each review and turn on moderation, so only the reviews you approve go live.
Step 4: Start Collecting New Reviews
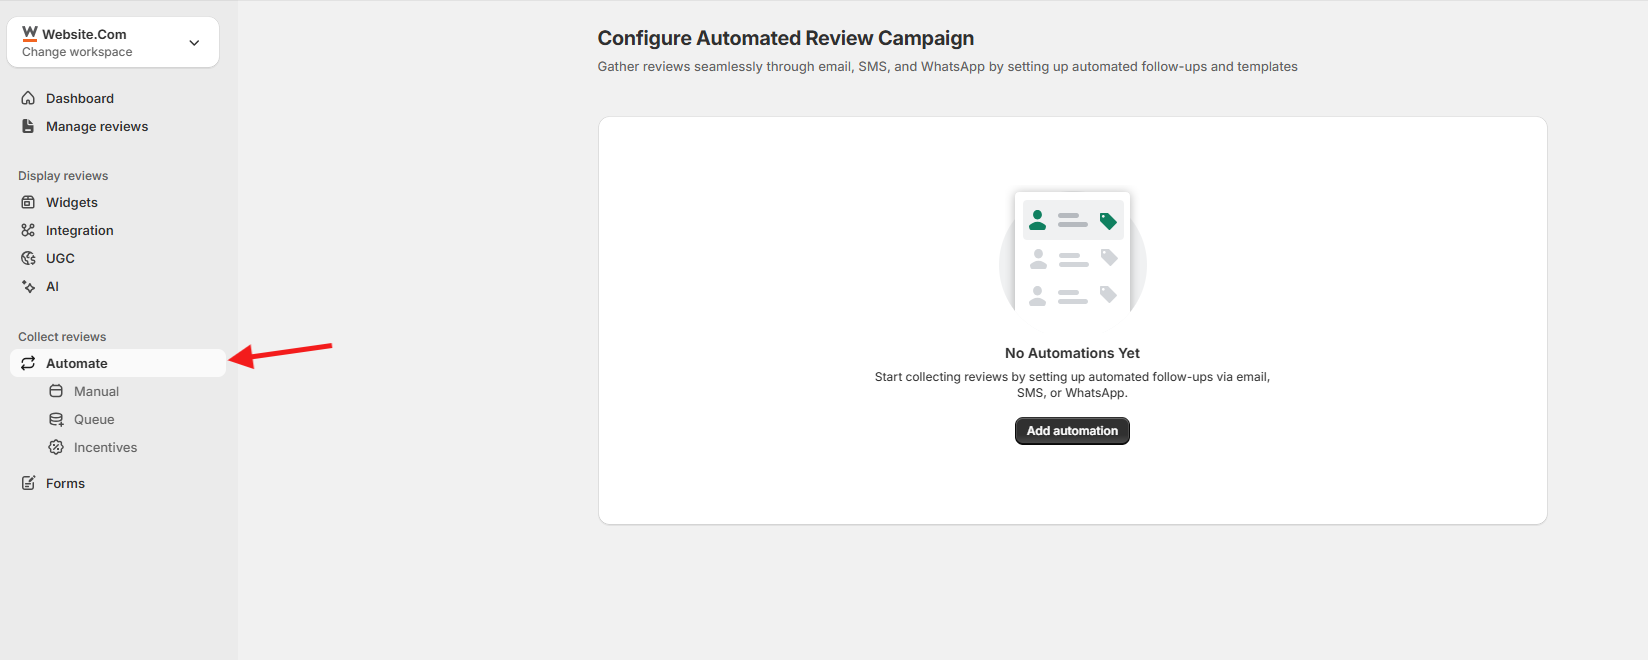
Go to Automate and click Add automation. Stores connect their orders, so a review request goes out by email, SMS or WhatsApp a set number of days after delivery.
Service businesses, coaches and SaaS teams can trigger the same requests from a webhook or Zapier. Or go to Forms, create a review form and share its link with clients.
See the guides for automated review requests and review forms.
Step 5: Pick a Review Widget
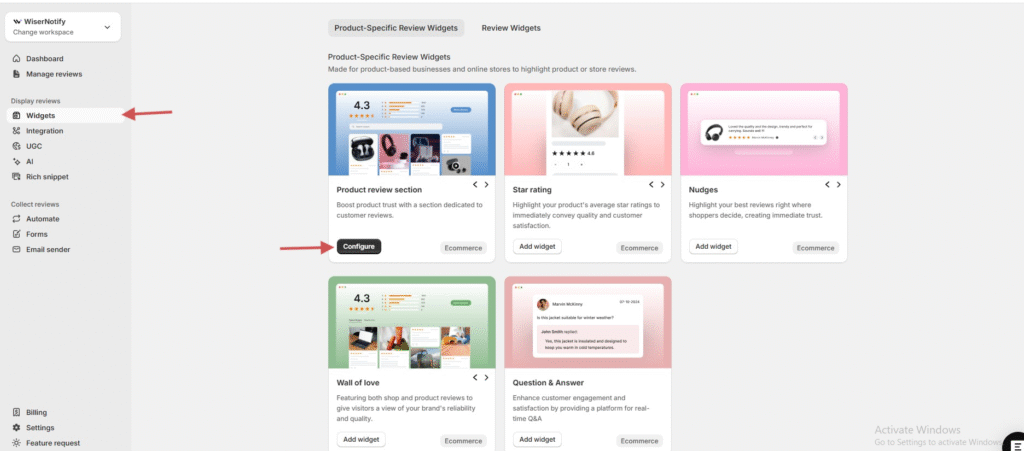
Go to Widgets. Find the widget you want, such as Product review section, Star rating, Nudges or Wall of love, and click Configure or Add widget. The widget table further down shows which one fits each page.
Step 6: Choose and Style Your Reviews
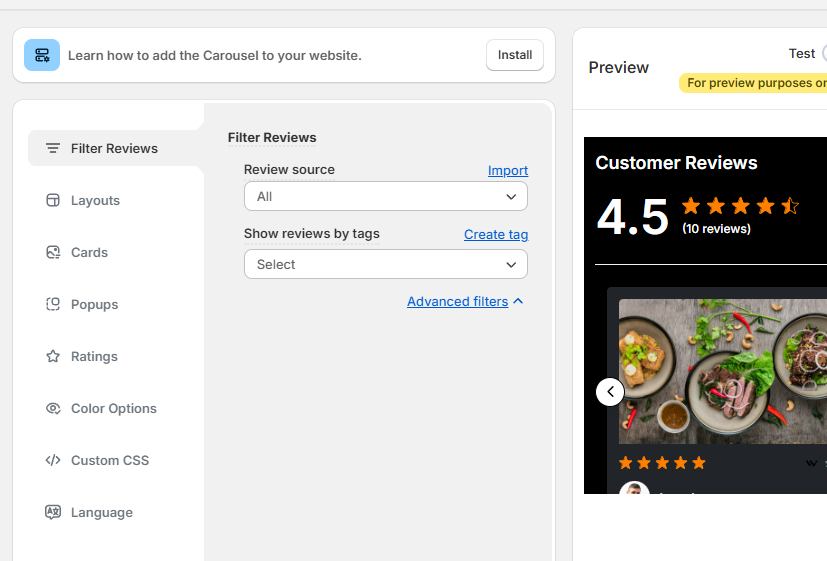
Under Filter Reviews, pick the review source and tags to show. Then set the layout, cards, ratings, colors and language so the widget matches your site.
Each widget has its own setup guide in the display reviews docs.
Step 7: Embed the Widget and Check It
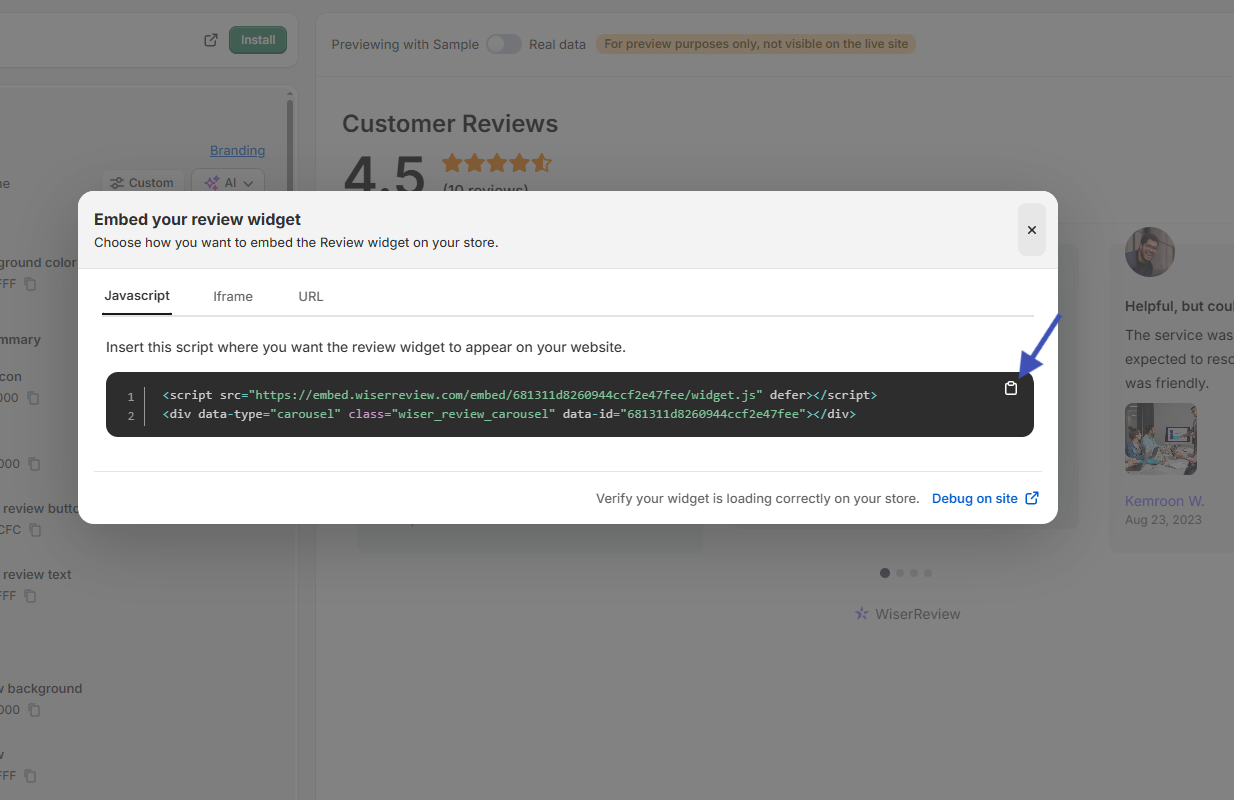
Click Install and copy the code from the Javascript tab. Paste it into an HTML or embed block where reviews should appear. If your builder blocks scripts, use the iFrame tab instead.
Open the live page to confirm the widget loads. If it doesn’t, click Debug on site in the install window to check the setup, or reach WiserReview support from the chat in your dashboard.
How to Create a Review Page
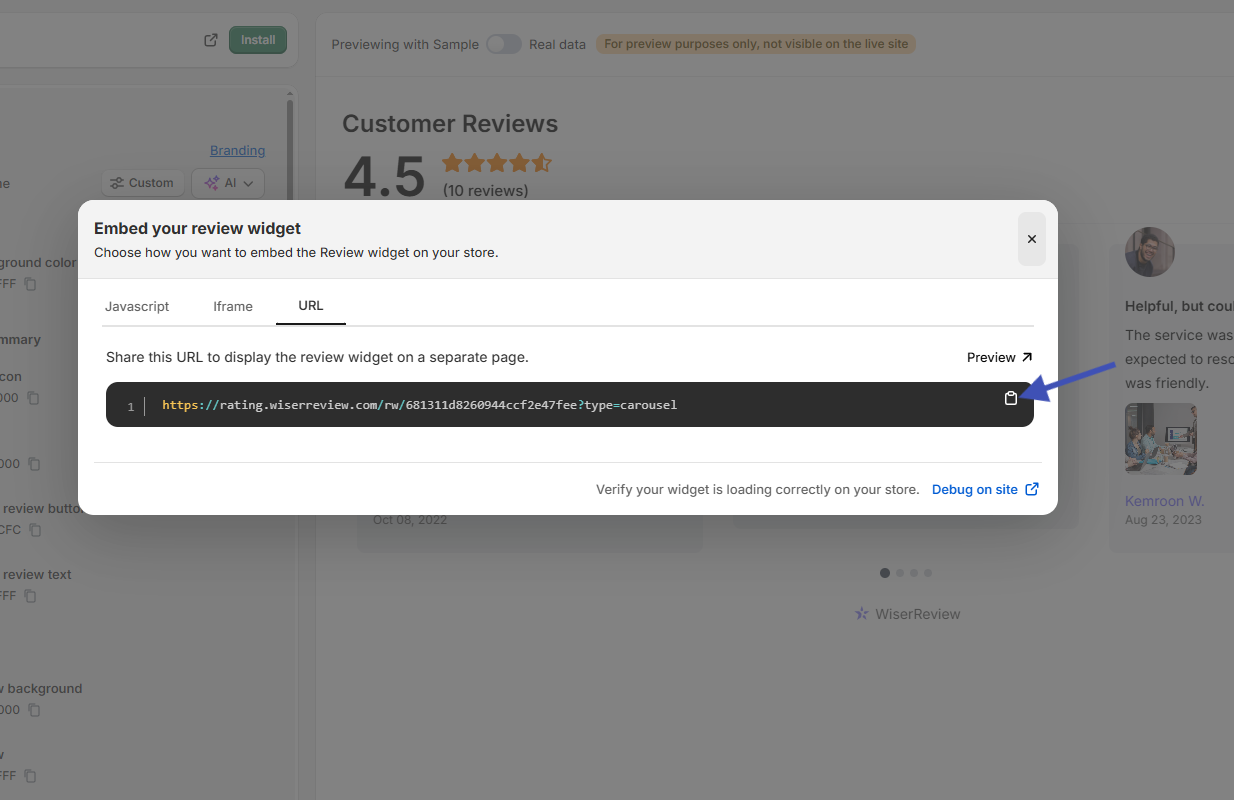
You can build a review page two ways:
- Embed a Wall of love on a new page called “Reviews” or “Testimonials”. It shows every review in one grid, with search, sorting and a load-more button. Follow the Wall of love setup guide.
- Use the hosted URL. In the install window, open the URL tab and copy the link. It opens your reviews on their own page, ready to link from a menu, email or “See what customers say” button.

All your reviews in one place
Collect reviews, manage every response, and display them where they matter most.
Review Widget Types and Where to Use Them
Each widget suits a different spot on your site. Use the table to match a widget to a page, then see how each one looks.
| Widget | Best placement |
|---|---|
| Product review section and star rating | Product pages and collection pages |
| Nudges and trust badge | Near Add to cart, pricing tables and page headers |
| Carousel and auto slider | Homepage, services pages and landing pages |
| Avatar strip and floating popup | Homepage hero, product pages and checkout |
| Sidebar snippet and floating badge | Long pages like blog posts and service details |
| Wall of love | A dedicated reviews or testimonials page |
Product Review Section and Star Rating

The review section lists every review with photos, videos and a rating summary. The star rating shows only the average and count, so shoppers see it before they scroll.
Nudges and Trust Badge

Nudges show one short review quote at the moment someone is deciding. The trust badge sums up your overall rating in a small label.
Carousel and Auto Slider

Both show two or three reviews at a time in a sliding row. The carousel moves when visitors click, and the auto slider moves on its own.
Avatar Strip and Floating Popup

The avatar strip shows a row of customer faces with your rating. The floating popup slides a top review into the corner while people scroll.
Sidebar Snippet and Floating Badge

A “Reviews” tab stays on the side of the screen and opens a panel of reviews. The floating badge keeps your star rating visible on every page.
Wall of Love

A large grid of brand, shop and product reviews, with filters and search. It’s the widget to use for a full review page, covered above.
Best Practices for Showing Reviews

- Place reviews near buttons. Put them beside “Add to cart”, “Book now” or “Sign up”, where people make the decision.
- Match reviews to the page. Use tags so product pages show product reviews and service pages show service reviews.
- Moderate before publishing. Filter spam and offensive language, but keep honest critical reviews. A mix looks more believable than only five stars.
- Show photos when you have them. Photo reviews show the product in real use.
Common Mistakes to Avoid
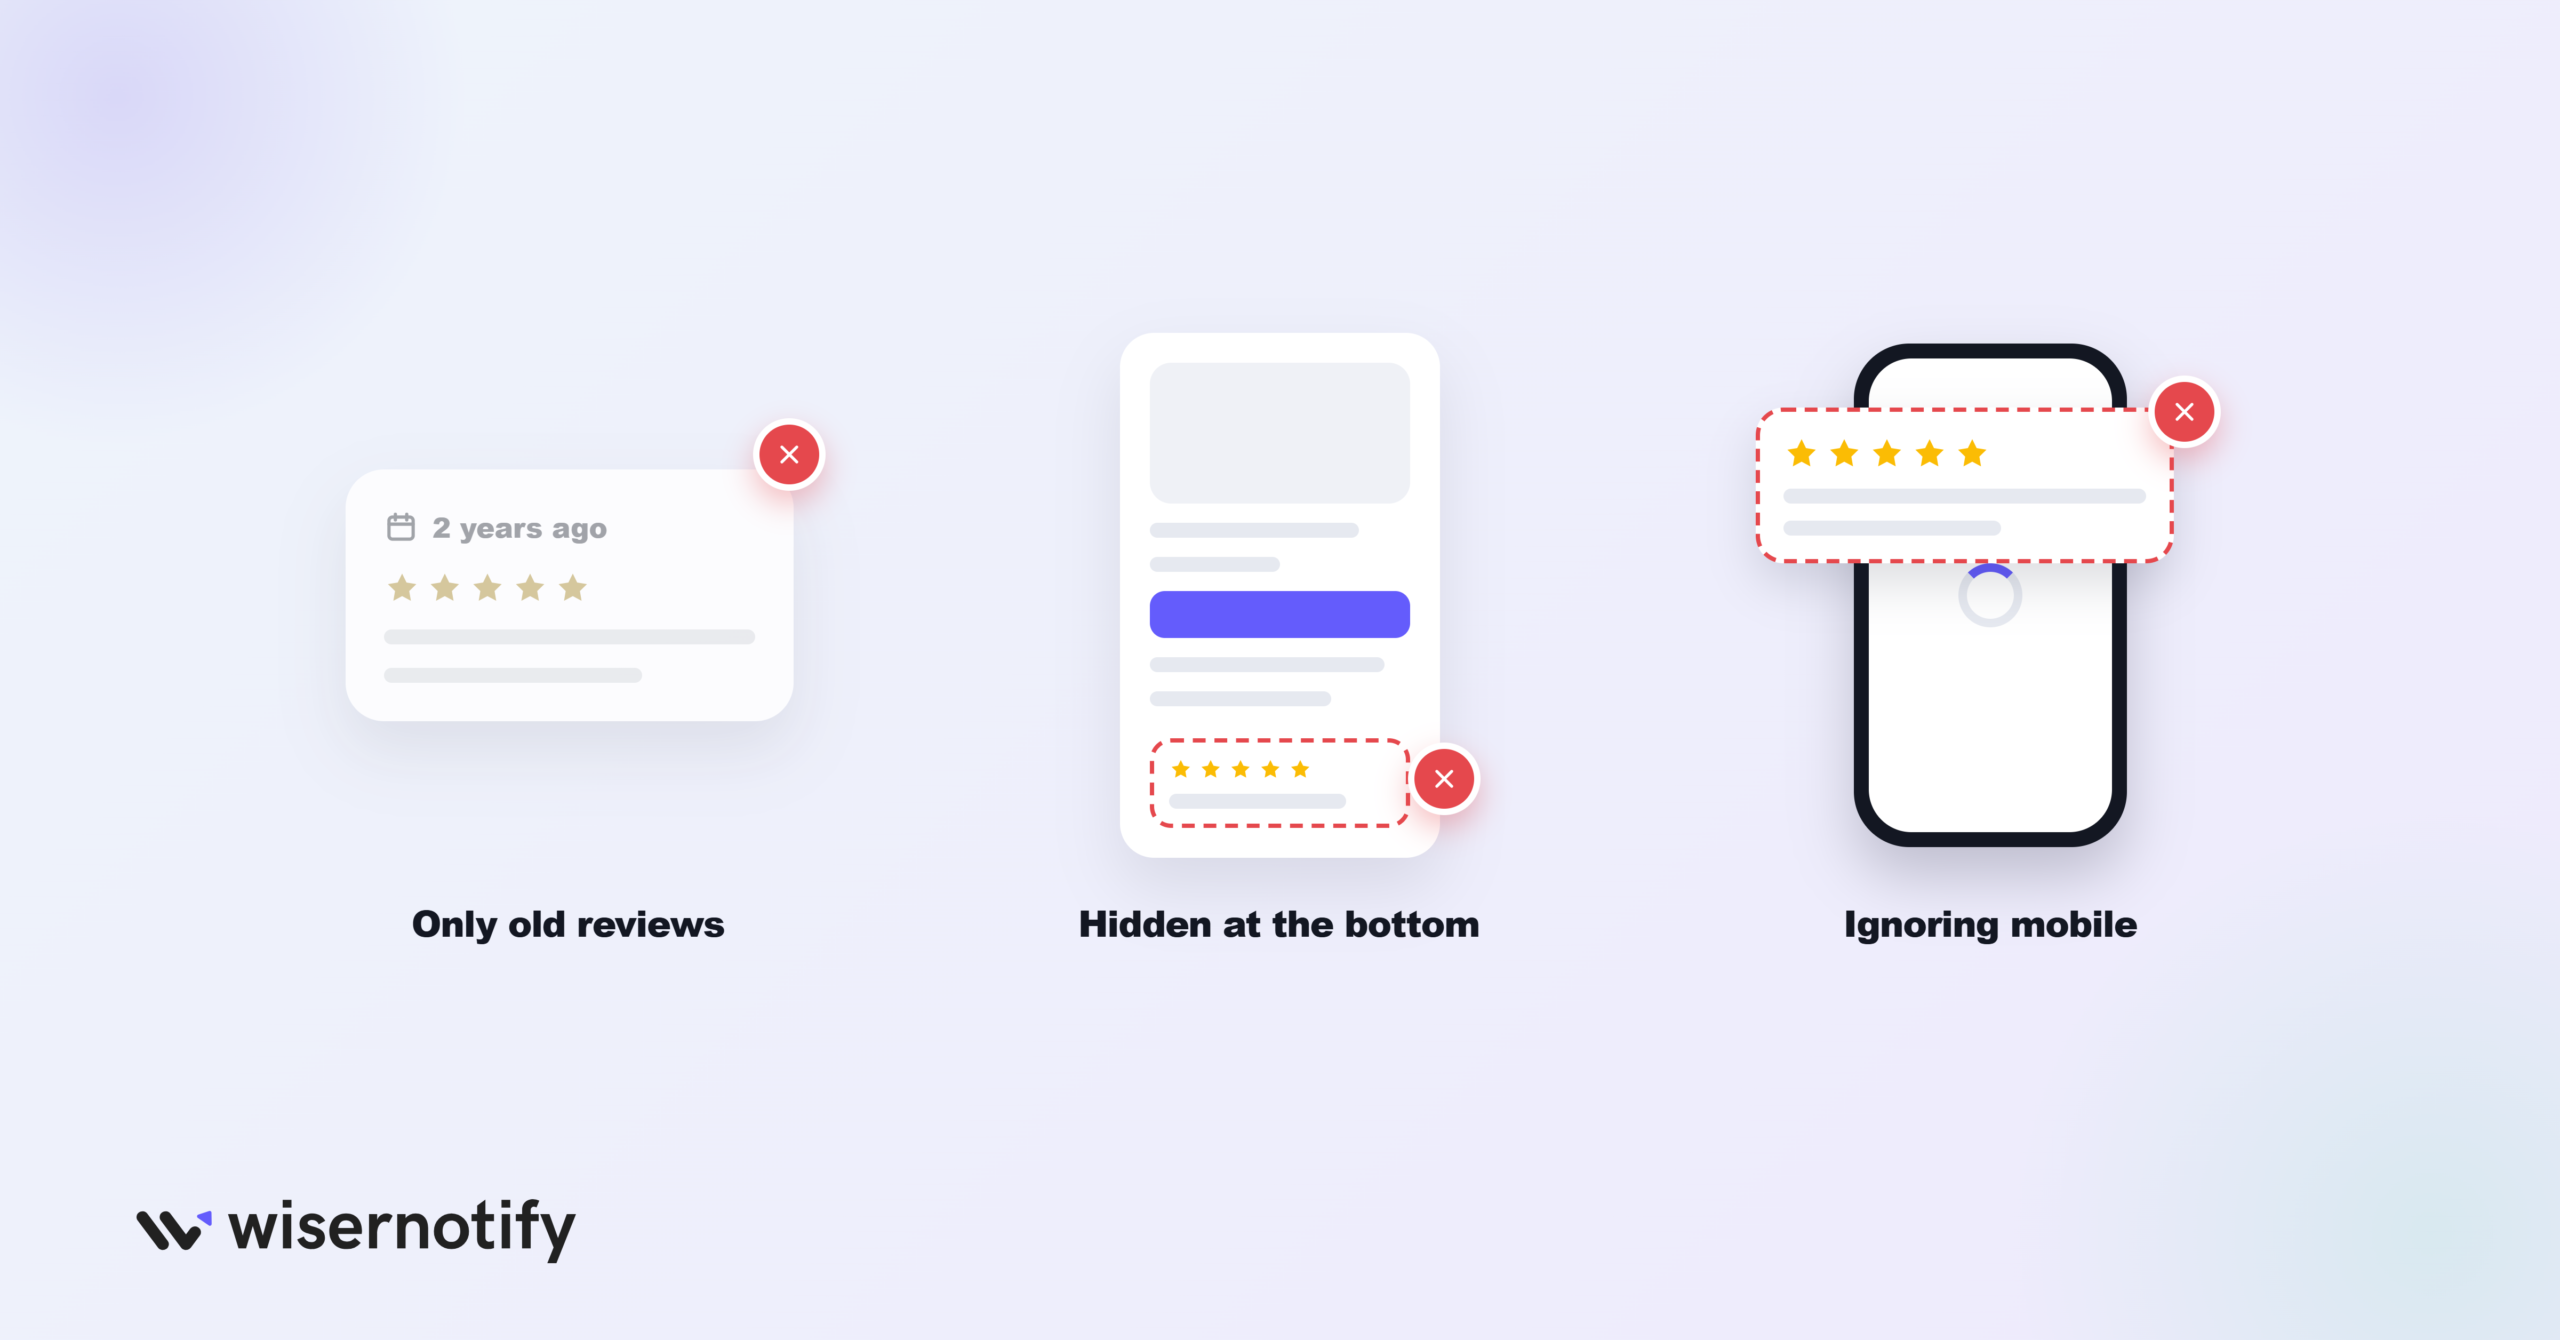
- Only old reviews. Keep collecting so recent reviews show customers are still buying and still happy.
- Reviews hidden at the bottom. Place them near the title, price or checkout, where visitors look.
- Ignoring mobile. Check that the widget loads fast and reads well on a phone.
Add Reviews From Other Sites
Already have reviews on Google, Facebook or a software directory? These guides show how to bring them onto your site.
- Add Google reviews to your website
- Add testimonials to your website
- Add Facebook reviews to your website
- Add Capterra reviews to your website
- Add Amazon reviews to your website
- Add G2 reviews to your website
- Add Yelp reviews to your website
Platform Guides for Adding Reviews
Pick your platform for exact install steps.
Ecommerce platforms
- Add reviews to Shopify
- Add reviews to WooCommerce
- Add reviews to BigCommerce
- Add reviews to Magento
- Add reviews to PrestaShop
- Add reviews to Ecwid
- Add reviews to Squarespace
- Add reviews to Wix
- Add reviews to GoDaddy
- Add reviews to Weebly
Website builders and CMS
- Add reviews to WordPress
- Add reviews to Elementor
- Add reviews to Oxygen Builder
- Add reviews to Flatsome
- Add reviews to Webflow
- Add reviews to Drupal
- Add reviews to Joomla
- Add reviews to Carrd
- Add reviews to Bynder
Funnels, landing pages and courses
- Add reviews to landing pages
- Add reviews to ClickFunnels
- Add reviews to Instapage
- Add reviews to Leadpages
- Add reviews to Unbounce
- Add reviews to Swipe Pages
- Add reviews to Systeme.io
- Add reviews to Kartra
- Add reviews to Kajabi
- Add reviews to Teachable
- Add reviews to Thinkific
- Add reviews to LearnWorlds
- Add reviews to Podia
Wrap Up
Start with one widget on the page that sells the most, usually your product or pricing page, and add a review page linked from your menu.
Once reviews are live, keep collecting new ones so the proof on your site stays fresh.
Frequently Asked Questions
How many reviews do I need before showing them?
Start once you have a handful per product. A few real reviews beat an empty section, and more keep coming as you collect.
Can reviews improve my Google rankings?
They can help. Reviews add fresh wording to your pages, and review markup can show star ratings in search results.
Where should I place reviews on a product page?
Near the product title, price or Add to cart button, where the buying decision happens.
Can I show reviews from Google, Facebook or Amazon?
Yes. You can import reviews from platforms like Google, Facebook, Amazon, Yelp, G2 and Capterra and show them in the same widgets.
Do I need a developer to add reviews to my website?
No. You copy one embed code from WiserReview and paste it into an HTML block on your page.

Krunal Vaghasiya is a marketing tech expert who boosts e-commerce conversion rates with automated social proof and FOMO strategies. He loves to keep posting insightful posts on online marketing software, marketing automations, and improving conversion rates.




 Capterra