
How to Add an Announcement Bar to Wix: 2 Easy Methods

An announcement bar is a short message displayed near the top of your website. Use it to promote a sale, share a delivery update, announce an event, or highlight important information.
On Wix, you can add an announcement bar in two ways:
- Use a Wix Strip for a simple site-wide message
- Use WiserNotify for targeting, scheduling, and campaign controls
Use a Wix Strip if every visitor should see the same message. Use WiserNotify if you want to show different messages on specific pages or to specific visitors.
Types of Announcement Bars
Wix users can leverage announcement bars for a variety of purposes:
Promotional Bars
Highlight discounts or special offers to boost sales.
Example: “Get 20% off sitewide – Use Code: SAVE20!”
Event Notifications
Announce upcoming events or webinars.
Example: “Join us for a free webinar this Thursday at 6 PM – Register now!”
Urgency Bars
Encourage quick action with countdowns or limited-time offers.
Example: “Flash Sale! Ends in 2 hours.”
Seasonal Announcements
Align messages with holidays or seasons for relevance.
Example: “Celebrate Spring with 15% off!”
Updates and Alerts
Share important updates, such as new store hours or policy changes.
Example: “We’re now open on Sundays from 10 AM to 4 PM.”
Method 1: Add an Announcement Bar With a Wix Strip
A Wix Strip is the easiest option for creating a basic announcement bar.
Step 1: Open Your Wix Editor
- Sign in to your Wix account.
- Open the website you want to edit.
- Click Edit Site.
Step 2: Add a Strip

- Click Add Elements on the left side of the editor.
- Select Strip.
- Choose a simple strip.
- Drag it near the top of the page.
Step 3: Add Your Announcement Text

Add a text element to the strip and write your message.

Examples:
- Free shipping on orders over $75
- New collection available now
- Early registration ends Friday
- Use code SPRING15 at checkout
Keep the message short so visitors can understand it quickly.
Step 4: Add a Button or Link

If visitors need to take action, add a button or link.
Link the button to the relevant product, service, event, or offer page. Avoid linking to the homepage unless it is the correct destination.
Step 5: Attach the Strip to the Header
- Drag the strip toward the site header.
- Wait until Wix shows Attach to Header.
- Drop the strip into the header area.
Attaching the strip to the header allows it to appear with the header on pages that use the same site layout.
Step 6: Check the Mobile Layout
Switch to the mobile view and check:
- Whether the text fits on the screen
- Whether the button is easy to tap
- Whether the strip makes the header too tall
- Whether the menu remains visible
- Whether the text and background have enough contrast
Shorten the message or reduce the spacing if the banner looks too large.
Step 7: Publish the Announcement
- Click Publish.
- Open the live website.
- Check several pages.
- Test the announcement link or button.
Your Wix announcement bar is now live.
Build urgency
Add floating offers with countdown timer & coupon code.

Method 2: Add an Announcement Bar to Your Wix Site Using WiserNotify
Use WiserNotify when you need more control over where and when the announcement appears.
WiserNotify is added to Wix through Custom Code.
For more details, check our doc: How to install pixel code on Wix.
Step 1: Copy Your WiserNotify Pixel
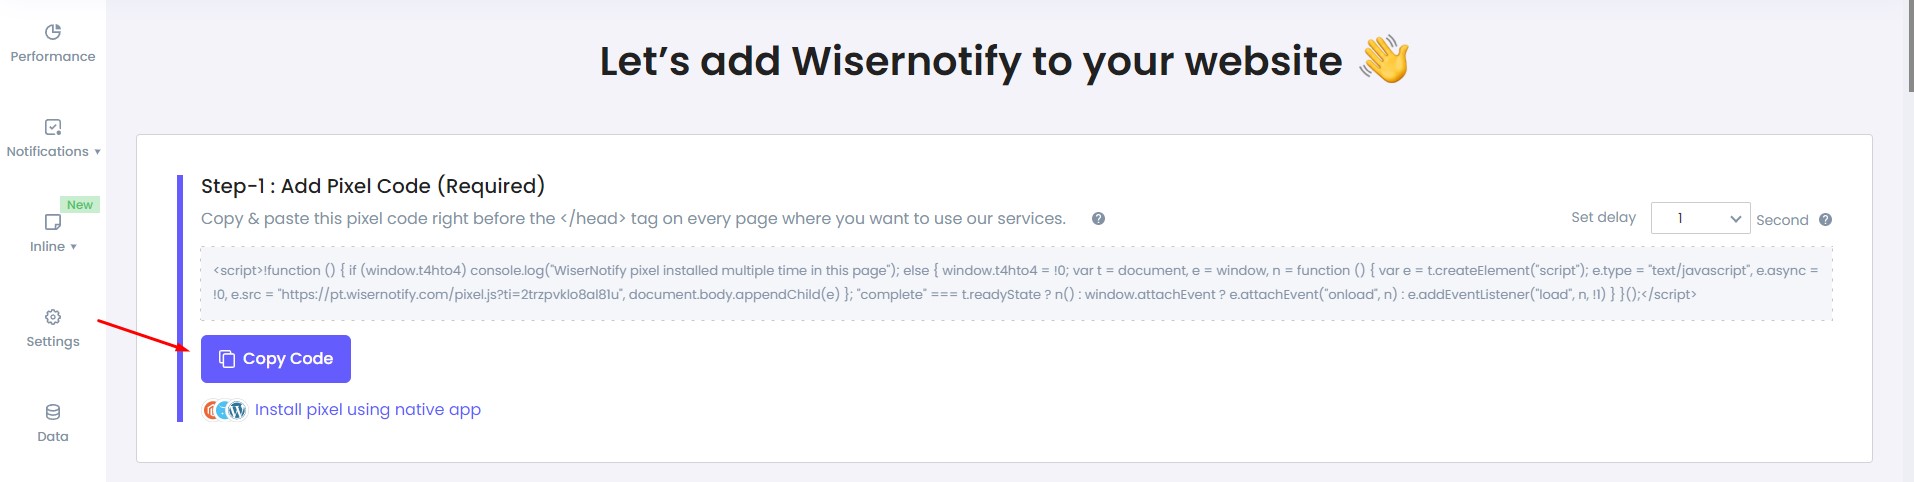
- Sign in and log in to your WiserNotify account.
- Open the pixel installation section.
- Copy the provided pixel code.
Do not change the code before adding it to Wix.
Step 2: Open Wix Custom Code

- Open your Wix site dashboard.
- Go to Settings.
- Open Custom Code.
Depending on your Wix dashboard, Custom Code may appear under Development & integrations or an advanced settings section.
- Click Add Custom Code.
Your Wix site usually needs to be published and connected to a domain before you can add custom code.
Step 3: Add the Pixel to Wix

- Paste the WiserNotify pixel into the code field.
- Enter a name, such as WiserNotify Site Pixel.

- Set the code to load on All pages.
- Choose the option to load it on each new page.
- Select Head as the code placement.
- Save the code.
Adding the pixel to all pages allows WiserNotify to apply page and visitor rules later.
Step 4: Verify the Pixel

- Return to WiserNotify.
- Open the pixel installation area.
- Click the verification option.
If the code is installed correctly, WiserNotify should show that the pixel is active.
If it is not detected:
- Check the published website, not only the Wix editor
- Confirm that the code is placed in the Head
- Make sure it is set to load on all pages
- Refresh the live site
- Test again in a private browser window
Step 5: Create the Announcement
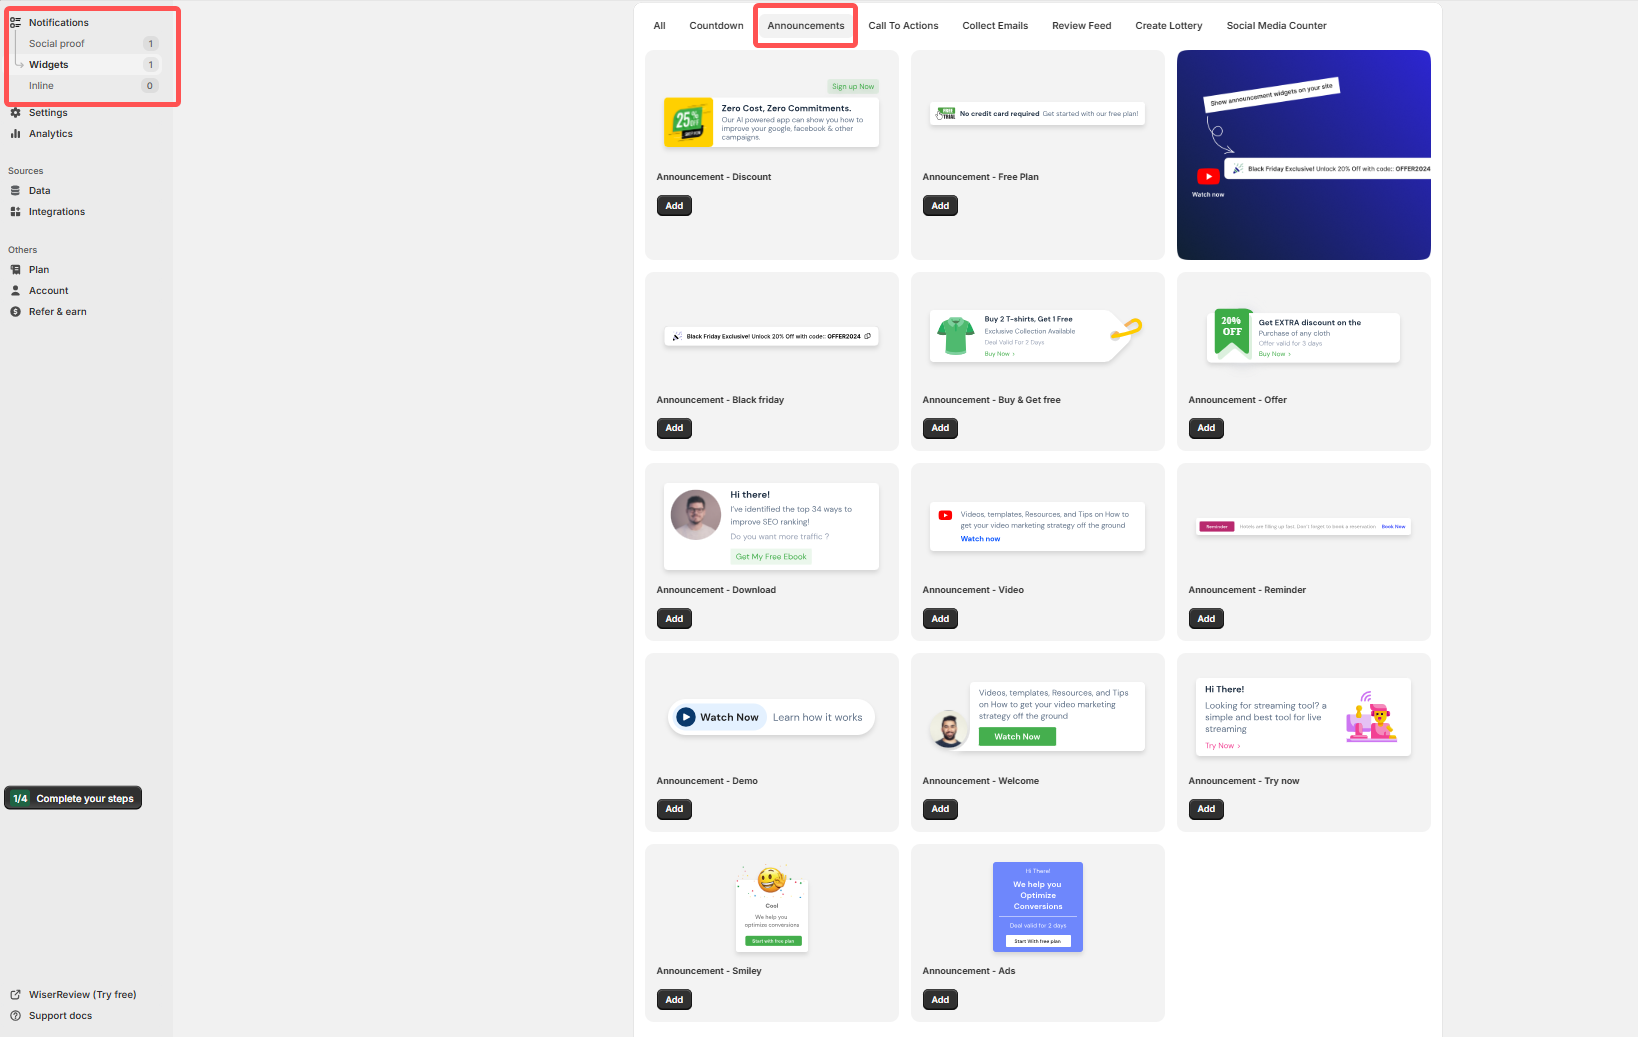
- In WiserNotify, create a new notification.
- Select the Announcement Bar format.
- Enter your message.
- Add a button if visitors need to take action.
Examples:
- Get 10% off your first order- Claim the offer
- Enrollment closes Friday- View the program
- Free delivery available today- Shop now
Step 6: Customize the Design
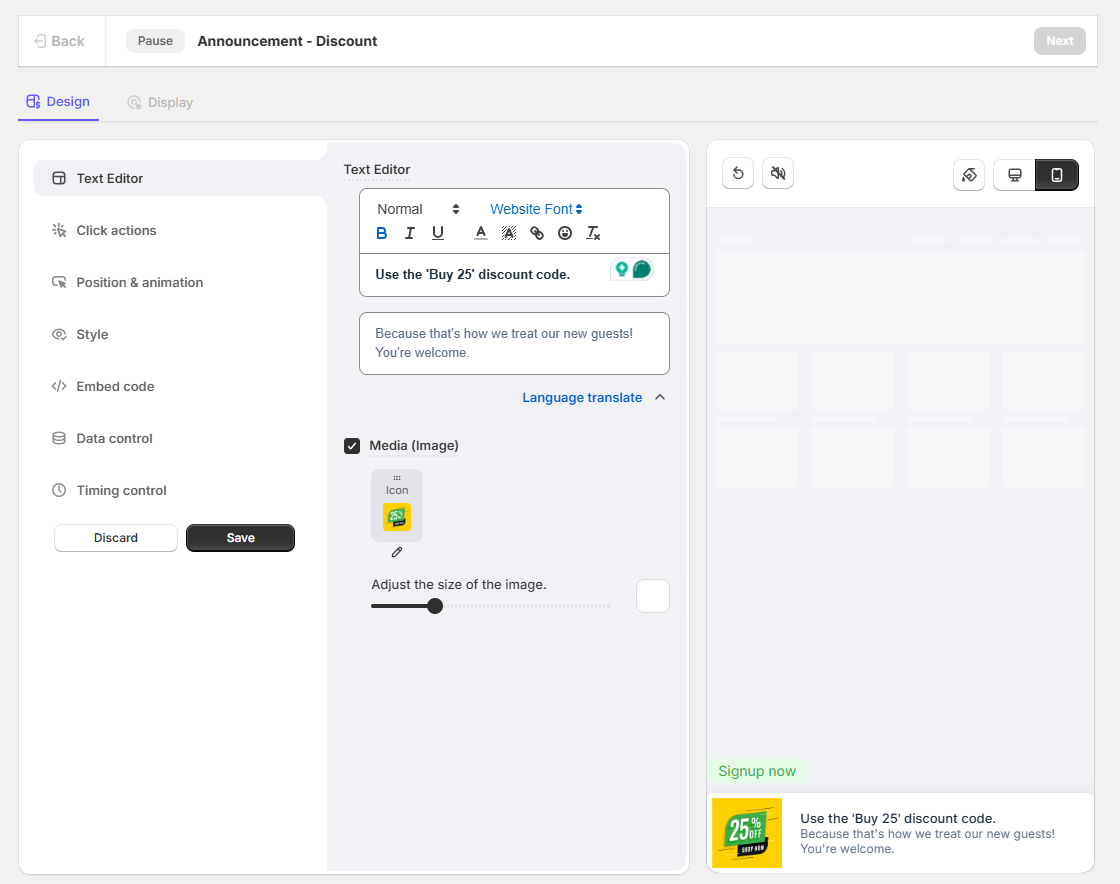
Adjust the announcement bar to match your Wix website.
You can usually change:
- Background color
- Text color
- Font
- Button style
- Position
- Spacing
- Close button
Use colors and styles that match your Wix header and main buttons.
Step 7: Choose Where It Appears
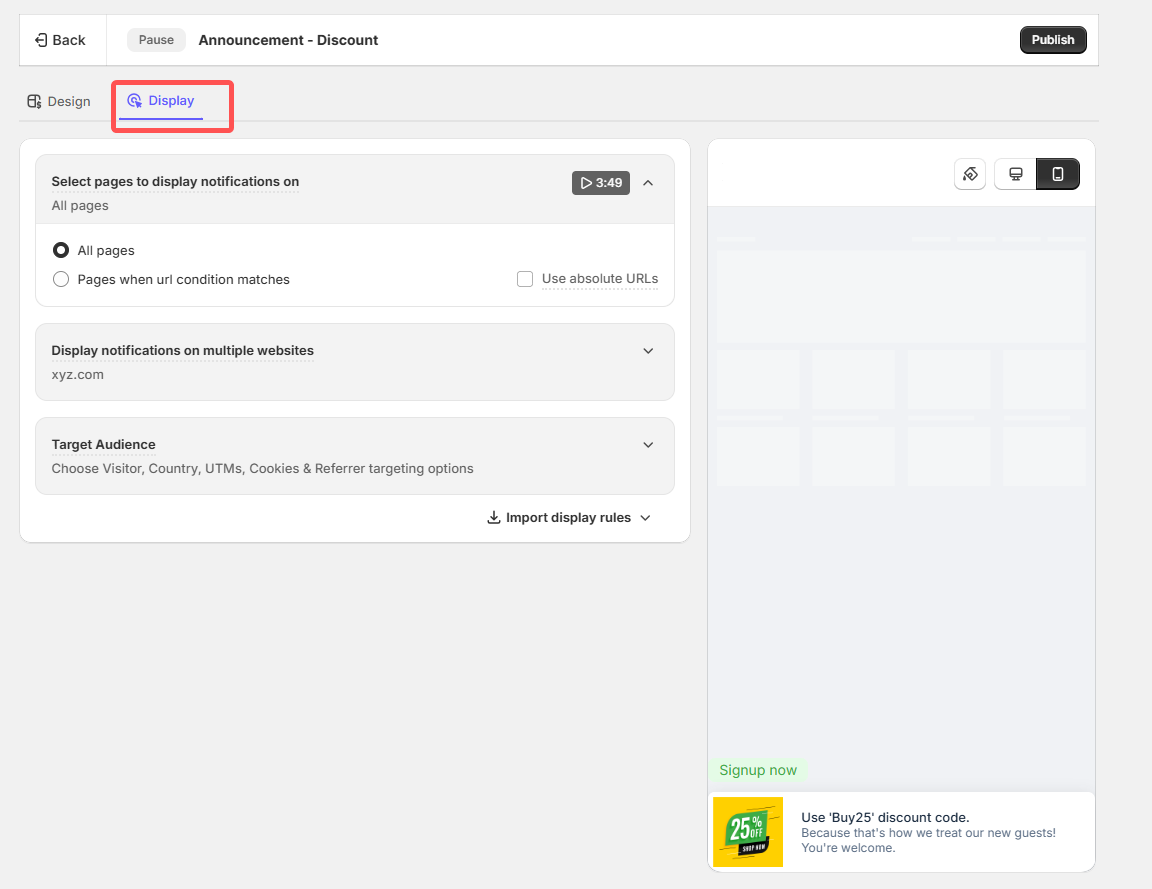
Set the display rules for the announcement.
Depending on your WiserNotify plan and settings, you may be able to show it on:
- All pages
- Specific pages
- Selected page groups
- Pages visited by people from certain locations
- Visitors from specific UTM campaigns
- Visitors from particular traffic sources
- Visitors who complete certain actions
For example, you can show a course promotion only on course pages or display a delivery message only to visitors in supported regions.
Step 8: Set the Schedule
If the announcement is temporary, set a start and end date.
You may also be able to control:
- When the bar first appears
- How often a visitor sees it
- How long it remains visible
- Whether it stays hidden after a visitor closes it
Always add an end date to limited-time promotions.
Step 9: Test and Publish
Before publishing, check the announcement on desktop and mobile.
Test:
- The message
- The button link
- Page targeting
- Start and end dates
- Text wrapping
- Close behavior
- Visibility in a private browser window
When everything works correctly, save and publish the notification.

Boost Conversion Instantly
Add Social Proof & Urgency to your website
Best Places to Display an Announcement Bar on Wix
At the Top of the Homepage
- Ensure maximum visibility for all visitors.
On Product Pages
- Use promotional bars to drive sales by emphasizing discounts or free shipping.
On the Checkout Page
- Reinforce urgency or provide coupon codes to encourage conversions.
Specific Landing Pages
- Highlight targeted campaigns for better engagement.
Exit-Intent Popups
- Combine the bar with an exit-intent feature to capture visitors before they leave.
Also see: 9 Killer announcement bar examples
Common Mistakes to Avoid
- Adding too much text: Keep the message short so visitors can understand it quickly.
- Making the bar too large: Avoid using too much padding or large text, especially on mobile.
- Forgetting to attach the strip to the header: If you use a Wix Strip, attach it to the header so it can appear across your site.
- Using the wrong link: Send visitors directly to the product, service, event, or offer mentioned in the bar.
- Leaving old promotions live: Remove expired messages or set an end date in WiserNotify so visitors always see current information.
Build trust & FOMO
Highlight real-time activities like reviews, sales & sign-ups.
Conclusion
Adding an announcement bar to your Wix website is a powerful way to capture your audience’s attention and communicate key messages.
Whether you use Wix’s native tools or integrate third-party apps, the process is simple and offers ample room for customization.
By following the steps and best practices outlined in this guide, you can create an effective announcement bar that enhances user engagement and drives conversions.
Start experimenting today and watch your website’s performance improve!
Frequently Asked Questions
What is an announcement bar in Wix?
An announcement bar in Wix is a strip at the top of your website that displays important messages, such as promotions, updates, or announcements, to grab visitors’ attention instantly.
How can I add an announcement bar to my Wix website?
You can add an announcement bar in Wix by using the “Welcome Bar” app from the Wix App Market or by customizing a strip in the Wix Editor and pinning it to the top of the page.
Can I customize the text and design of the announcement bar?
Yes, Wix allows full customization of the text, font, colors, background, and even animations of the announcement bar to match your site’s theme.
Can I make the announcement bar clickable?
Yes, you can add a link to the announcement bar, allowing visitors to click and navigate to a specific page, such as a sales page, event registration, or an external URL.
Does Wix offer pre-designed templates for announcement bars?
While Wix doesn’t have specific announcement bar templates, you can use the “Welcome Bar” app or customize a strip from scratch to create your own design.

Krunal Vaghasiya is a marketing tech expert who boosts e-commerce conversion rates with automated social proof and FOMO strategies. He loves to keep posting insightful posts on online marketing software, marketing automations, and improving conversion rates.




 Capterra