This guide will walk you through:
- Connect GoHighLevel with WiserNotify using a webhook to fetch real-time lead sign-ups, form submissions, appointment bookings, and other customer activities.
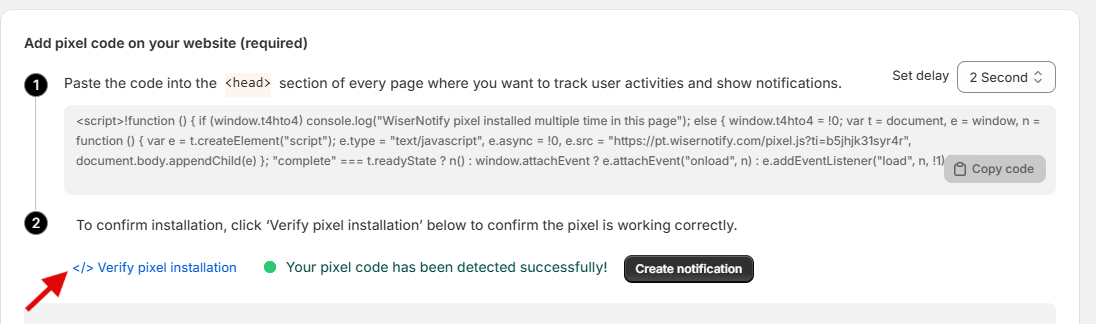
Add wisernotify pixel code in gohighlevel
- Go to Install Pixel page
- Click Copy Code to copy your script.

- Then go to your GHL account
- Go to site>Funnel > Edit > Setting > Head tracking code > Paste wisernotify pixel code here
- Go back to your Wisernotify pixel page & verify pixel installation to check if the pixel is active.
- If installed correctly, you will see a “Pixel Active” successfully message.
Add Webhook Integration to Connect GoHighlevel to pull the events lead data
Step 1: Get the Webhook URL from WiserNotify
– Go to WiserNotify > GoHighlevel Integration.
– Click on the Integrate button inside the Integration box.
1. Enter Connection Name
2. Click on the Create button.
3. Click on the copy button.

Note: A unique webhook is required for each GHL workflow/ trigger/form. So, you can create multiple webhook connections as well. Separately for each workflow/trigger/form. If you want to show all form data in one notification, then just create one webhook.
Step 2: First add trigger in workflow
Login with GoHighlevl & Navigate to workflows & Click on Create workflow,

You can display two types of data:
- Lead activities – Form submitted data
- Sales notification- Payment received Data
Lead activities – Show form submitted data
- If you want to show any form submission data, then Add Trigger & Select Form Submitted Event.

- Optional: Use the form filter option if you want to show specific form registration data into the lead activities notification

- Save the trigger
Sales activities- Show Payment received Data
- If you want to show any sales data then select the “Payment Received” trigger into sales activities notification.
- Optional: Use filter if you want to receive any specific product purchased data

Step 3: Then add action in workflow
Two ways to post the form submission or payment receives data from GHL to wisernotify
- using webhook action
- using custom webhook action
Use webhook action
- add Gohighlevel wisernotify webhook here then & save publish the workflow.

OR Use custom webhook action
– Here, you can use any triggers like form submission or Payment received – any other trigger as well.

- Get the custom webhook from wisernotify & start webhook listening
- At GoHighLevel > custom webhook action, Set the contact fields or custom fields used in form, Optionally if you want to send the custom data like product name, just write it manually in body section.

- Click on Test workflow, Select the contact data & run the test

- Complete the field mapping at wisernotify custom integration as per doc.
Now, whenever a new form submission or payment is received, that data will be sent to the added Webhook URL automatically.
Make sure you’ve selected the correct connection in the Data Source for your Lead or Sales Activity Notifications in WiserNotify
Please test by adding new data & visit the WiserNotify Dashboard – Data page. Here, You can see all the captured/ received data with its source name.