This guide will walk you through:
Custome Webhooks allow WiserNotify to receive data (sales, leads, reviews, etc.) from other platforms and trigger notifications based on that data.
Add Custome Webhook Integration to Connect Custom Webhooks to pull the events data
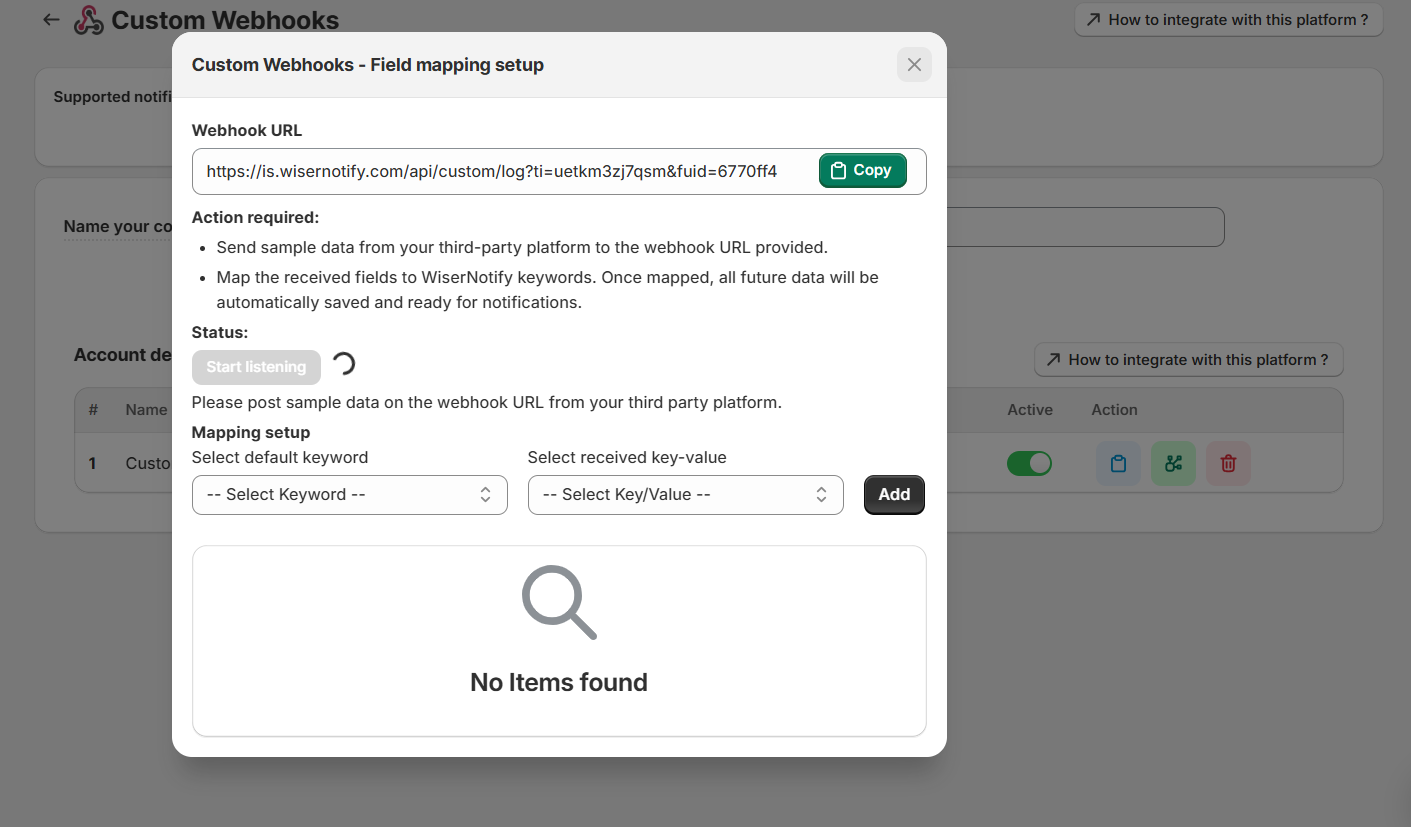
Step 1: Get the Webhook URL from WiserNotify
– Go to WiserNotify > Custom Webhooks Integration.
– Click on the Integrate button inside the Integration box.
1. Enter Connection Name
2. Click on the Create button.
3. Click and copy the URL.
ii. Click on the mapping icon & Start Listening.

Step 2: Configure Webhooks
Now, There are below two way to post the data on the webhook URL.
Option A: Add this webhook URL to your 3rd party tool.
– Post a test data ( Submit the form).
——–or————-
Option B: API integration with your Backend:
Integrate webhook URL with your custom backend solution & post the data.
Please follow below data format if you want to post the data from your backend server.
Only if you want to post “Conversion” data
Method
POST
URL{{WISERNOTIFY_WEBHOOK_URL}}
Headers{ “Accept”: “application/json”, “Content-Type”: “application/json” }
body
{ “username”: “Mr.Alok”, “firstname”: “Mr.Alok”, “lastname”: “Smith”, “email”: “[email protected]”, “phone”: “202-555-0118”, “city”: “Albany”, “state”: “New York”, “country”: “USA”, “ip”: “102.10.2.45”, “latitude”: “40.730610”, “longitude”: “-73.935242”, “userimage”: “https://example.com/user.png”, “customfield1”: “Lorem Ipsum is simply dummy text”, “customfield2”: “Lorem Ipsum is simply dummy text”, “customfield3”: “Lorem Ipsum is simply dummy text” }
Response
{ “status”: “success” }
Only if you want to post “Purchase” data.
Method
POST
URL
{{WISERNOTIFY_WEBHOOK_URL}}
Headers
{ “Accept”: “application/json”, “Content-Type”: “application/json” }
body
{ “username”: “Mr.Alok”, “firstname”: “Mr.Alok”, “lastname”: “Smith”, “email”: “[email protected]”, “phone”: “202-555-0118”, “city”: “Albany”, “state”: “New York”, “country”: “USA”, “ip”: “102.10.2.45”, “latitude”: “40.730610”, “longitude”: “-73.935242”, “productname”: “LCD T.V.”, “producturl”: “https://example.com/lcd-tv”, “productimageurl”: “https://example.com/lcd-tv.png”, “customfield1”: “Lorem Ipsum is simply dummy text”, “customfield2”: “Lorem Ipsum is simply dummy text”, “customfield3”: “Lorem Ipsum is simply dummy text” }
Response
{ “status”: “success” }
Only if you want to post “review” data.
Method
POST
URL
{{WISERNOTIFY_WEBHOOK_URL}}
Headers
{ “Accept”: “application/json”, “Content-Type”: “application/json” }
body
{ “firstname”: “Mr.Alok”, “lastname”: “Smith”, “rating”: “5”, “reviewtext”: “It is a long established…”, “reviewimageurl”: “https://example.com/user.png”, “customfield1”: “Lorem Ipsum is simply dummy text”, “customfield2”: “Lorem Ipsum is simply dummy text”, “customfield3”: “Lorem Ipsum is simply dummy text” }
Response
{ “status”: “success” }
4. Go back to custom webhook “Field mapping” sidebar area in WiserNotify.
Once it receives your testing data, you will see the “success” message!

Step 3. Do field mapping now
Once the mapping is done, enable a custom webhook into the notification at the data source section.

This way you can connect your 3rd party tool (Option A) or Custom backend ( Option B) with WiserNotify.
Once the mapping is done, enable a custom webhook into the notification at the data source section.