This guide will walk you through:
- Display Notifications
- Capturing Sales Activities
✅ Both steps will be completed once the wisernotify magento extension is installed and the API key is verified.
Magento 2 Extension Installation Steps
Step 1. Download & Extract the Extension
- Download the WiserNotify Magento 2 extension.
- Unzip the downloaded folder.
Step 2. Copy the Extension to Magento Root Directory
- Navigate to your Magento root directory.
- Create a new folder:
app/code/Tatvam. - Copy the unzipped WiserNotify folder into
app/code/Tatvam/.
Step 3: Enable the Extension Using Terminal
-
Open the terminal in the root directory of your Magento 2 installation.
-
Run the following command to enable the extension:
php bin/magento module:enable Tatvam_Wisernotify
Or
php bin/magento setup:upgrade
Step 4. Compile & Deploy the Extension
- Run the following command to compile dependencies:
php bin/magento setup:di:compile
- Deploy static content with:
php bin/magento setup:static-content:deploy
Step 5: Clear all Cache from admin.
- Log in to your Magento Admin Panel.
- Go to System > Cache Management.
- Click Flush Magento Cache.
✅ The WiserNotify extension is now installed on your Magento 2 store.
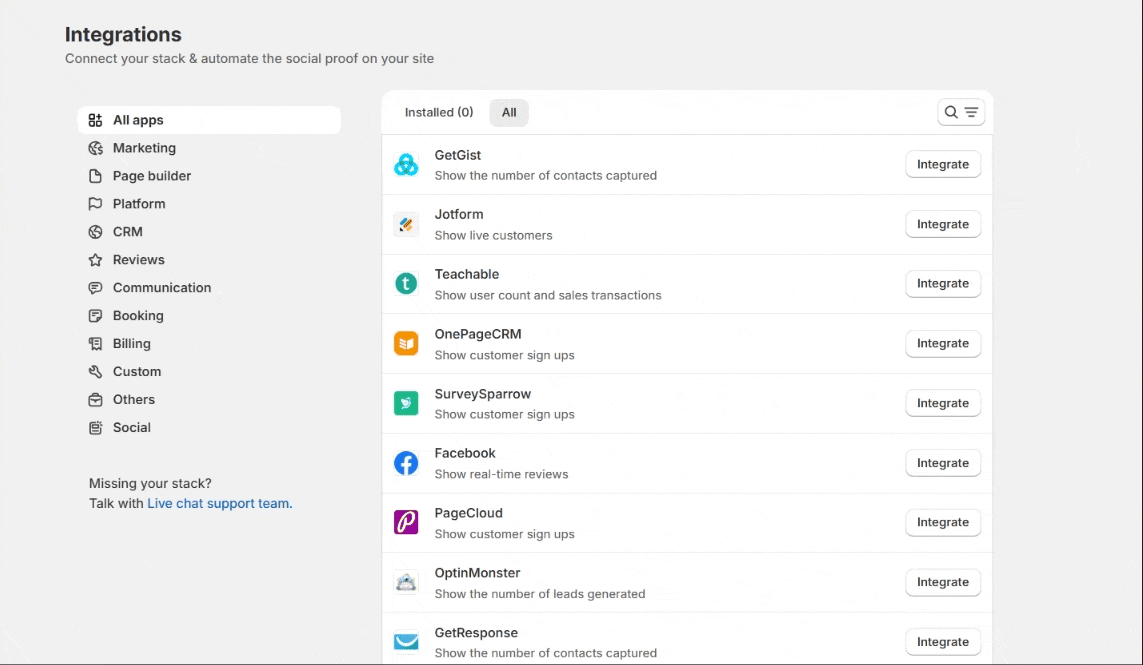
Connect Magento 2 with WiserNotify
- Log in to your WiserNotify account.
- Go to Integrations > Magento 2.0.
- Click Integrate and copy your API Key
- Add the API Key to Magento 2 so, Log in to your Magento Admin Panel.
- Navigate to System > WiserNotify Extension.
- Paste the API Key inside the Enter API Key text box & Click Verify.

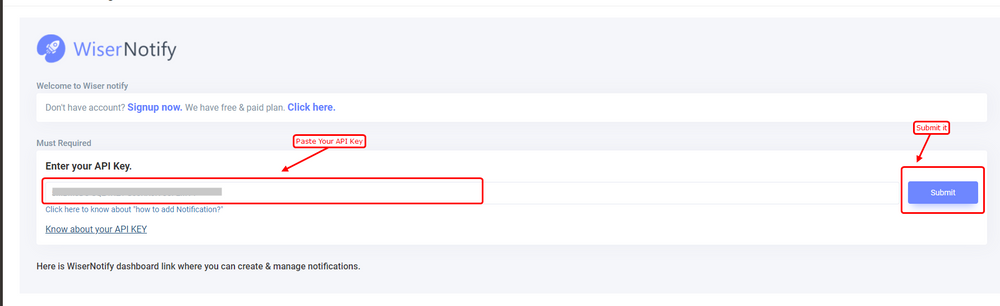
✅ After verification, the following operations will be performed automatically:
- Pixel Code Added: The WiserNotify pixel script will be added to your store (loads asynchronously for better performance).
- Fetch Existing Sales Data: The last 30 orders from Magento will be pulled into WiserNotify for notifications.
- Webhook Setup: A webhook will be created to send real-time sales order data to WiserNotify.