This guide will walk you through:
Capturing Chatbot Activities: Connect Quriobot with WiserNotify using a webhook to fetch real-time lead data, form submissions, and user interactions.
Add Webhook Integration to Connect Quriobot to pull the events lead data
Step 1: Get the Webhook URL from WiserNotify
- Go to WiserNotify >Quriobot Integration.
- Click on the Integrate button inside the Integration box.
1. Enter Connection Name
2. Click on the Create button.
3. Click on the copy button.

Step 2: Configure Webhook in Quriobot
1. Edit your chatbot.
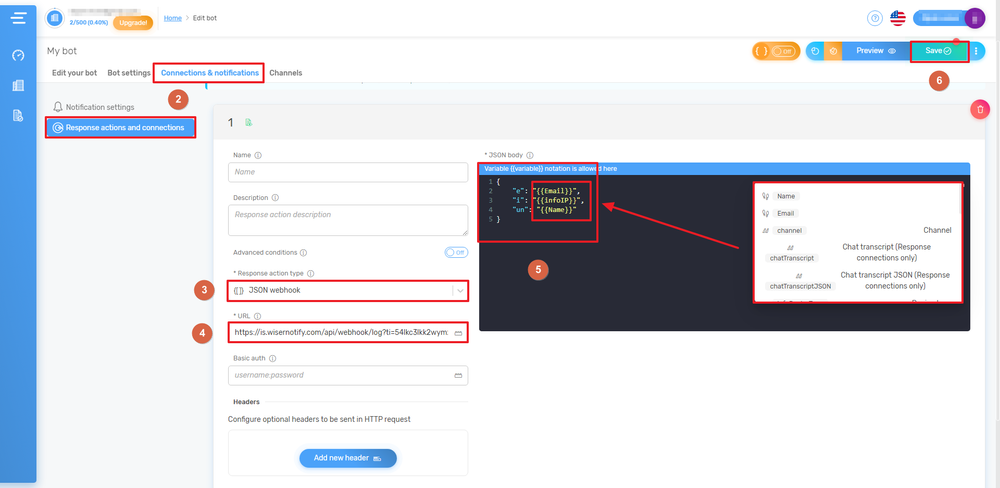
2. Navigate to Connections & Notification > Responses actions and connections.
3. Select Response action type JSON Webhook.
4. Paste the copied WiserNotify webhook URL.
5. Enter key-value pair as shown –
{ “un”: “john doe”, //User name “fn”:”john”,//First Name “ln”:”doe”,//Last Name “e”: “[email protected]”, //Email “ct”: “Mumbai”, //City “st”: “Maharashtra”, //State “cn”: “India”, //Country “i”: “192.168.0.0”, //Ip Address “lt”: “19.076090”, //Latitude “lg”: “72.877426”, //Longitude “ht”: “xyz.com”, //Host Name }
6. Click on the Save button.
Please test by adding a new data & visit the WiserNotify- Dashboard Data page. Here, You can see all the captured/ received data with its source name.