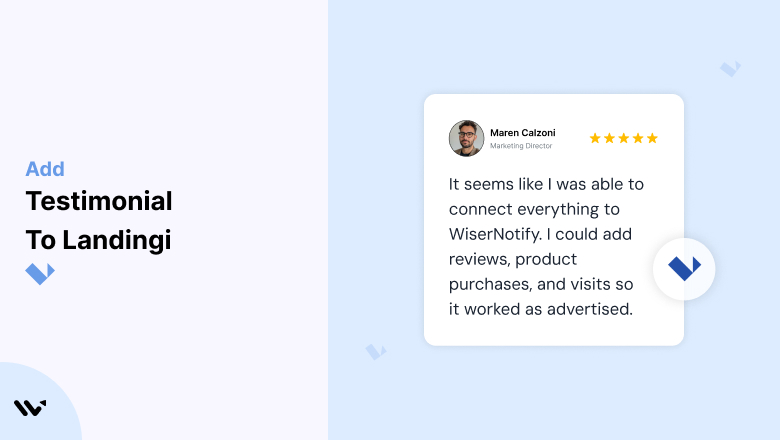

In the competitive landscape of online marketing, landing pages are your digital storefronts. Landingi, a robust platform for creating high-converting landing pages, provides tools to attract and convert visitors.
However, even the most visually appealing landing pages can falter if they lack trust-building elements. Testimonials play a critical role in bridging this trust gap by showcasing genuine customer experiences.
This guide will delve into how to effectively leverage testimonials on your Landingi pages to boost conversions, build credibility, and enhance user experience.
From strategic placement to optimization tips, we’ll cover everything you need to turn testimonials into a conversion-driving asset.
Why Add Testimonials to Landingi?
Build Credibility and Social Proof: Testimonials provide social proof that reassures visitors about the value of your offerings. Studies show that 88% of consumers trust online testimonials and reviews as much as personal recommendations. For Landingi users, this can make the difference between a bounce and a conversion.
Increase Conversions: Landing pages designed with testimonials can experience a significant boost in conversion rates. Placing positive customer feedback strategically on your pages can reduce skepticism and encourage visitors to take action, whether it’s signing up, downloading, or making a purchase.
Address Common Objections: Every potential customer has doubts or objections. Testimonials act as a subtle but effective way to address these concerns by showing how others overcame similar hesitations and found success with your product or service.
Shorten the Decision-Making Process: When visitors see that others have benefitted from your offerings, they’re more likely to decide quickly. Testimonials provide the reassurance needed to move prospects down the funnel faster.
Boost SEO: Search engines love fresh, user-generated content. By incorporating testimonials into your Landingi pages, you add keyword-rich, relevant content that can improve your rankings and visibility.
Build trust & FOMO
Highlight real-time activities like reviews, sales & sign-ups.


How to Add Testimonials to Landingi


Step-by-Step Guide
1. Collect Testimonials
- Gather reviews, feedback, or success stories from your customers.
2. Log in to Landingi
- Access your Landingi dashboard and open the landing page editor for the page you want to update.
3. Add a Testimonial Widget
- Use Landingi’s drag-and-drop editor to insert a testimonial widget or custom HTML block.
- Paste or type in the testimonial content, including the customer’s name, photo, and designation if available.
4. Customize the Design
- Adjust the widget’s style to align with your landing page design, including fonts, colors, and spacing.
5. Optimize for Mobile
- Ensure your testimonials look great on all devices by previewing and adjusting for mobile responsiveness.
6. Publish and Test
- Save your changes and test the page to confirm proper functionality and appearance.
3 Testimonial Optimization Tips
Be Specific and Authentic: Avoid generic testimonials like “Great service!”. Instead, encourage customers to share specific details about how your product or service helped them achieve their goals.
Use Multiple Formats: Incorporate text, images, and video testimonials to appeal to a broader audience. Video testimonials are particularly effective, with studies showing they can boost conversions by up to 80%.
Showcase Relevant Testimonials: Tailor testimonials to match the audience of each landing page. For example, if your page promotes a free trial, feature testimonials that highlight the ease of getting started.
Best Places to Show Testimonials on Landingi
Above the Fold
- The area above the fold is prime real estate for attention-grabbing elements. Placing a compelling testimonial here can immediately capture visitors’ trust and interest.
Near Call-to-Action (CTA) Buttons
- Position testimonials close to your CTAs to reinforce the decision-making process. For instance, add a customer’s positive experience right next to a “Sign Up Now” or “Get Started” button.
Dedicated Testimonials Section
Create a dedicated section on your landing page to display multiple testimonials. Use sliders or grids to showcase a variety of customer experiences without overwhelming the page.
On Forms or Checkout Pages
- Reduce friction by including a reassuring testimonial on forms or checkout pages. A quote like “Completing the sign-up was so quick and easy” can alleviate hesitation.
Footer Section
- Embedding testimonials in the footer ensures they’re visible on every scroll. This subtle placement reinforces trust as visitors navigate your page.
Other Ways to Add Testimonials to Landingi
Email Campaigns
- Include testimonials in your email marketing campaigns to build trust and drive traffic back to your landing pages. For example, add a success story at the bottom of a promotional email.
Social Media Integration
- Embed testimonials from your social media accounts directly onto your Landingi pages. Platforms like Instagram and Facebook provide user-generated content that feels authentic and relatable.
Pop-Ups and Overlays
- Use pop-ups or overlays to display testimonials dynamically. These can be triggered by user actions, such as scrolling or attempting to exit the page.
Blog Content
- Leverage blog posts to share in-depth customer success stories and link back to your landing pages. This strategy not only builds trust but also drives organic traffic.
Video Testimonials
- Host customer video testimonials on platforms like YouTube and embed them onto your Landingi pages. Video content is highly engaging and effective for building credibility.
3 Testimonial Mistakes on Landingi
Overloading Pages
- While testimonials are essential, too many can clutter your landing page and dilute their impact. Prioritize quality over quantity and strategically place testimonials for maximum effect.
Neglecting Mobile Optimization
- With a large percentage of users browsing on mobile devices, failing to optimize testimonials for smaller screens can lead to a poor user experience.
Using Unverified Testimonials
- Avoid using fake or unverifiable testimonials. Authenticity is key to building trust, and dishonesty can harm your brand’s reputation.
Wrap Up
Testimonials are a powerful tool for building trust and driving conversions on Landingi. By strategically placing authentic, engaging testimonials across your landing pages, you can create a compelling user experience that inspires action.
Ready to enhance your Landingi pages? Start implementing these testimonial strategies today and watch your conversions soar!
Related Posts:
- Add Testimonial to Leadpages
- Add Testimonial to HTML Website
- Add Testimonial to Groovefunnel
