If you want to display Recent Leads activities on your website with product names and details, WiserNotify makes it easy to set up and customize notifications to drive trust and urgency.
Follow this step-by-step guide to create and publish your notification.
Step 1: Create a Notification
- Log in to your WiserNotify dashboard.
- Navigate to the Social Proof section and select Recent Leads from the notification options.
- Click the “Add” button under the Recent Leads widget to begin
Step 2: Customize Your Notification
In the Design Section, customize the notification to align with your brand and preferences:

1. Text Editor
Customize the notification text content.
Add static or dynamic text (e.g., placeholders like {{TIME_AGO}}).
Configure mobile-friendly text truncation for better display on smaller devices.
2. Click Actions
Define the action when a user clicks on the notification.
Options include:
- Redirecting users to a specific URL.
- Triggering events or interactions on your website.
3. Position & Animation
Position: Set where the notification will appear on the screen (e.g., bottom-left, top-right).
Animation: Add visual effects such as fade-in or slide animations to enhance visibility and engagement.
4. Style
Customize the visual elements, including:
- Colors (e.g., background, text, border).
- Fonts (e.g., typeface, size, weight).
- Icon styles or shapes.
- Adjust design elements to ensure brand consistency.
5. Embed Code
Generate and access the embed code required to integrate this notification into your website.
This is typically placed in the HTML of your website or through your CMS platform.
6. Data Control
Manage and filter the data displayed in the notification.
Examples include:
- Excluding specific users or actions.
- Formatting how data is presented (e.g., names, timestamps).
7. Timing Control
Adjust when and how often the notification appears:
- Set delays for the first notification.
- Define intervals between notifications.
- Control the overall duration of the notification display.
8. Verify Label
Add a verification label to the notification (e.g., “Verified by WiserNotify”) to enhance trust and credibility.
You can customize the label text and style.
Here, you can see all the options in the designs section in detail.
Step 3: Configure Display Settings

Under the Display Section, define where and how your notification will appear:
- Select Pages: Choose specific pages or display notifications across all pages.
- Multiple Websites: Configure settings for notifications on multiple domains.
- Advanced Targeting: Target users based on visitor behavior, location, UTM parameters, cookies, or referrer.
Here, you can see all the options in the display section in detail.
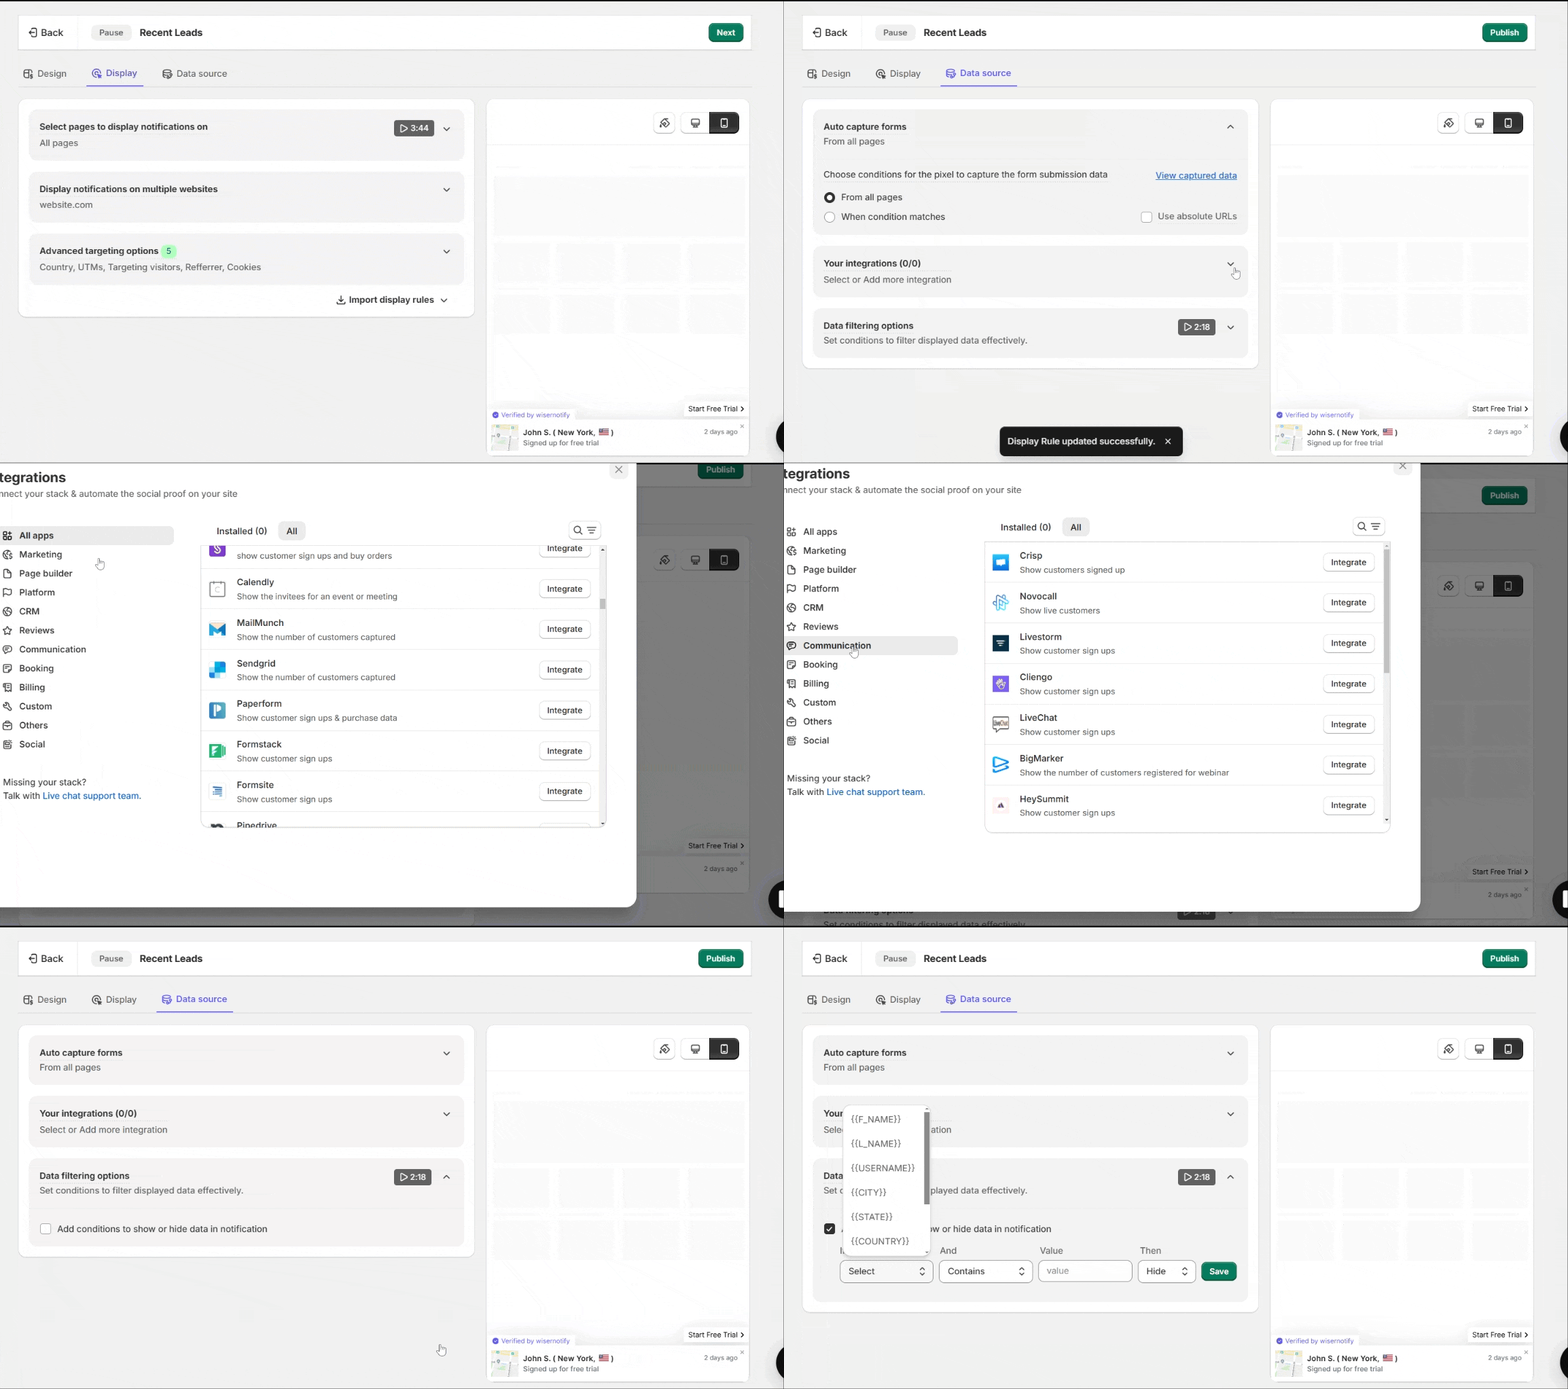
Step 4: Integrate Data Source & Publish

1. Auto Capture Forms
This feature allows WiserNotify to automatically capture data from forms on your website.
Options:
-
- From all pages: Indicates that data is being collected from forms across your entire site. You may specify which forms to capture data from (if applicable).
- It simplifies data collection without requiring manual setup for each form.
2. Your Integrations (0/0)
This section displays connected integrations with third-party platforms (e.g., CRMs, email marketing tools, or eCommerce platforms).
-
- Select or Add more integration: Use this option to connect external tools (e.g., Zapier, Shopify, Mailchimp) to pull data directly from them.
- Shows the count of active integrations (e.g., 0/0 in this case means no integrations have been added yet).
Connect your platforms to populate notifications with real-time data, such as customer signups or purchases.
3. Data Filtering Options
Enables advanced filtering to control which data is displayed in notifications.
-
- Add conditions to show or hide data in notification: Check this option to define rules for displaying data. For example:
- Only show notifications for users who signed up in the last 7 days.
- Exclude data from specific locations or sources.
- Set conditions: Create rules based on data fields, such as user names, locations, or actions, to customize the visibility of notifications.
- Add conditions to show or hide data in notification: Check this option to define rules for displaying data. For example:
A quick tutorial is linked to help users understand how to set up filtering conditions effectively.
Here, you can see all detail option of data-source in detail.
Click “Save” and then “Publish” your notification.
Now, Visit your site.


