If you have a custom-built website (HTML, PHP, JavaScript, or any framework), you can easily install the WiserNotify Pixel by adding the tracking code to your website’s <head> section.
Step 1: Copy the WiserNotify Pixel Code
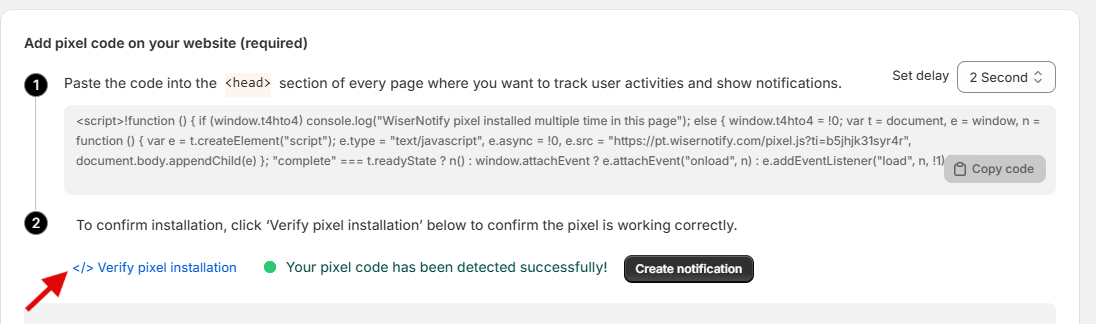
- Go to Install Pixel page
- Click Copy Code to copy your script.

Step 2: Add the Pixel Code to Your Website
Normal custom HTML website:
- Open your index page
- Locate the
<head>section of your webpage. - Paste the WiserNotify Pixel Code before the closing
</head>tag. - Save the file and upload it to your server.
Single-Page Applications (ReactJS, Angular, Vue.js)
If your website is built using React, Angular, Vue.js, or any other Single-Page Application (SPA) framework, you need to take additional steps to ensure the WiserNotify Pixel Code works properly.
Unlike traditional websites, SPAs do not reload pages when users navigate. Instead, they dynamically update content.
This means that the pixel code needs to be reset whenever the URL changes to track events correctly.
- Add that copied pixel Code to your Root Page (inside the <head> section of your index.html or root template file)
- Since SPAs do not reload pages, reset the pixel when navigation occurs:
Get this additional below reset Code:
<Script>
if (window.wiser)
{ window.wiser.resetNotif(window.location.href); }
</Script>
Step 3: Verify Installation
- Go back to your Wisernotify pixel page.
- Click on verify pixel installation to check if the pixel is active.
- If installed correctly, you will see a “Pixel Active” successfully message.
Note: This pixel script tag is required on every page wherever you want to track visitor activities, capture form submit events & display notifications.