Thinkific creators often struggle to build instant trust with potential students who land on their course pages. Without visible proof of learner success or active community engagement, your offering might feel untested or unverified.
Static testimonials and generic course descriptions may not be enough. When users can’t see others interacting with your course or celebrating wins, they hesitate to enroll—even if your content is high-quality.
A social media feed embedded on your Thinkific site changes that. It shows real-time engagement from your audience—success stories, behind-the-scenes moments, student shoutouts, and more. Wisernotify makes embedding this live, interactive content effortless.
Why Add Social Media Feed on Thinkific?
Thinkific is a robust platform for online learning. But pairing it with real-time social proof gives it the boost it needs to convert hesitant browsers into committed students.
Build Immediate Trust: Seeing live Instagram, Facebook, or Twitter posts showing current learners interacting with your course validates your offer and builds credibility.
Increase Course Enrollments: A feed filled with success stories, screenshots of student progress, or tweets of praise acts as real-time testimonials that drive conversions.
Keep Pages Looking Fresh: Thinkific pages can feel static if not frequently updated. A social media feed adds new content automatically as you post.
Reinforce Your Community: From branded hashtag campaigns to video reviews, your social feed can highlight the energy and engagement happening around your course.
Showcase User-Generated Content (UGC): Displaying UGC like student selfies, quotes, or course completions makes your offering more relatable and proof-driven.
Example: If you teach coding on Thinkific, embedding a Twitter feed showing students sharing certificates or project screenshots is a powerful motivator for new visitors.
How to Add Social Media Feed on Thinkific


How to Embed Social Media Feed on Thinkific
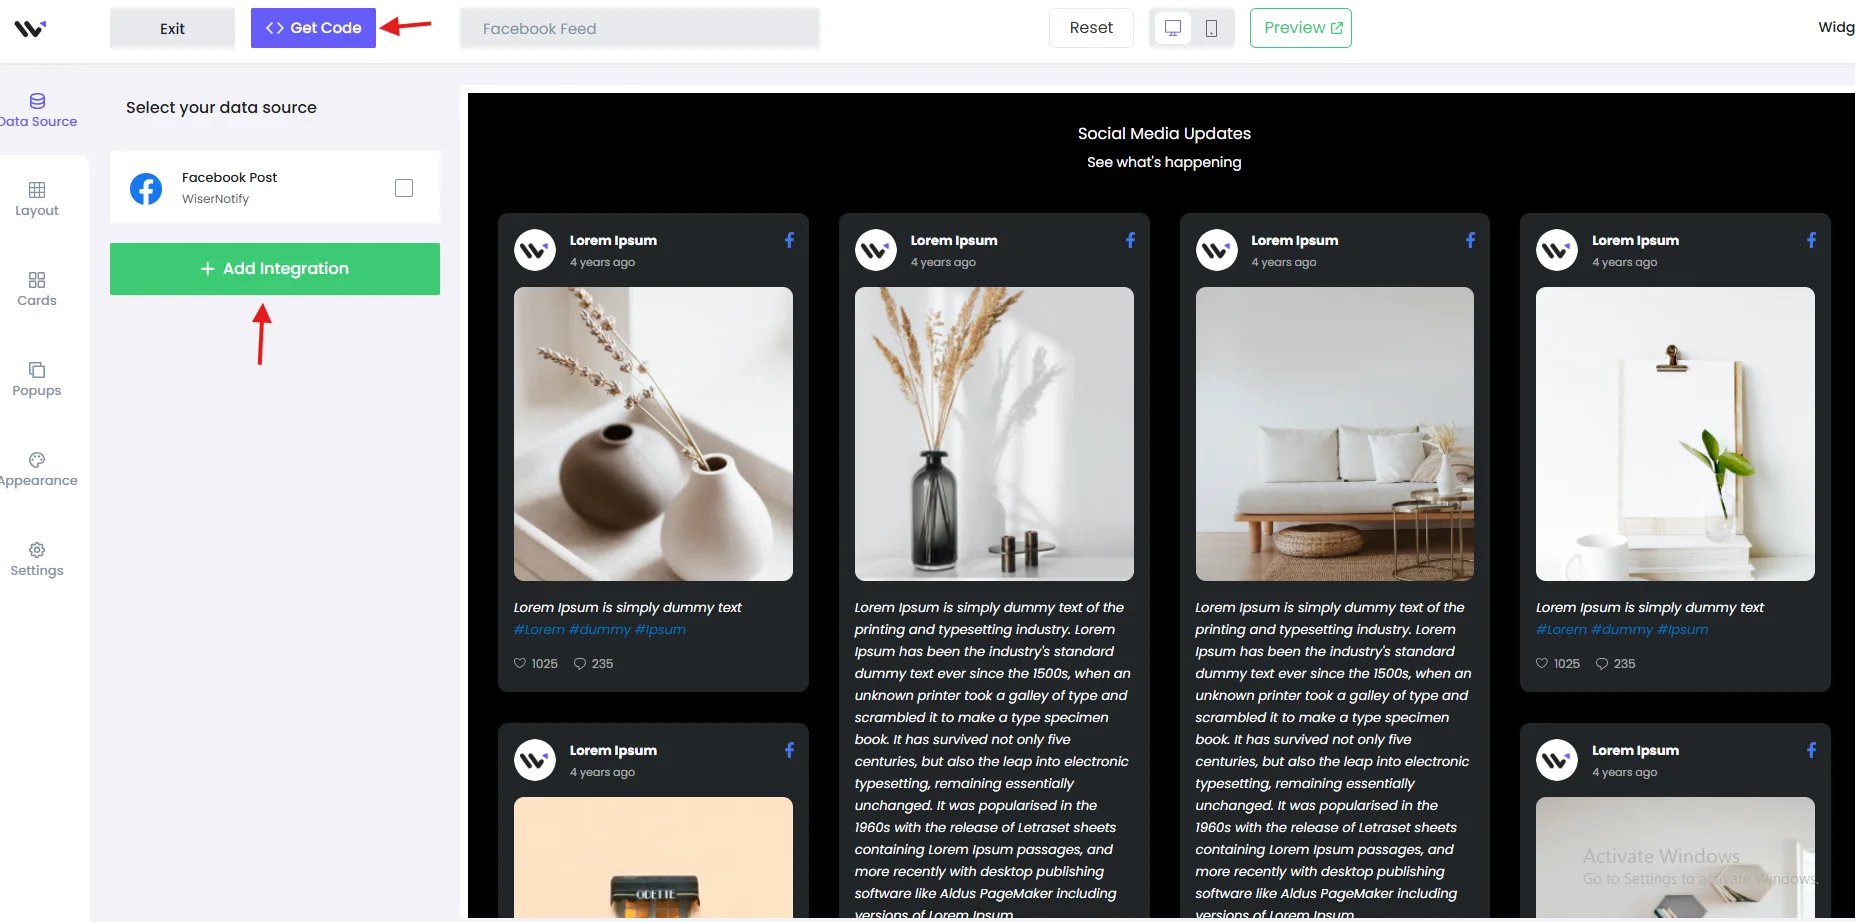
Once your Wisernotify social feed widget is ready, here’s how to embed it on your Thinkific site:
1. Log Into Your Thinkific Admin Panel
- Visit https://admin.thinkific.com and sign in to your course site.
2. Go to “Site Builder”
- From your admin dashboard, select “Design Your Site” > “Site Builder.”
3. Choose the Page to Edit
- Select the page where you want your feed to appear — typically your homepage, course landing page, or bundle sales page.
4. Add a New Section
- Click “+ Add Section” and scroll down to choose the “Custom Code” section type.
5. Paste the Embed Code from Wisernotify
- Copy the Wisernotify embed code from your widget dashboard.
- Paste it into the Custom Code block on Thinkific.
6. Position the Section
- Drag and drop the section into place to make sure it appears in a visible and relevant part of the page.
7. Save and Preview
- Click “Save” and use the preview function to make sure your social feed looks and loads correctly.
8. Publish the Changes
- Once you’re happy with the layout, click “Publish” to make the feed live.
Best Practices for Showcasing Instagram Feed on Thinkific
Use Key Locations
- Place the feed just below your course overview or testimonials. It acts as a trust-booster and encourages users to scroll further.
Match Design with Thinkific Branding
- Keep your social feed aligned with your course design. Wisernotify’s customization tools help match it to your existing site colors and typography.
Curate High-Impact Posts
- Highlight posts that celebrate student success or show real impact. Avoid crowding the feed with irrelevant content.
Keep It Light and Mobile-Optimized
- Choose a layout that looks good across devices. Wisernotify’s embeds are responsive, but test for performance on mobile too.
Encourage Hashtag Use
- Run campaigns using a unique hashtag and tell your students to tag you. Wisernotify can auto-pull these posts for maximum visibility.
Common Mistakes to Avoid When Adding Social Media Feed to Thinkific
Placing Feeds in Low-Traffic Areas
- Avoid putting your social feed at the bottom of a long page. Position it near your CTAs or course highlights.
Ignoring Feed Responsiveness
- Even though Thinkific is mobile-optimized, poorly embedded feeds may break. Wisernotify helps, but always preview on mobile.
Overloading with Content
- Too many posts can distract users. Limit your feed to 6–9 strong pieces of content and rotate them often.
Skipping Moderation
- Always review what’s pulled into your feed. Wisernotify lets you moderate and hide posts that aren’t relevant.
Using Default Styles
- Feeds that don’t match your branding can feel out of place. Customize the design to match your Thinkific site aesthetic.
Wrap-Up
Your Thinkific site is your educational storefront. Adding a social media feed with Wisernotify transforms it from a static landing page into a vibrant, trusted hub of student success and community engagement.
Wisernotify helps you set this up in minutes—no coding, no hassle. Use it to increase credibility, build community, and grow your enrollments.
